Jump to content


Photo
- - - - -

Mk3 Saloon, Very Rusty Project


  • Please log in to reply
879 replies to this topic

#811 Ben_O

Ben_O

    Mill Road Garage

  • Paint Doctor
  • PipPipPipPipPipPipPipPipPipPip
  • 9,781 posts
  • Location: Isle of Wight

Posted 19 August 2013 - 02:59 PM

Nice one, Hope you find out the reason for the brakes. What you have suggested above sounds possible so hopefully its that! Hate to think of you taking the clevis pin out for nothing. Before I started that, I was told that removing the clevis pin was the most difficult job on a mini! wouldn't go that far but its awful, especially when its been in there a few years (or decades as mine had)


Good luck


Ben


#812 Will16

Will16

    Wants a custom member title

  • Members
  • PipPipPipPipPipPipPip
  • 1,090 posts
  • Location: Abingdon, Oxfordshire

Posted 19 August 2013 - 06:03 PM

Looking very smart!  Hopefully you'll get it on the road soon!  Great turnaround  :lol:


#813 jagman.2003

jagman.2003

    One Carb Or Two?

  • Members
  • PipPipPipPipPipPipPip
  • 1,307 posts
  • Location: In the shed.
  • Local Club: Owner of my own club of Minis

Posted 20 August 2013 - 07:59 AM

Looking very smart!  Hopefully you'll get it on the road soon!  Great turnaround  :lol:

Thanks, determined to get it on the road very soon.


#814 jagman.2003

jagman.2003

    One Carb Or Two?

  • Members
  • PipPipPipPipPipPipPip
  • 1,307 posts
  • Location: In the shed.
  • Local Club: Owner of my own club of Minis

Posted 20 August 2013 - 08:05 AM


Nice one, Hope you find out the reason for the brakes. What you have suggested above sounds possible so hopefully its that! Hate to think of you taking the clevis pin out for nothing. Before I started that, I was told that removing the clevis pin was the most difficult job on a mini! wouldn't go that far but its awful, especially when its been in there a few years (or decades as mine had)


Good luck


Ben


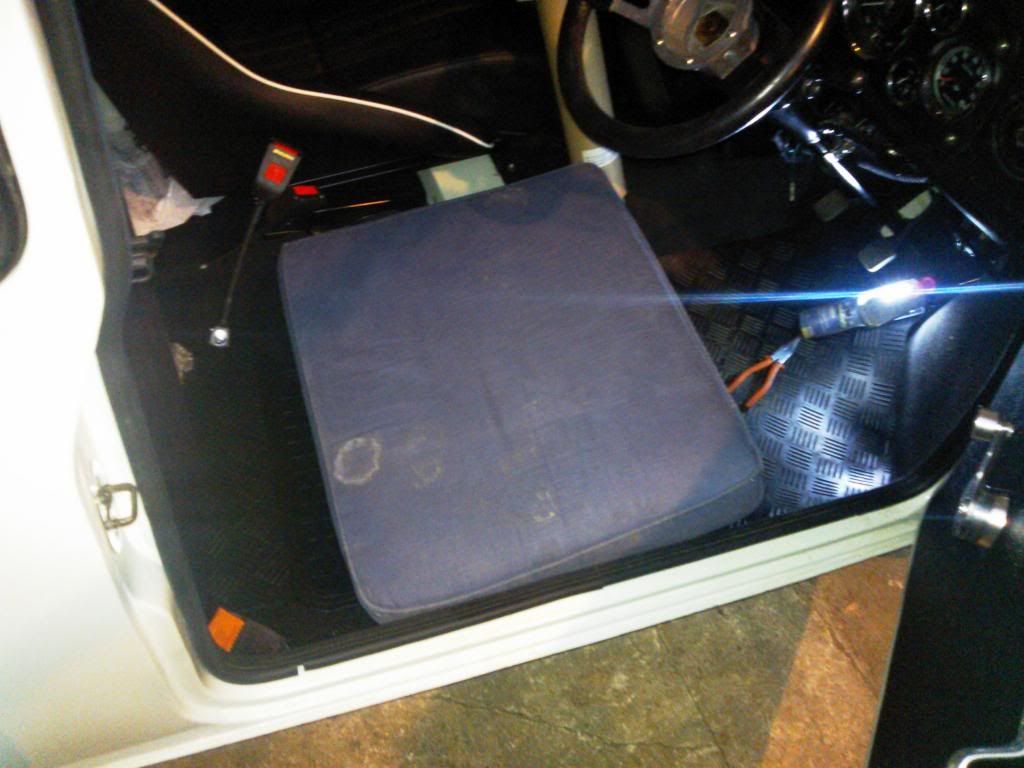
 Well I got the clevis pin out. Fairly painless. If it helps others this is how I did it. I removed the drivers seat. Two bolts & it's out of the way. I then used an old sofa cushion on the floor. Being of mature years I find the cross member doesn't do my back any favours. This was alot more accessible & comfortable than I thought it would be. When I installed the split pin I made sure it was well bent round. That unfortunately meant it wasn't so easy to get out. I used some snips to trim the curly legs off. Then cut the loop. The two legs left could just slide out. Took about 15mins. in all & minimal swearing..! I think I might keep the sofa cushion in the car for a smoother ride. Oh yes & I'm still messing with the rear wheel arch trim to cover up excess rivnut fixings. Used another thin piece of trim. Subtle but effective.

WP_000549_zpsd92b8015.jpg


Edited by jagman.2003, 20 August 2013 - 12:41 PM.


#815 PipeNslippers

PipeNslippers

    Learner Driver

  • Noobies
  • PipPip
  • 13 posts

Posted 20 August 2013 - 11:30 AM

Weekend brakes update. I changed the servo, which made no difference at all. Meaning the servo isn't really the problem. I now have a spare servo for the next project. Luckily just as I went into head scratching mode a friend of mine popped by. You know what they say two heads confused is better than one. Or something like that. We messed about with the brakes trying various theories. Finally by Saturday evening we have a theory that seems credible. It is possible that the master cylinder pushrod is not returning to it's full extent. Up against the circlip. So imagine the brakes can pump up, like most brakes do if repeatedly pressed without letting off completely. But if the pedal never gets released fully. The brakes stay pumped up & engaged. The servo merely amplified the pressure. Disconnecting the servo lessens the issue but the brakes still bind a bit. Now I have lifted the master cylinder up on it's mountings temporarily & that hasn't made any difference. But I am going to persist with this as it seems to make sense. Next thing to do is disconnect the master cylinder from the pedal & let it hang free. Hopefully that might show some length issues. The next stage will be swap out the mini pushrod for the original, but shortened & extended thread to get the positions right. getting to the clevis pin once all the interior is in is not easy as I'm sure your all aware. I'll probably take the drivers seat out & crawl in upside down. Job for tonight.

But I did relocate the drivers rear arch late last night. So the arch to wheel clearance & appearance is better now.


I have just googled vertically mounted master cylinders:


http://www.ten-tenth...ad.php?t=119087


Looking at your installation you may have an issue related to:


"T'is true. Any air bubbles that can't be forced through to the slaves have no way of escaping if you mount them vertically, but the cylinders have small air bleeds at the top (probably the same hole that connects the reservoir to the cylinder in 95% of cases) for horizontal 'breathing'.

So the point still stands. Why make your master cylinder fitment more complicated, heavier and less reliable than it needs to be? Why not try and copy the successful designs of other single seaters, taking inspiration from F1 through to, well, just about anything."


#816 jagman.2003

jagman.2003

    One Carb Or Two?

  • Members
  • PipPipPipPipPipPipPip
  • 1,307 posts
  • Location: In the shed.
  • Local Club: Owner of my own club of Minis

Posted 20 August 2013 - 12:30 PM


Weekend brakes update. I changed the servo, which made no difference at all. Meaning the servo isn't really the problem. I now have a spare servo for the next project. Luckily just as I went into head scratching mode a friend of mine popped by. You know what they say two heads confused is better than one. Or something like that. We messed about with the brakes trying various theories. Finally by Saturday evening we have a theory that seems credible. It is possible that the master cylinder pushrod is not returning to it's full extent. Up against the circlip. So imagine the brakes can pump up, like most brakes do if repeatedly pressed without letting off completely. But if the pedal never gets released fully. The brakes stay pumped up & engaged. The servo merely amplified the pressure. Disconnecting the servo lessens the issue but the brakes still bind a bit. Now I have lifted the master cylinder up on it's mountings temporarily & that hasn't made any difference. But I am going to persist with this as it seems to make sense. Next thing to do is disconnect the master cylinder from the pedal & let it hang free. Hopefully that might show some length issues. The next stage will be swap out the mini pushrod for the original, but shortened & extended thread to get the positions right. getting to the clevis pin once all the interior is in is not easy as I'm sure your all aware. I'll probably take the drivers seat out & crawl in upside down. Job for tonight.

But I did relocate the drivers rear arch late last night. So the arch to wheel clearance & appearance is better now.


I have just googled vertically mounted master cylinders:


http://www.ten-tenth...ad.php?t=119087


Looking at your installation you may have an issue related to:


"T'is true. Any air bubbles that can't be forced through to the slaves have no way of escaping if you mount them vertically, but the cylinders have small air bleeds at the top (probably the same hole that connects the reservoir to the cylinder in 95% of cases) for horizontal 'breathing'.

So the point still stands. Why make your master cylinder fitment more complicated, heavier and less reliable than it needs to be? Why not try and copy the successful designs of other single seaters, taking inspiration from F1 through to, well, just about anything."


 Thanks for the link. Not quite sure how it relates. I have had no problem with bleeding. Air in the system would cause a spongy & ineffective brake. I have the opposite with brakes far too eager to please. The reservoir is above the cylinder giving plenty of opportunity for the air to feed back. I took on board the idea that the hose maybe restricting return fluid. That will be under investigation.

 Alternatively the idea of changing the whole pedal box for something more racey was tempting. But not sure how much room I have for horizontal or if heat from the manifold would become an issue. From my 'under dashboard' investigation last night I noticed the pushrod length was ok. The pedal wasn't creating a poor return position. But some of the components I introduced could be. I picked up a 5/16" unf die today to extend the thread on the pushrod originally supplied with the cylinder. I'm going to take it steady & check all possibilities before refitting.


 One thing I have considered though. If fluid isn't returning to the master cylinder, then air cannot also be introduced. I may have made a really good one man bleeding system!


Quote from Lotus Elan forum:

I just fitted a replacement brake master cylinder over the week-end - it came from a Lotus dealer so I was confident it was simply a matter of replacing old with new. The replacement push rod measures 80mm from centre of clevis pin to the crown of the domed head ... rather than the underside as posted below. This was obviously too long for my +2S because the brakes wouldn't release after being used a few times, presumably because travel of the plunger was restricted and the valve seal was blocking return flow through the inlet port. The old push rod is 12mm shorter and refitting the shorter rod allowed the brakes to release as before. However, the pedal now feels a bit low in comparison - I think the optimum length must be somewhere in between these two and I'm considering changing to an adjustable rod.


Edited by jagman.2003, 20 August 2013 - 12:34 PM.


#817 hughJ

hughJ

    Soldiering Along

  • Members
  • PipPipPipPipPipPipPip
  • 727 posts
  • Location: Highlands, Scotland

Posted 20 August 2013 - 08:36 PM

Glad to see you use a cushion. Must be an older guy like me. Working on the clutch clevis pin I took the drivers seat out and used two old sheets as padding. Still had a sore shoulder at the end.


Hugh


#818 jagman.2003

jagman.2003

    One Carb Or Two?

  • Members
  • PipPipPipPipPipPipPip
  • 1,307 posts
  • Location: In the shed.
  • Local Club: Owner of my own club of Minis

Posted 21 August 2013 - 07:17 AM

Glad to see you use a cushion. Must be an older guy like me. Working on the clutch clevis pin I took the drivers seat out and used two old sheets as padding. Still had a sore shoulder at the end.


Hugh


Yes, cushions all the way now. I always use an old section of carpet on the concrete floor, maybe sometimes even a large piece of cardboard. No creaky knees for me! I do have one of those creeper boards for under the car. But I fall off it quite often.


#819 jagman.2003

jagman.2003

    One Carb Or Two?

  • Members
  • PipPipPipPipPipPipPip
  • 1,307 posts
  • Location: In the shed.
  • Local Club: Owner of my own club of Minis

Posted 23 August 2013 - 07:34 AM

I have working brakes again. I rebuilt the master cylinder. Removed the mini pushrod & refitted the original. The original pushrod had the thread extended & a short clevis fitted. Myself & my trusty pedal pusher assistant worked until late getting the air out. So now I have a pedal. Would have liked to have taken it for a test drive last night, but it was rather dark. Not the best time if anything goes wrong. If it doesn't rain this evening I'll give it a quick go. But importantly they don't pump up like before. So the mini pushrod arrangement must have limited the return position of the piston.


Edited by jagman.2003, 23 August 2013 - 07:35 AM.


#820 Ben_O

Ben_O

    Mill Road Garage

  • Paint Doctor
  • PipPipPipPipPipPipPipPipPipPip
  • 9,781 posts
  • Location: Isle of Wight

Posted 23 August 2013 - 09:35 AM

I'm glad to hear this mate. I hope all goes well with the test drive. Hopefully it's sorted now.


Ben


#821 hughJ

hughJ

    Soldiering Along

  • Members
  • PipPipPipPipPipPipPip
  • 727 posts
  • Location: Highlands, Scotland

Posted 24 August 2013 - 08:57 PM

Good one jagman.2003. All these things come to build our characters or something like that. Most impressed how you stuck with getting your brakes sorted out.


Hugh


#822 jagman.2003

jagman.2003

    One Carb Or Two?

  • Members
  • PipPipPipPipPipPipPip
  • 1,307 posts
  • Location: In the shed.
  • Local Club: Owner of my own club of Minis

Posted 28 August 2013 - 07:40 AM

Good one jagman.2003. All these things come to build our characters or something like that. Most impressed how you stuck with getting your brakes sorted out.


Hugh


Thanks Hugh, hopefully brakes back in the running now. These things are sent to try us, & they keep on trying.


#823 jagman.2003

jagman.2003

    One Carb Or Two?

  • Members
  • PipPipPipPipPipPipPip
  • 1,307 posts
  • Location: In the shed.
  • Local Club: Owner of my own club of Minis

Posted 28 August 2013 - 07:57 AM

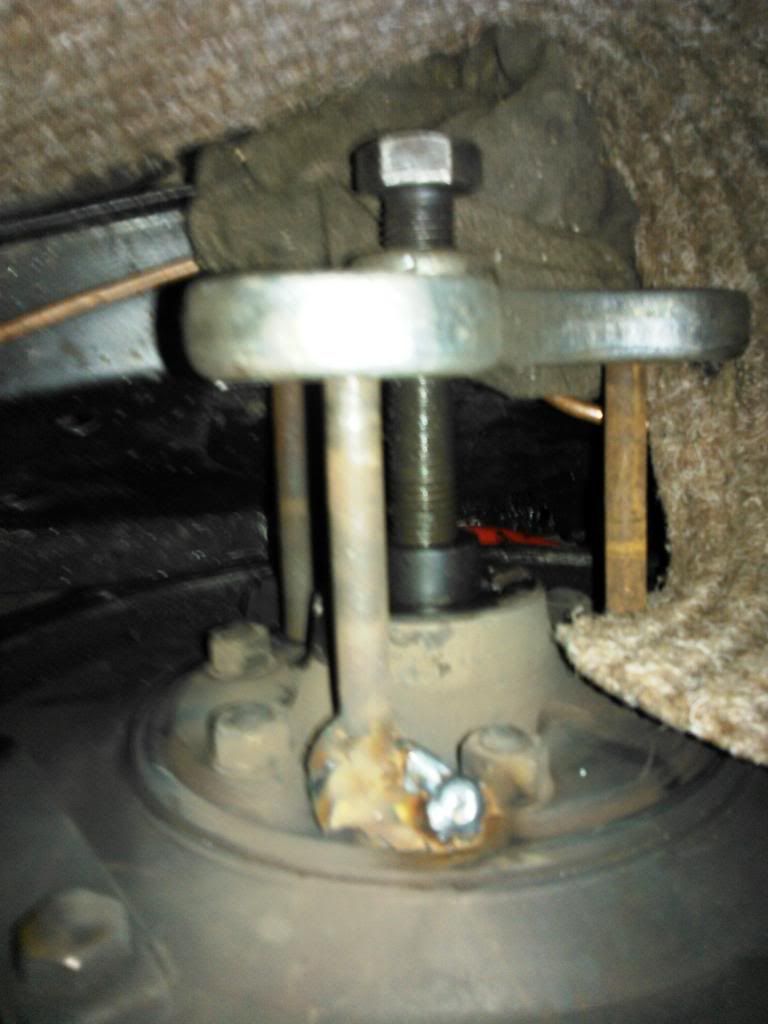
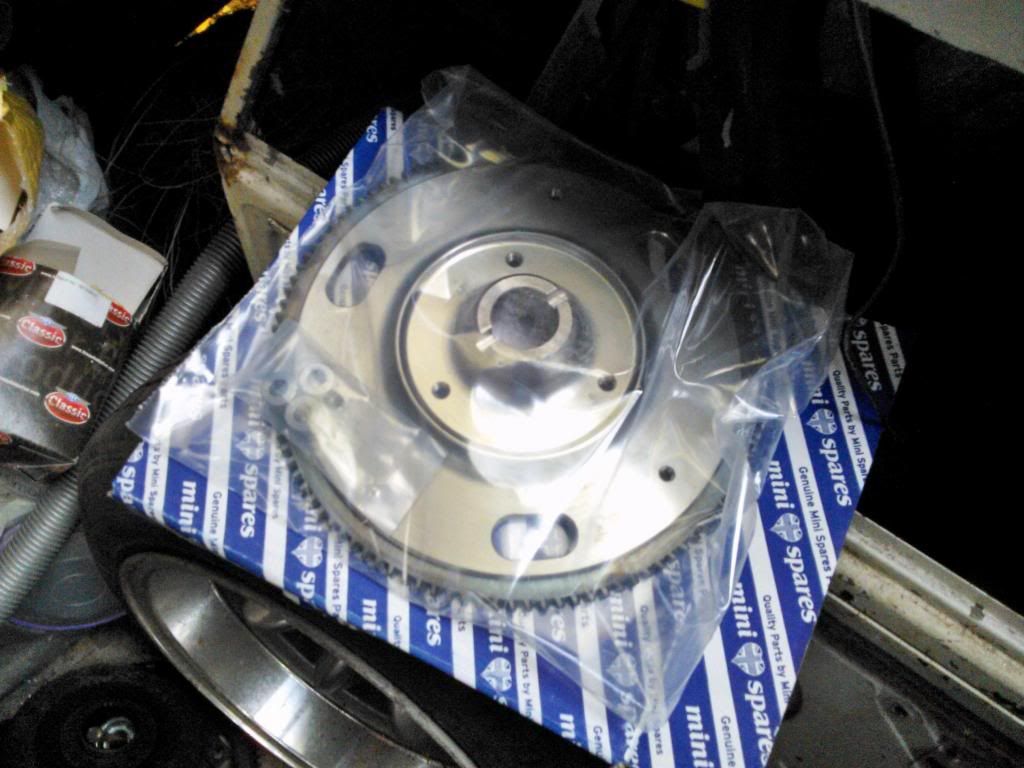
OK, so brakes are back. A test drive seemed to confirm they worked alot better. But it also confirmed the brake issue finished off the clutch. It hadn't done that many miles but must've had a harder life than I thought. Despite some subtle adjustments it wasn't biting at all. So it had to come out. A quick burn up to Minispares Oldbury (in the new Jag) got me a new clutch plate, orange diaphragm, oil seal & release bearing. There was some oil contamination, which may have explained it's early demise. I got to the point of pulling the flywheel off & heard the happy sound of a loud bang. But instead of the flywheel coming off, one of the puller bolts had pulled the thread out of the flywheel. The flywheel has been a long term fixture. It was lightened & balanced in the late eighties from the biggest fattest old Austin 1300 flywheel ever. But has been very effective until now. So the problem was how to get the flywheel off. So I decided to weld the bolt to the steel section. This worked until the second bolt popped out. This too was welded on. Finally the flywheel came off after a trip to Halfords to get a bigger spanner. I'm sure the old flywheel can be salvaged, but I don't have time to fettle that now. A new lightened flywheel & backplate have been purchased. Another flying trip to Minispares yesterday. I must say very good service there. I can get parts for the Jags on the same counter too!!! I was tempted by the ultra light flywheel but was quite rightly warned off this one for road use. I already have a tall diff & would probably never get off the driveway with anything less than 5000 revs. So I'm in the process of putting it all back together now. Hopefully driving it again this weekend. Also in case you were interested in one of the earlier posts. I have the Jaguar XJS back with fresh MOT. I had a day doing some more work on that & it's starting to come together nicely now. 5.3 litres does go rather well..! :D

WP_000563_zps786266e7.jpg

WP_000565_zps2df83b61.jpg


Edited by jagman.2003, 28 August 2013 - 07:59 AM.


#824 Jmccrary

Jmccrary

    Mini Mad

  • Members
  • PipPipPipPip
  • 171 posts
  • Location: Mildenhall

Posted 28 August 2013 - 03:09 PM

Just wanted to say...your car went from something my wife would divorce me for thinking about and now to something she would ride in...wicked job!


#825 minimikej

minimikej

    Speeding Along Now

  • Members
  • PipPipPipPipPip
  • 346 posts
  • Location: Derbyshire

Posted 28 August 2013 - 05:45 PM

OK, so brakes are back. A test drive seemed to confirm they worked alot better. But it also confirmed the brake issue finished off the clutch. It hadn't done that many miles but must've had a harder life than I thought. Despite some subtle adjustments it wasn't biting at all. So it had to come out. A quick burn up to Minispares Oldbury (in the new Jag) got me a new clutch plate, orange diaphragm, oil seal & release bearing. There was some oil contamination, which may have explained it's early demise. I got to the point of pulling the flywheel off & heard the happy sound of a loud bang. But instead of the flywheel coming off, one of the puller bolts had pulled the thread out of the flywheel. The flywheel has been a long term fixture. It was lightened & balanced in the late eighties from the biggest fattest old Austin 1300 flywheel ever. But has been very effective until now. So the problem was how to get the flywheel off. So I decided to weld the bolt to the steel section. This worked until the second bolt popped out. This too was welded on. Finally the flywheel came off after a trip to Halfords to get a bigger spanner. I'm sure the old flywheel can be salvaged, but I don't have time to fettle that now. A new lightened flywheel & backplate have been purchased. Another flying trip to Minispares yesterday. I must say very good service there. I can get parts for the Jags on the same counter too!!! I was tempted by the ultra light flywheel but was quite rightly warned off this one for road use. I already have a tall diff & would probably never get off the driveway with anything less than 5000 revs. So I'm in the process of putting it all back together now. Hopefully driving it again this weekend. Also in case you were interested in one of the earlier posts. I have the Jaguar XJS back with fresh MOT. I had a day doing some more work on that & it's starting to come together nicely now. 5.3 litres does go rather well..! :D


You were lucky to get the flywheel off! You definitely got the right bolts? Pretty sure Verto clutches have metric threads...


Nearly there now !


Cheers


0 user(s) are reading this topic

0 members, 0 guests, 0 anonymous users