

What Do You Need Tool Wise For Welding
Started by
sonikk4
, Jun 14 2011 07:09 PM
185 replies to this topic
#91

sonikk4
-
- Admin
-

- 16,175 posts
Twisted Paint Polisher!!!
- Name: Neil
- Location: Cotwolds.
Posted 18 December 2012 - 09:09 AM
Glad its helping folk
#92
sonikk4
-
- Admin
-
- 16,175 posts
Twisted Paint Polisher!!!
- Name: Neil
- Location: Cotwolds.
Posted 21 December 2012 - 08:21 PM
Some more info and this time its with regards to keeping heat distortion to a minimum.
For a long time i have always used a moist rag to keep the area i am working in cool. Some folks on here say it will cause more distortion but and its a big but i have not suffered using this method.
However there are other methods and products available.
First method is to use a section of copper behing the area you are going to weld. You can use a section of copper pipe cut along its length and then flattened. Pin this in place with some cleco's.
Then there is this product http://www.frost.co....ont-414ml.html. Another member on here Deemo introduced me to this product in his build thread Edward the multi purpose mini and the product when used looks like this
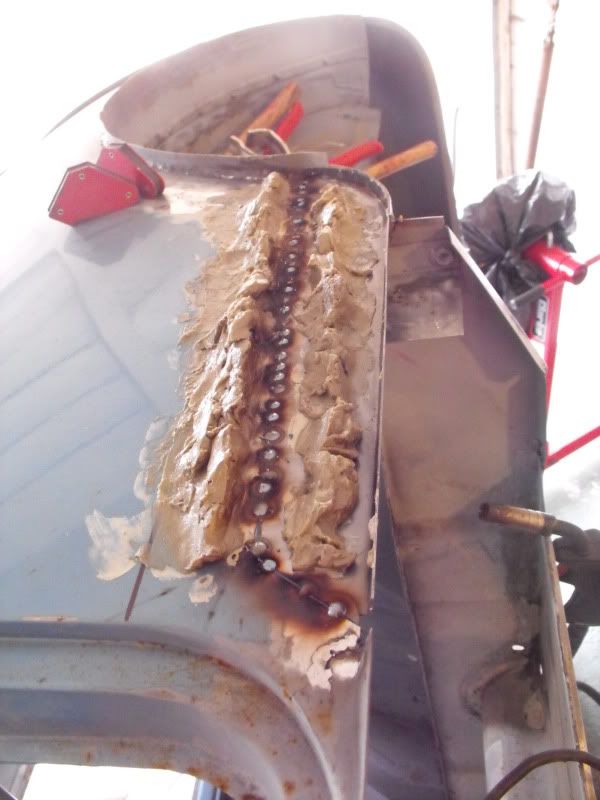
Deemo says it works well and i will be getting some to give it a go.
For a long time i have always used a moist rag to keep the area i am working in cool. Some folks on here say it will cause more distortion but and its a big but i have not suffered using this method.
However there are other methods and products available.
First method is to use a section of copper behing the area you are going to weld. You can use a section of copper pipe cut along its length and then flattened. Pin this in place with some cleco's.
Then there is this product http://www.frost.co....ont-414ml.html. Another member on here Deemo introduced me to this product in his build thread Edward the multi purpose mini and the product when used looks like this
Deemo says it works well and i will be getting some to give it a go.
#93
Wise Old Elf
-

- Members
-
- 1,655 posts
Camshaft & Stage Two Head
- Location: Maldon
- Local Club: Club Lotus
Posted 02 January 2013 - 05:12 PM
All great info here.
I did see some pics on a welding forum but cannot find them now of welds and how they could be improved. Such as:
Power too low
Power too high
Wire speed too high
Wire speed too low
Not enough gas
Metal dirty
Is there any chance you could add some pics of poor welds and how to improve on this thread? Or is there one already on TMF?
Cheers
Jason
#94
sonikk4
-
- Admin
-
- 16,175 posts
Twisted Paint Polisher!!!
- Name: Neil
- Location: Cotwolds.
Posted 02 January 2013 - 06:43 PM
I might have a play in the workshop tomorrow Jason to see if i can mess up some welds etc. I've got some rusty metal floating about and not just the mini's.
#95
Wise Old Elf
-
- Members
-
- 1,655 posts
Camshaft & Stage Two Head
- Location: Maldon
- Local Club: Club Lotus
Posted 02 January 2013 - 07:16 PM
Great. I think it would help everyone (not just me). LOL
#96
sonikk4
-
- Admin
-
- 16,175 posts
Twisted Paint Polisher!!!
- Name: Neil
- Location: Cotwolds.
Posted 03 January 2013 - 06:54 PM
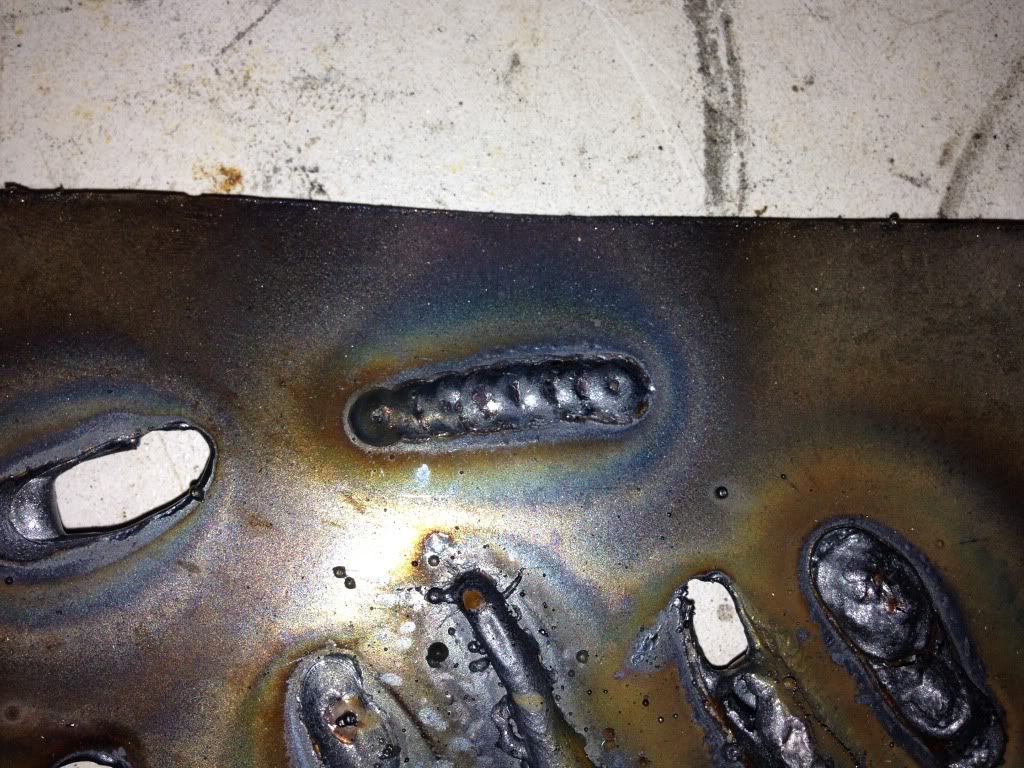
Right if photobucket behaves itself here are some dodgy looking welds

Looking from right to left (i have just amended this folks as i had it going the wrong way, it is now correct)
No gas good wire speed,
no gas poorwire speed
good gas but not enough power
good gas and nearly there with the wire speed and power
too much power and not enough wire speed,
too much power and wire speed for the thickness of the metal although i was lucky for it not to drop out.
At the bottom is a pulse weld with good gas feed and good power. ignore the hole next to it that was a mistake. Here's a better picture of the pulse weld.
In the next picture is a reasonable seam weld for the metal thickness but to be honest i will only ever use the pulse welding method on 0.9mm steel sheet.
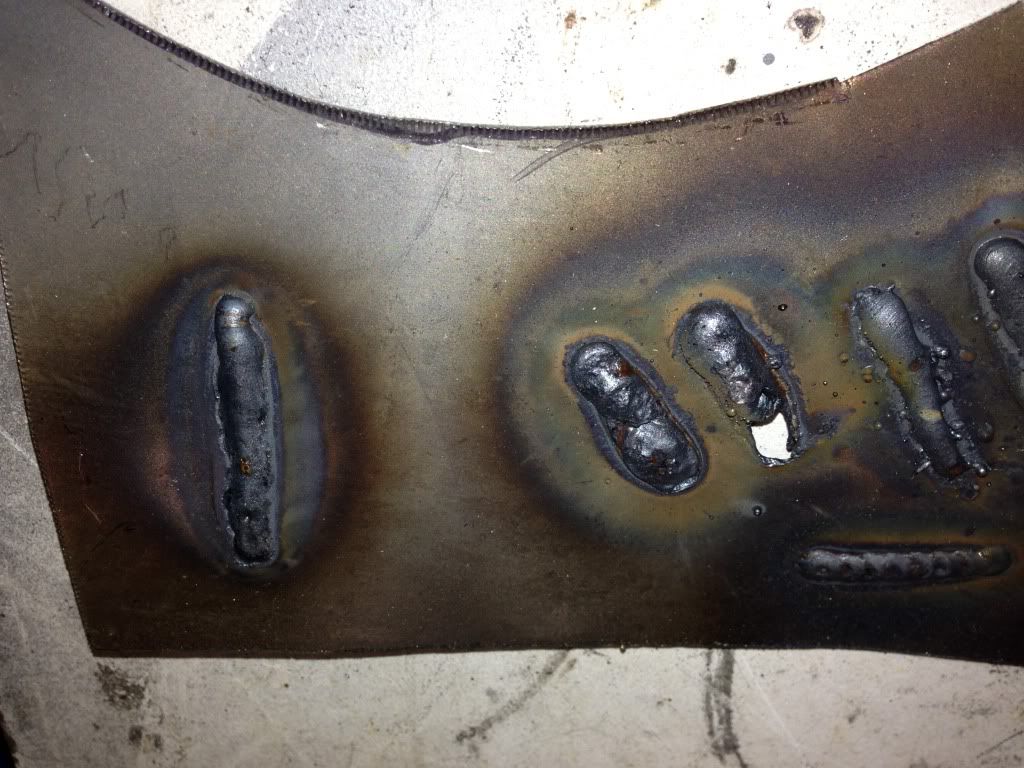
The next picture shows the penetration or lack of it.
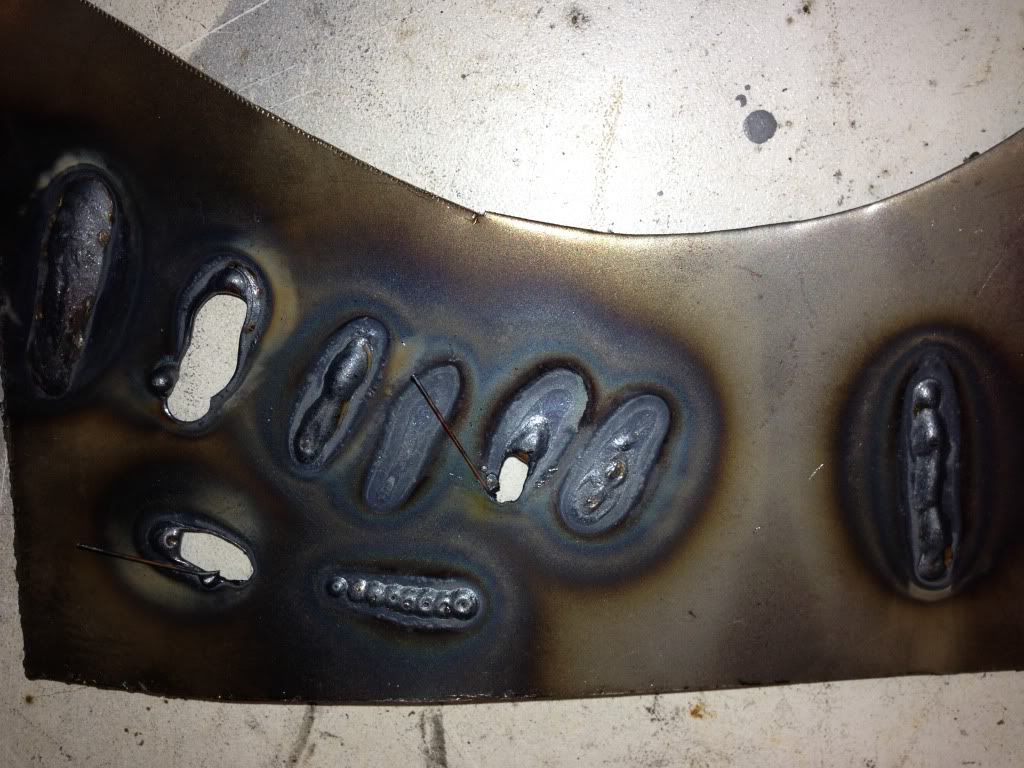
The pulse welding is good at the bottom, the seam weld on the right is good, the weld on the left is good but it was more luck than judgement, and the weld just of cneter to the left is good.
Now don't get me wrong i slapped this together very quickly so even the good welds are not perfect but it gives you an idea of what to look for. At least you can see what too much power, not enough power, wire speed etc will look like and also no gas.
The thickness of the metal you are welding counts for a lot with regards to power and wire speed. Once you have got a gas setting sorted you are happy with then you can pretty much leave it alone.
Looking from right to left (i have just amended this folks as i had it going the wrong way, it is now correct)
No gas good wire speed,
no gas poorwire speed
good gas but not enough power
good gas and nearly there with the wire speed and power
too much power and not enough wire speed,
too much power and wire speed for the thickness of the metal although i was lucky for it not to drop out.
At the bottom is a pulse weld with good gas feed and good power. ignore the hole next to it that was a mistake. Here's a better picture of the pulse weld.
In the next picture is a reasonable seam weld for the metal thickness but to be honest i will only ever use the pulse welding method on 0.9mm steel sheet.
The next picture shows the penetration or lack of it.
The pulse welding is good at the bottom, the seam weld on the right is good, the weld on the left is good but it was more luck than judgement, and the weld just of cneter to the left is good.
Now don't get me wrong i slapped this together very quickly so even the good welds are not perfect but it gives you an idea of what to look for. At least you can see what too much power, not enough power, wire speed etc will look like and also no gas.
The thickness of the metal you are welding counts for a lot with regards to power and wire speed. Once you have got a gas setting sorted you are happy with then you can pretty much leave it alone.

#98
sonikk4
-
- Admin
-
- 16,175 posts
Twisted Paint Polisher!!!
- Name: Neil
- Location: Cotwolds.
Posted 29 January 2013 - 08:10 PM
Cheers Alex
#99
ob1riley
-

- Noobies
-
- 6 posts
Just On Tickover
Posted 31 January 2013 - 04:50 PM
0.8mm , what you welding? Cool advice. Cheers
#100
sonikk4
-
- Admin
-
- 16,175 posts
Twisted Paint Polisher!!!
- Name: Neil
- Location: Cotwolds.
Posted 31 January 2013 - 06:56 PM
0.8mm , what you welding? Cool advice. Cheers
Are you on about the wire thickness or the metal thickness?? I have been using 0.6mm thick wire on 0.9mm thick steel with some at 1.2mm thick.
#101
CBJ805T
-

- Members
-
- 459 posts
Speeding Along Now
- Location: Kenilworth
Posted 11 February 2013 - 05:29 PM
Hi Neil,
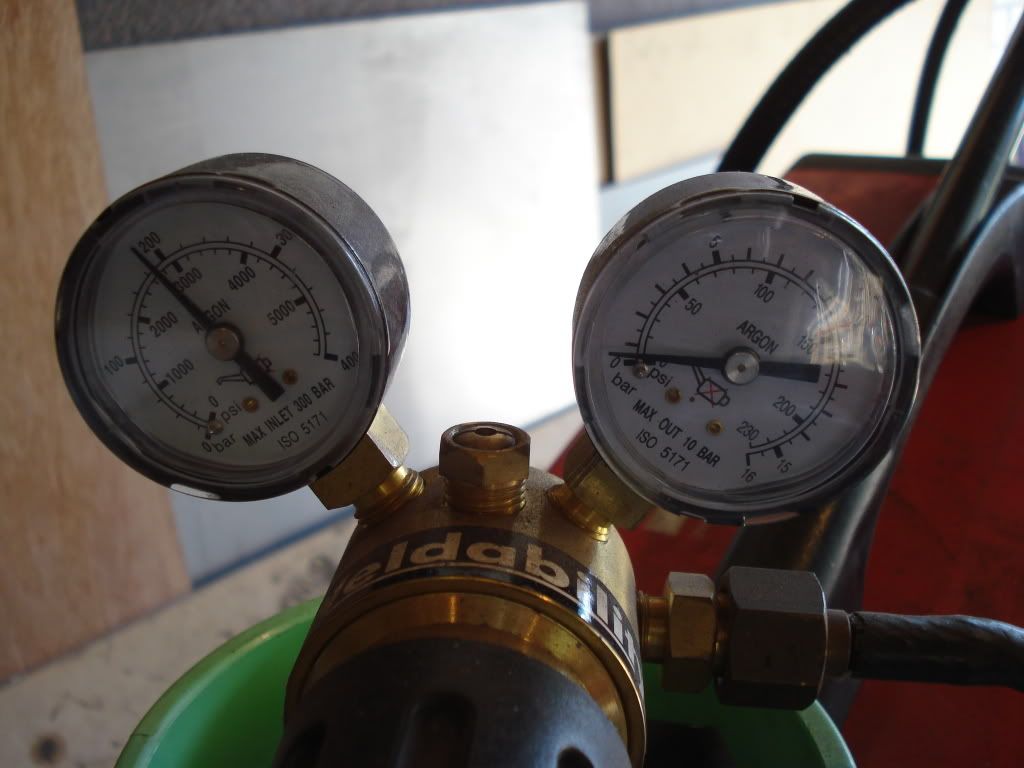
I've got a Clarke 135t welder which came with a basic regulator and disposable bottle. I'm picking up my gas tomorrow and getting a new radiator. The basic regulator has a connection for a sml bire flexible pipe which is plumbed into the welder.I notice in your pictu below that the regulator has a large diameter pipe coming from it. Did you get an adaptor to fit to the sml bore pipe or replace the pipe that came with the welder?
Any help appreciated
img]http://i1206.photobu...ld/DSC04788.jpg[/img]
#102
sonikk4
-
- Admin
-
- 16,175 posts
Twisted Paint Polisher!!!
- Name: Neil
- Location: Cotwolds.
Posted 11 February 2013 - 06:14 PM
Hi Neil,
I've got a Clarke 135t welder which came with a basic regulator and disposable bottle. I'm picking up my gas tomorrow and getting a new radiator. The basic regulator has a connection for a sml bire flexible pipe which is plumbed into the welder.I notice in your pictu below that the regulator has a large diameter pipe coming from it. Did you get an adaptor to fit to the sml bore pipe or replace the pipe that came with the welder?
Any help appreciated
img]http://i1206.photobu...ld/DSC04788.jpg[/img]
Hi you should have got an adapter with your welder if i remember correctly (its been a while since i bought mine) if not a welding accessories store should have them.
#103
CBJ805T
-
- Members
-
- 459 posts
Speeding Along Now
- Location: Kenilworth
Posted 11 February 2013 - 08:31 PM
That's. it didn't come with mine but I've found it on machine mart
. http://www.machinema...TC=RV-010140001
Thanks for your help
. http://www.machinema...TC=RV-010140001
Thanks for your help
#104
M1n1Mad
-

- Noobies
-
- 66 posts
Stage One Kit Fitted
- Location: Hatfield
Posted 12 June 2013 - 02:11 PM
Hey
Ive got a 160T clarke mig but i keep blowing holes in the metal. .8mm but will be getting .6mm wire
What settings do i need it to be on?
Ive got a 160T clarke mig but i keep blowing holes in the metal. .8mm but will be getting .6mm wire
What settings do i need it to be on?
#105
sonikk4
-
- Admin
-
- 16,175 posts
Twisted Paint Polisher!!!
- Name: Neil
- Location: Cotwolds.
Posted 12 June 2013 - 05:50 PM
Hey
Ive got a 160T clarke mig but i keep blowing holes in the metal. .8mm but will be getting .6mm wire
What settings do i need it to be on?
What switches do you have on the front panel?? Wire feed controller, 3 position rotary power switch, a min max rocker switch and the on off switch??


0 user(s) are reading this topic
0 members, 0 guests, 0 anonymous users


