Jump to content


Photo
- - - - -

Project Bec


  • Please log in to reply
54 replies to this topic

#31 LouisT

LouisT

    Mini Mad

  • Members
  • PipPipPipPip
  • 197 posts
  • Location: Manchester

Posted 28 August 2011 - 06:12 PM

Evening folks, spent a good 2 solid days on Bec today,

Started bright and early yesterday, with the most tedious job ever!!!! the sound deadening, took forever!!!

Posted Image

Quite rewarding when you have finished it though,

I was quite shocked to find the floor in more or less mint condition, bar one small spot of rust on the drivers floor pan, which hopefully i can cut out and weld some new aluminium in there instead of a full panel

Posted Image

Then i started on the rear bench, got the hang of the bitumen side by this point and had it off within minutes, but this uncovered some rust spots, but they shouldnt be too hard to rectify. Which again i'll use new aluminium cut to shape which i'll weld in.

Posted Image

Posted Image

Posted Image

After having all the bitumen up, i decided to have a brush around and try and discover some rusty bits,

This is what i found......

Passenger Inner sill

Posted Image

Passenger rear bin

Posted Image

Tiny bit of outer passenger sill, that won't be too hard to do

Posted Image

Then... this was the worse bit covered up by lots and lots of fibreglass

Posted Image

so started digging and found the other side to be the same, so im going to cut the whole back end off.

Posted Image

New rear End
New Rear lower Valance
New boot floor repair section

Whilst i was digging around, i found that where the previous owner had welded new outer sills on, he had created some pin holes (can i just weld a blob on these and grind them down afterwards?)

Posted Image

I knew i needed a new N/S/R quarter, so i decided to look if it was fudged anywhere else, and this is what i found lol....

Posted Image

Heres my new panel for that side

Posted Image

The other side isnt knowhere near as bad but theres enough to change it so orderd a new O/S/R Quarter.

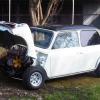
By this point i was getting bored of looking for rust, so moved onto the engine removal and subframe, been stuck with this for ages, went up to see R1minimagic (dale) this morning to pick up a genuine rear subby and he gave me abit of advice that worked :)

And hey presto.. finally, was funny doing this part seeing my girlfriend trying to help me lift the shell up haha.

Posted Image

Here she is hard at work, sanding the rear subby and getting rid of all the gunk ready to get it powdercoated. Haha, she wasn't happy at either of these pics.

Posted Image

Posted Image

Not very often she helps so thought i'd get a pic haha.

That's all for now, might go and have another bash tomorrow as i'm off work with it being bank hol, but may go and watch Jenson Button in Manchester in his F1 car.

Thanks for reading/looking

Louis

#32 LouisT

LouisT

    Mini Mad

  • Members
  • PipPipPipPip
  • 197 posts
  • Location: Manchester

Posted 29 August 2011 - 04:26 PM

Well had another few hours in the garage today,

After removing the subframe and engine yesterday, i decided the next bit would be to cut the front end off.

So here she is feeling abit sorry for herself,

Posted Image

So then i thought i best start looking for more rust....

Passenger side flitch panel, will need some new metal welding in.

Posted Image

Also the top and underneath of the scuttle panel at the ends will both need replacing.

Posted Image

Drivers side was covered in fibreglass, some chizzle that off and it end up looking like this

Posted Image

I then removed the shock mounts and found the usual rust that i was expecting. With these is it best to cut an even bigger peice than ive marked up and drill the holes in my new peice of metal?

Posted Image

Both side's are just as bad

Posted Image

Found some more on the passenger door step, so ill weld a new door step in the and an inner sill whilst im at it.

Thats all for another week or so, will get my new panels etc ordered now.

Hope you all have a good week, Cheers

Louis

#33 carboy001

carboy001

    One Carb Or Two?

  • TMF+ Member
  • PipPipPipPipPipPipPip
  • 1,065 posts

Posted 29 August 2011 - 05:57 PM

Good stuff Louis. Quick progress, shame about the rust but at least your logical about it and don't avoid it.

Like the pic of the rear quarter also haha.

#34 LouisT

LouisT

    Mini Mad

  • Members
  • PipPipPipPip
  • 197 posts
  • Location: Manchester

Posted 29 August 2011 - 06:04 PM

I know, its got to be right, not spending a fortune on a paint job then rust starts coming through.

Just ordered some new panels, both door steps, passenger inner sill, scuttle ends, under scuttle ends and i will also redo the a panels when i get to that bit.

#35 LouisT

LouisT

    Mini Mad

  • Members
  • PipPipPipPip
  • 197 posts
  • Location: Manchester

Posted 30 August 2011 - 06:27 PM

Quick update.....

I received my Mondo Sport Steering Column Drop Bracket this morning,

Very well made and lightweight.

Posted Image

Thats all for today and untill next wednesday.

But...... found out Moss's showroom is 2 minutes away from my work haha, so will be taking a few trips there on my dinner break.

Cheers

Louis

Edited by LouisT, 30 August 2011 - 07:05 PM.


#36 Zeemax Adventure

Zeemax Adventure

    Speeding Along Now

  • TMF+ Member
  • PipPipPipPipPip
  • 301 posts
  • Location: Llandudno

Posted 31 August 2011 - 02:25 PM

Looks like a good project. Reading through what you discovered reminds me of stripping mine. I thought id only need a new rear valance, but oh no, i had to do 1/2 boot floor, valance, hinge panel and corners too. With regards to the rust behind the shock absorber mounts, i made patches slightly bigger, drilled the holes, then bolted the 4 bolts in to hold it, plus reassuring myself the holes lined up before welding. Id get some heat on the bolt thats snapped off too and remove it with grips. I used a small blowtorch till it was glowing orange, then it slowly released while still hot. much easier than drilling it out.

Attached File  020 (2).JPG   1.03MB   7 downloads

Edited by Zeemax Adventure, 31 August 2011 - 02:28 PM.


#37 LouisT

LouisT

    Mini Mad

  • Members
  • PipPipPipPip
  • 197 posts
  • Location: Manchester

Posted 31 August 2011 - 08:17 PM

Ahh brill, thanks for that bud, great bit of advice, i was worried about the holes not being in the correct place haha,

Cheers mate

Louis

#38 Risky

Risky

    Mini Mad

  • Members
  • PipPipPipPip
  • 213 posts
  • Location: Zegge (The Netherlands)

Posted 01 September 2011 - 02:39 PM

Looking good, would be nice if my girlfriend would help me with my mini as well... oh well, let's dream on haha :P

#39 LouisT

LouisT

    Mini Mad

  • Members
  • PipPipPipPip
  • 197 posts
  • Location: Manchester

Posted 01 September 2011 - 08:03 PM

haha, shes a good help, did quite alot last week.

My Mini Tec hinges arrived today after the second time in owning them haha, no pics, bit boring really haha..

Cheers

Louis

#40 analogue_radio

analogue_radio

    Up Into Fourth

  • TMF+ Member
  • PipPipPipPipPipPipPipPipPip
  • 4,897 posts
  • Location: Melton Mowbray, UK.

Posted 01 September 2011 - 08:16 PM

I might copy and paste that photo of your girlfriend helping out to my girlfriend!

Mind if I ask how much that steering drop bracket was?

#41 LouisT

LouisT

    Mini Mad

  • Members
  • PipPipPipPip
  • 197 posts
  • Location: Manchester

Posted 01 September 2011 - 08:20 PM

Haha, everyones girlfriends will be in pictures on their threads now!!!!

It was £35 and £5 delivery, great peice of kit, really lightweight aswell.

Louis

#42 LouisT

LouisT

    Mini Mad

  • Members
  • PipPipPipPip
  • 197 posts
  • Location: Manchester

Posted 04 September 2011 - 08:38 PM

No update this weekend as ive been working, but i'm off wednesday and this is my plan of action.

Get the bulkhead back to bare metal with my wire cup brush i bough and then cut the rot out, weld new in and etch prime the lot,

Then at weekend, im going to make a start on the sills, door steps and post and work backwards.

i'll get pics as i go along,

cheers

#43 jagman.2003

jagman.2003

    One Carb Or Two?

  • Members
  • PipPipPipPipPipPipPip
  • 1,307 posts
  • Location: In the shed.
  • Local Club: Owner of my own club of Minis

Posted 05 September 2011 - 07:26 AM

Not waisting any time there. Look's like a pretty solid shell to start with.

#44 LouisT

LouisT

    Mini Mad

  • Members
  • PipPipPipPip
  • 197 posts
  • Location: Manchester

Posted 05 September 2011 - 10:54 AM

Haha, yeh it's not too bad I suppose, nothing compared to yours :)

I've not welded for years so that should be fun to see how that goes!

Cheers

Louis

#45 Swainy

Swainy

    Speeding Along Now

  • Members
  • PipPipPipPipPip
  • 319 posts
  • Location: Derbyshire
  • Local Club: Sexy People Only Mini Club

Posted 07 September 2011 - 10:48 AM

Top totty! ;)

Looking good mate. Keep it up :)


1 user(s) are reading this topic

0 members, 1 guests, 0 anonymous users