Jump to content


Photo
- - - - -

Project Zippy - Mk1 1981 Midas Project.


  • Please log in to reply
715 replies to this topic

#346 MrBounce

MrBounce

    Up Into Fourth

  • TMF+ Member
  • PipPipPipPipPipPipPipPipPip
  • 2,563 posts
  • Location: The Manroom in Ipswich

Posted 11 July 2016 - 05:31 PM

Did a few little jobs yesterday, most of which I don't have pics for. I finished off the gear selector and bolted it all together with some fresh grease and it looks rather good.
 
One of the things I wasn't entirely happy with was the state of the flywheel bolt locktab when I put the engine together (I had made a mental note to change it but didn't get round to it). A new one was found in the darkest recesses of the spares box (I knew I had one somewhere!) and after some grunting and use of the big breaker bar, on it went. Staying with the engine I also chucked in the new set of manifold studs I had and also changed the thermostat housing, removing the sandwich plate that I am reliably informed will not fit under the bonnet without surgery. More soon.
 
Good looking gear selector housing now bracketed up and finished.
 
Midas%20939_zpsxnnoqubm.jpg


#347 chadd123

chadd123

    Mini Mad

  • Members
  • PipPipPipPip
  • 212 posts
  • Local Club: Wirral-minis

Posted 12 July 2016 - 10:32 PM

And i thought my rebuild was hard,great work,
iam still having brake problems

#348 MrBounce

MrBounce

    Up Into Fourth

  • TMF+ Member
  • PipPipPipPipPipPipPipPipPip
  • 2,563 posts
  • Location: The Manroom in Ipswich

Posted 16 July 2016 - 04:50 PM

Thanks Chadd - I am guessing I will have problems to come...


Another quick update - should be a longer one but my efforts were somewhat thwarted. Let me explain. Before I start doing things like putting on the rear axle and front subframe, I need to sort out the brake and fuel lines. The fuel line itself is fine after a blow through and wipe down as I'd cleaned it a few years, but because I changed from a single to a dual line braking system, the front to rear brake pipe is different. I had bought one for the project many moons ago and it's been hanging on the garage wall for a year or so. Amusingly, it has some orange overspray on it... Of course, the body was sitting on its trolley, something it's been doing for quite a while. Up went the front, followed by the back and the trolley was removed for the first time in years. 
 
My plan with the brake and fuel lines was to re-use the clips which were factory fittings. Unfortunately (and unsurprisingly really) they were utterly crap. You could push the line in and it would hold for a few seconds before pinging out and, in this case, hitting me in the face. I had a few P clips but unfortunately the wrong type of bolts to fit them. I shall get some cap head bolts with a dome as they'll be the least obtrusive option as they will sit on a raised section under the carpet. I managed to get a couple of clips in on the bulkhead and the brake pipe is bent to shape. I just need to replace ALL the clips... More to follow.
 
Rear brake pipe fitted (but not entirely finished). Sorry about the overspray and amusing spiderweb!
 
Midas%20940_zpserwexebr.jpg
 
It's finally off its trolley!
 
Midas%20941_zpskwucdqki.jpg


#349 minimat

minimat

    Super Mini Mad

  • Members
  • PipPipPipPipPipPip
  • 689 posts
  • Local Club: anglian mini club

Posted 17 July 2016 - 08:11 PM

Thats looking really good Dave well done.


#350 MrBounce

MrBounce

    Up Into Fourth

  • TMF+ Member
  • PipPipPipPipPipPipPipPipPip
  • 2,563 posts
  • Location: The Manroom in Ipswich

Posted 01 August 2016 - 04:16 PM

Thanks Matt - you should pop over and take a look!  :thumbsup:


Well I haven't updated this for a bit because of three factors: 1) Time (I haven't had much); 2) Weddings (we've been invited to SEVEN this year) and 3) Heat. Anything over about 22 degrees and the Manroom turns into an oven. I think I accidentally gave myself heatstroke the other weekend as a result...
 
Anyway, Mrs Bounce gave up half an hour of her time by wielding a screwdriver, thus allowing me to fix the front to rear brake line with new P clips. The old factory fitted clips really were (for want of a better word) atrocious, so there was no way I was going to re-use them. I still need to do the fuel line, but I am sure I can grab an assistant from somewhere. 
 
This morning I had a couple of hours so I did some little jobs (which of course take a bit of time). I resprayed the areas of the bulkhead which had been affected by overspray, as well as removing the brake valve, master cylinder & bracket as they too had been affected by the dreaded "orange fleck". I masked these and gave them a fresh coat of satin black.Whilst this was drying I popped in the bolts for the top of the front shock mounts. It's a really small job, but something that makes me feel good - another small bit is on the car. Finally I have started work on fabricating a small bracket to allow a more standard looking battery clamp. The previous one was bolted to the bulkhead "buttress" and looked dreadful. More to follow.
 
Bulkhead looking tidier.
 
Midas%20942_zpsbuvlgsai.jpg
 
Upper shock mount bolts finally in.
 
Midas%20943_zpsyss0pude.jpg
 
New cap-head bolts on fuel line side awaiting new P clips underneath.
 
Midas%20944_zpsj8kze1ao.jpg
 
Not-so-black bits now black again!
 
Midas%20945_zpssyhpgtux.jpg
 
Bracketing under construction.
 
Midas%20946_zpsjhseqt9z.jpg


#351 MrBounce

MrBounce

    Up Into Fourth

  • TMF+ Member
  • PipPipPipPipPipPipPipPipPip
  • 2,563 posts
  • Location: The Manroom in Ipswich

Posted 14 August 2016 - 03:37 PM

Some more progress has been made - there's been a small step back but that's hopefully sorted.
 
When I chucked the pedalbox in, I of course didn't check where the pedals were sitting. Due to the spring, they were sitting somewhere up near the dash shelf. And because of the design of the bulkhead, I couldn't get them back down without removing them. So I did just that, removing the homemade captive bolt plate, re-positioning the pedals, before holding them in place with something heavy (in this case my bowling ball in its bag - and even that struggled). I nipped up the nuts on the captive bolts and they sit where they should now. 
 
The next issue was the master cylinder bracket. This was the original item on the car, which ran a single-line master cylinder. The main seal is significantly larger on the dual-line master cylinder (9mm difference in diameter!), so it won't fit properly in the bracket. The pedalbox is not an issue because the seal tapers - at least that's what I am hoping... So first thing was to cut a bigger hole in the bracket - no problem I thought - I have hole saws in my set of drills. The only trouble was, this was a cheap set of drill bits (it was a present), and all the hole saw did was make a small mark, get very blunt and cause the wood underneath the bracket to smoke wildly. However, I am nothing if not resourceful. Using the hole saw mark, I cut several slots in the metalwork, bent them out with pliers and then cut them off with the Dremel before giving the whole thing a tickle with the grinder and tidying up with the grinding stone. Granted it's not particularly professional, but now there's lots of clearance and nothing catches. Just needs a coat of paint and all should be fine.
 
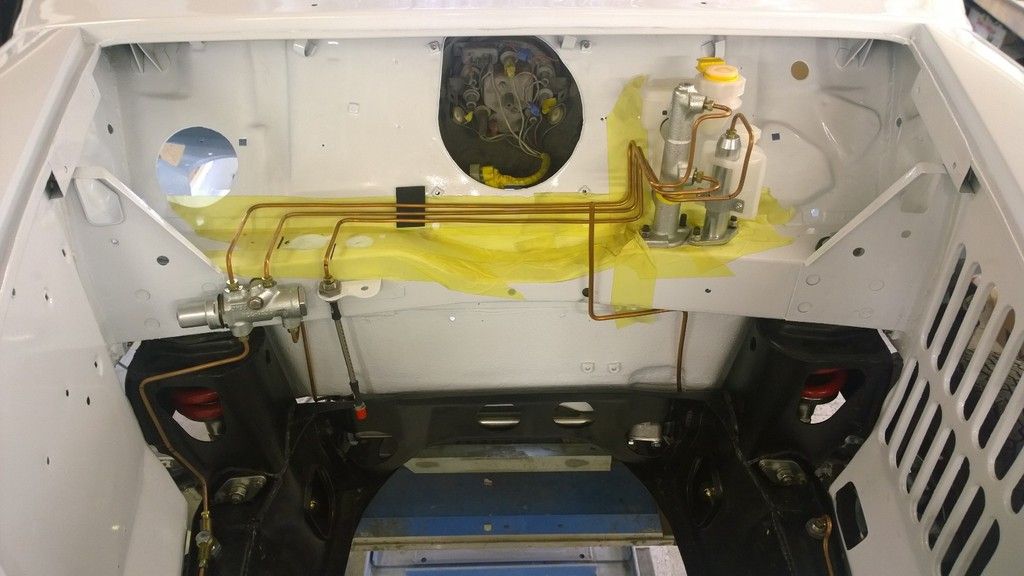
The other day Shaun came over and despite him having a horrible week at work, I put him to work holding the screwdriver whilst I sorted the P clips underneath holding the fuel line. It still needs a couple of more accessible clips in the engine bay doing (and holes drilling for them!) but the awkward bit is done. Whilst I was underneath, I also sorted the remaining heatshield for the exhaust. Again, it's not perfect, but the only person seeing this will hopefully be the MOT tester, and the majority of it will be hidden behind a subframe, a gear selector and an exhaust so I am not too bothered about how it looks - it's for stopping the bulkhead catching fire, not looking good. This of course left me the wonderful task of the steering rack. Anyone who's done one on a Mini will know that they're utter bar stewards when the subframe is on, so I was glad to put it on now, without that large lump of metal being there. It's still awkward when you're doing it on your own, but a carefully placed piece of wood allowed me to pop the U-bolts through (no I didn't forget the little plastic anti-friction strips). I nipped up the bolts to hold it there, although it does need a small amount of adjustment which can wait until next time. Finally, I popped the freshly repainted brake valve back on the bulkhead. This took significantly longer than expected due to the inaccessibility of the nut, but some careful use of a small socket and believe it or not, some cable ties sorted the situation. More soon!
 
Pedals now where they should be.
 
Midas%20947_zpsersqanrw.jpg
 
Hole saw a bit rubbish? No problem - use a bit of back-street engineering!
 
Midas%20948_zpshalr76zc.jpg
 
A tickle with the grinder and it looks acceptable. It won't be seen anyway...
 
Midas%20949_zps5ahgbnaj.jpg
 
Fuel line now held in place - cheers Shaun!
 
Midas%20950_zpsfwyyynav.jpg
 
Heatshield now fitted up to the selector area
 
Midas%20951_zpsvqrjpb6n.jpg
 
Rack now loosely in place.
 
Midas%20952_zps4gcffrh2.jpg
 
And brake valve fitted to the bulkhead. 
 
Midas%20953_zps8ewy5b3i.jpg


#352 MrBounce

MrBounce

    Up Into Fourth

  • TMF+ Member
  • PipPipPipPipPipPipPipPipPip
  • 2,563 posts
  • Location: The Manroom in Ipswich

Posted 17 August 2016 - 08:23 PM

I don't like Mini braking systems. Mainly because over the years they've been messed about with BL / Austin Rover / whatever they were called that week penny-pinching numptiness. The plan was, as my single-line Cooper S Master Cylinder was kippered, to convert to a dual-line system using a yellow-tag MC and limiter valve on the bulkhead as I also wasn't keen on using the rear valve (VERY rusty). To date I have acquired brand new brake lines all round, an FAM7821 valve (Secondhand) and have rebuilt the s/h yellow tag MC. All new front to rear brake line is fitted. Excellent I thought - I will connect everything up.
 
Problem 1: The thread to the rear brakes on the valve is knackered. Tightens up so far and then spins on itself. And as it's a blind hole I can't re-cut the thread. New valve then - that's £87 I don't have.
 
Problem 2: My yellow tag MC and brand new clutch MC do not fit together on the same base plate. There's precious little clearance between them, but add a couple of pipes and they simply don't fit. I am either doing something drastically wrong or fiting a yellow tag is simply out of the question. To put it back to the way it was, a new Cooper S single line MC is £72 I don't have, plus I would need the regulator valve at the back (another £73 - and it's out of stock).


I have closed the garage door and walked away before I pick up something dangerous like  a blow torch and some petrol.
 
This is junk...
 
Midas%20954_zpsth48pdqv.jpg
 
...and these two bar stewards don't fit together.
 
Midas%20955_zpsdxuvmmfy.jpg


#353 Cavazzi

Cavazzi

    Stage One Kit Fitted

  • Noobies
  • PipPipPip
  • 75 posts
  • Location: Herning

Posted 18 August 2016 - 07:00 AM

Hi mr Bounce,


Your need to turn the clutch master cylinder 180 degrees. I placed it the same way as you did because it would look better but it wont fit that way.


Have a look at my engine bay as ive just finished up that part.


WP_20160521_15_01_31_Pro_zpsw9zaxeqi.jpg


brgds

Christian


#354 Udo

Udo

    Camshaft & Stage Two Head

  • Members
  • PipPipPipPipPipPipPipPip
  • 1,670 posts
  • Location: Lincoln

Posted 18 August 2016 - 09:16 AM

Bounce fairly sure I've got a spare valve you are welcome to, cover post or If Helen is heading your way soon I can get it to her?


#355 Ethel

Ethel

    ..is NOT a girl!

  • TMF Team
  • PipPipPipPipPipPipPipPipPipPipPip
  • 25,418 posts
  • Local Club: none

Posted 18 August 2016 - 09:57 AM

That Fam valve looks like it could be off something other than a Mini if it has 2 front circuit outlets. The Mini version is threaded M10x1, so if you're trying to fit a 3/8unf union....


Cavazzi's clutch master looks different again, I used a Metro clutch master (also a sligthly smaller bore), but some banjo unions would probably do the job.


#356 MrBounce

MrBounce

    Up Into Fourth

  • TMF+ Member
  • PipPipPipPipPipPipPipPipPip
  • 2,563 posts
  • Location: The Manroom in Ipswich

Posted 18 August 2016 - 12:42 PM

Udo pm'd you.

Ethel I don't get what you mean re the 2 front outlets. There's 2 inlets from the yellow tag cylinder then one outlet goes to the front and the other to the rear. There is also a bolt hole. The correct front to rear brake line was used.

#357 Udo

Udo

    Camshaft & Stage Two Head

  • Members
  • PipPipPipPipPipPipPipPip
  • 1,670 posts
  • Location: Lincoln

Posted 18 August 2016 - 01:20 PM

The clutch master Cavazzi has shown a picture of is different to yours Bounce as Ethel has pointed out, the base plate is at right angles to the reservoir where as yours is in line for want of a better word/description.


Think Ethel means looking at your picture, bolt hole top middle, inlet top left and top right, outlet bottom left and 2 outlets bottom right


Edited by Udo, 18 August 2016 - 01:21 PM.


#358 MrBounce

MrBounce

    Up Into Fourth

  • TMF+ Member
  • PipPipPipPipPipPipPipPipPip
  • 2,563 posts
  • Location: The Manroom in Ipswich

Posted 18 August 2016 - 02:40 PM

Nope - definitely only 2 inlets and 2 outlets! Happy to be put right re that and the clutch MC though. Thanks guys.

#359 Cavazzi

Cavazzi

    Stage One Kit Fitted

  • Noobies
  • PipPipPip
  • 75 posts
  • Location: Herning

Posted 18 August 2016 - 02:55 PM

I can see now that my clutch MC is different to yours. Mine is this: Link


Midas%20954_zpsth48pdqv.jpg


On the bottom of your PWDA valve you have 2 outlets for the front brakes. I dont know if it is from a metro?


#360 Artstu

Artstu

    One Carb Or Two?

  • Members
  • PipPipPipPipPipPipPip
  • 827 posts
  • Location: Derbyshire

Posted 18 August 2016 - 03:26 PM

It is the 5-port housing with only 4-ports drilled http://minispares.co...px|Back to shop


I threw mine in the bin on my last Midas, had the best brakes I'd ever had on a Midas. Keith's article on it http://www.calverst....ias-adjustment/


Edited by Artstu, 18 August 2016 - 07:08 PM.


0 user(s) are reading this topic

0 members, 0 guests, 0 anonymous users