Project Cliff - The Cherry Red Thirty
Started by
stretch tech
, Dec 17 2011 06:45 PM
764 replies to this topic
#31
Posted 18 December 2011 - 10:09 AM
Love a good 30 Rhys. It seems you're doing a good job on this one already
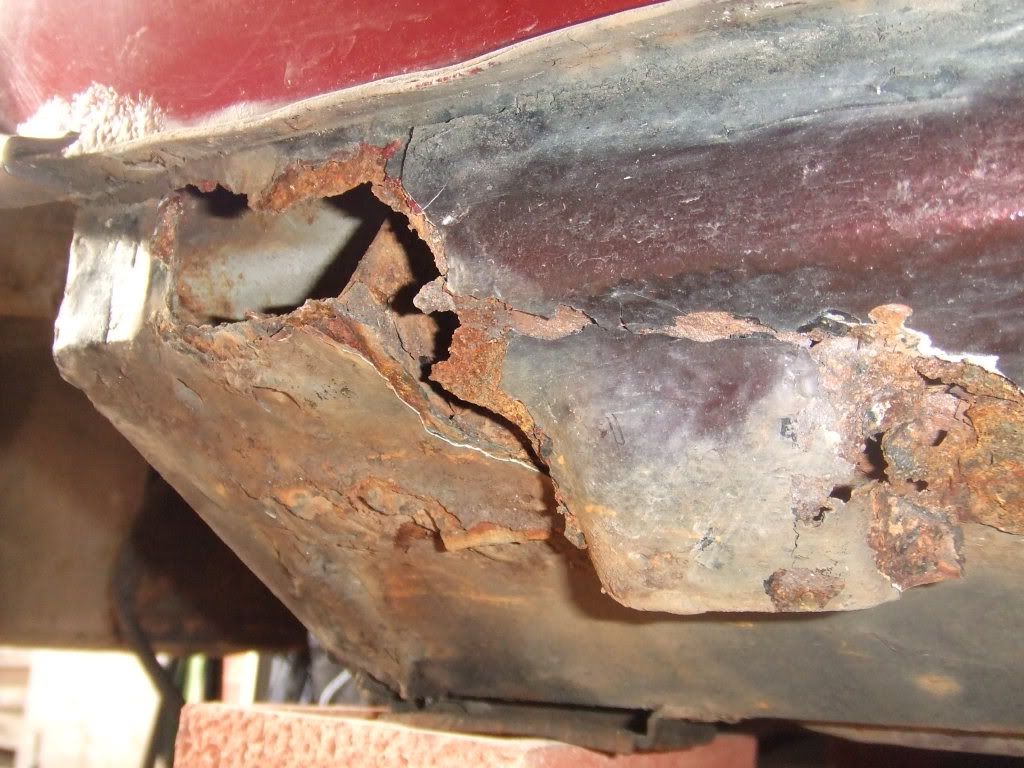
Enjoy the restoration - it WILL take longer than you expect...
#32
Posted 18 December 2011 - 01:19 PM
hi all, just been in the garage taking some pics...enjoy.
#33
Posted 18 December 2011 - 01:22 PM
rusty flitch panel
non existent jacking point
i can almost fit my hand through the hole
more rust near the subframe mount
non existent jacking point
i can almost fit my hand through the hole
more rust near the subframe mount
#34
Posted 18 December 2011 - 01:27 PM
check this out
i already have a proper mini jack but i found this when i was clearing out my grandad's cupboard, i think it's either from a mini van/estate/pick-up or an austin minor
#35
Posted 18 December 2011 - 01:31 PM
pic of the garage and CLIFF all tucked away awaiting body repairs
our home made racking (old scaffolding tower and pallets)
#36
Posted 18 December 2011 - 01:34 PM
all the interior parts all reconditioned and boxed up safely
the original interior and glass stacked safely at the back of the garage, out of the way of the work area to avoid damage
#37
Posted 18 December 2011 - 01:38 PM
solid replacement bonnet from a piccadilly
solid replacement boot lid
replacement internal locking grill (i prefer the look of this as they look sleeker)
solid replacement boot lid
replacement internal locking grill (i prefer the look of this as they look sleeker)
#38
Posted 18 December 2011 - 01:42 PM
brand new pattern front floor pans (the rear ones are solid as they are), outer narrow sills (never get the wide ones as they trap moisture = RUST), rear valance + closures and rear quarter repair panels.
#39
Posted 18 December 2011 - 01:45 PM
PS: i am going to completely remove the rear ash tray as someone has put chewing gum in the ash tray (YUK) and i don't smoke and never intend to let anyone smoke in my car ! !
#40
Posted 18 December 2011 - 01:50 PM
this is a roll of laminate flooring underlay/insulation, i will be using this as sound deadening all over the cabin and in the engine bay + bonnet to help reduce noise as much as possible.
it doesn't burn easily at all and when it finally catches fire it burns very slow with a small flame
#41
Posted 18 December 2011 - 01:59 PM
fully reconditioned...
heater
original radiator cowling + genuine lucas headlamp also found in my grandad's cupboard
original radiator
heater
original radiator cowling + genuine lucas headlamp also found in my grandad's cupboard
original radiator
#42
Posted 18 December 2011 - 02:04 PM
cleaned up wiring loom
alternator
reconditioned drive shafts and callipers with new pads and 8.5 inch discs (all thirties had these very large servo assisted disc brakes as standard)
reconditioned brake servo
alternator
reconditioned drive shafts and callipers with new pads and 8.5 inch discs (all thirties had these very large servo assisted disc brakes as standard)
reconditioned brake servo
#43
Posted 18 December 2011 - 02:11 PM
fully reconditioned rear subframe
before
after
this subframe was on the boundary of needing replacing but we decided to repair it and it turned out really good. the radius arms were solid but needed a repair kit for the bushes. new poly bushes all-round.
you can also see the cleaned and painted steering rack and pinion
before
after
this subframe was on the boundary of needing replacing but we decided to repair it and it turned out really good. the radius arms were solid but needed a repair kit for the bushes. new poly bushes all-round.
you can also see the cleaned and painted steering rack and pinion
Edited by TH3aRchit3ct95, 18 December 2011 - 02:13 PM.
#44
Posted 18 December 2011 - 02:16 PM
front subby
before
after
new poly bushes and brake lines all-round
you can also see the recon pedal box, brake master cylinder and coil
before
after
new poly bushes and brake lines all-round
you can also see the recon pedal box, brake master cylinder and coil
Edited by TH3aRchit3ct95, 18 December 2011 - 02:17 PM.
#45
Posted 18 December 2011 - 02:20 PM
other little bits and pieces such as the wiper mechanism, rod change and some odd brackets
0 user(s) are reading this topic
0 members, 0 guests, 0 anonymous users