Jump to content


Photo
- - - - -

How To Fit New Core Plugs


  • Please log in to reply
25 replies to this topic

#16 MRA

MRA

    Previously known as 'mra-minis.co.uk'.

  • Banned
  • PipPipPipPipPipPipPipPipPipPip
  • 7,607 posts
  • Location: Due to move again....

Posted 13 March 2016 - 01:47 PM

I need to replace the far left one when standing inf ront of the engine ( Cylinder 4) Is it easy? Or hard?


I realise this is a little old, however.....


Just for reference, all parts on or in a car are taken as viewed from the drivers seat, ie the 4th core plug you mention is on the RHS of the engine


#17 Dusky

Dusky

    Crazy About Mini's

  • Members
  • PipPipPipPipPipPipPipPipPipPip
  • 5,322 posts
  • Location: Belgium

Posted 13 March 2016 - 02:16 PM


I need to replace the far left one when standing inf ront of the engine ( Cylinder 4) Is it easy? Or hard?

 
I realise this is a little old, however.....
 
Just for reference, all parts on or in a car are taken as viewed from the drivers seat, ie the 4th core plug you mention is on the RHS of the engine
But I have an LHD car ;)
i ve always seen the engine parts numbered from the water pump end anyway. Was the first job ive done on my mini, amazing how much rust comes out a 160k km engine!

#18 MRA

MRA

    Previously known as 'mra-minis.co.uk'.

  • Banned
  • PipPipPipPipPipPipPipPipPipPip
  • 7,607 posts
  • Location: Due to move again....

Posted 13 March 2016 - 02:34 PM


I need to replace the far left one when standing inf ront of the engine ( Cylinder 4) Is it easy? Or hard?

 
I realise this is a little old, however.....
 
Just for reference, all parts on or in a car are taken as viewed from the drivers seat, ie the 4th core plug you mention is on the RHS of the engine
But I have an LHD car ;)
i ve always seen the engine parts numbered from the water pump end anyway. Was the first job ive done on my mini, amazing how much rust comes out a 160k km engine!


lol, that is exactly why the hand of drive is not mentioned


I use a rust remover in one of my machines to just pour and flush to remove the rust, works well and I can just leave it till it's done.


Edited by MRA, 13 March 2016 - 02:37 PM.


#19 Cooperman

Cooperman

    Uncle Cooperman, Voted Mr TMF 2011

  • TMF+ Member
  • PipPipPipPipPipPipPipPipPipPipPip
  • 23,310 posts
  • Location: Cambs.
  • Local Club: MCR, HAMOC, Chelmsford M.C.

Posted 14 March 2016 - 07:36 PM

It is the same convention as a ship and an aircraft. Left (port) & right (starboard) are looking towards the front.

#20 sonikk4

sonikk4

    Twisted Paint Polisher!!!

  • Admin
  • PipPipPipPipPipPipPipPipPipPipPip
  • 16,053 posts
  • Name: Neil
  • Location: Oxfordshire

Posted 14 March 2016 - 07:42 PM

It is the same convention as a ship and an aircraft. Left (port) & right (starboard) are looking towards the front.


As the acronym ALF attests to, Aft Looking Fwd. 


#21 firstforward

firstforward

    One Carb Or Two?

  • Members
  • PipPipPipPipPipPipPip
  • 824 posts
  • Location: Cornwall

Posted 14 March 2016 - 09:42 PM

Any red port left? if you like drinking port that is..


#22 MRA

MRA

    Previously known as 'mra-minis.co.uk'.

  • Banned
  • PipPipPipPipPipPipPipPipPipPip
  • 7,607 posts
  • Location: Due to move again....

Posted 20 March 2016 - 05:42 PM

Did somebody mention port....


#23 weeally

weeally

    Mini Mad

  • Just Joined
  • PipPipPipPip
  • 130 posts
  • Location: Stirling

Posted 27 December 2021 - 01:07 AM

Yes they can be knocked in too far.

As above leave them level with the inner part of the chamfer...

I have a very specific tool for these that only allows them to get to the required depth.

The oil galleries need to be brushed through using a 3/8" diameter, long bottle or oil way brush.

I know this is an old thread but I'd like to see this tool you speak of if still about.

Do apologise just realised he is BANNED. Guess that answers my query haha..

Edited by weeally, 28 December 2021 - 11:05 PM.


#24 Spider

Spider

    Moved Into The Garage

  • Admin
  • PipPipPipPipPipPipPipPipPipPipPip
  • 15,010 posts
  • Location: NSW
  • Local Club: South Australian Moke Club

Posted 13 January 2022 - 10:04 PM

I know this is an old thread but I'd like to see this tool you speak of if still about.


Look up 'Boiler Tuber Cleaning Brushes', eg-

https://www.solobrus...e-tube-brushes/


There are a few different types, some for hand, some for power operation. Just those by hand will be quite satisfactory. You may not get a brush long enough to go right through the block, but if you come in from each end, you'll get them.

Don't go too 'fat' on the brush and I would recommend steel brushes, rather than brass or Stainless. You'll find after a few uses they may start shedding wires, at least with steel, a magnet works here. Also, after the final clean, use a small torch and look through every oil way, not just to check they are clean, but also that no wires are left behind.

I would also strongly recommend the Oil Pressure Relief Valve Seat be pulled, if for no other reason, so you can inspect the 3rd Main Bearing Oil Feed properly.


#25 weeally

weeally

    Mini Mad

  • Just Joined
  • PipPipPipPip
  • 130 posts
  • Location: Stirling

Posted 15 January 2022 - 09:34 AM

Thansk for that reply.

#26 Ifi

Ifi

    Starting My Mini Up

  • Noobies
  • Pip
  • 2 posts
  • Location: Raanana

Posted 05 May 2025 - 04:51 PM

In response to various questions apropos Welsh/Core Plugs:

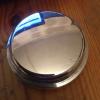
1. To remove the Cup shaped ones, shown in the picture, just bash them in on one side, so they turn sideways, then easy to remove with long nosed pliers. 

2. When you fit the new ones, get the outer rim flush, or slightly below the block level, just below any chamfer. South African made Blocks came with a slight chamfer.

3. You can use any sealant to seal them. Personally I use Permatex non hardening.


The Dome shaped ones are not quite so simple, hence the probable factory change to the Cup shaped ones, plus not having to machine the internal shelf.

1. To remove, drill a hole in the centre, large enough to take a suitable heavy screwdriver, or prybar, then prise them out.

2. When fitting, there is a shelf onto which they must be fitted snugly. 

3. When you tap them in, don't only bash them in in the centre!  That will only make them concave, with insufficient sideways spread! They can fall out! Instead, tap around about 1/4" to 1/2" from the perimeter, and then hammer them in in the centre, so that they lean towards being flattish, but not necessarily dead flat. 

4. Sealant is optional, as with cup types. 


Since both types are steel, they will rust if anti-rust/non-freeze coolant is not used. Don't use water! It attacks the aluminium thermostat housing and water pump, not to mention the core plugs! Apparently Brass plugs are available, but I've never had occasion to use such, so can't comment.


These are my methods of inserting and I've never had a failure in 60 years of restoring Minis.


1 user(s) are reading this topic

0 members, 1 guests, 0 anonymous users