got a crank mate, have to sort a time to maybe look at the xr2

Turbo 1963 Build
Started by
gorillas1963
, Mar 13 2012 02:32 PM
51 replies to this topic
#16

gorillas1963
-
- Validating
-

- 73 posts
Stage One Kit Fitted
- Location: south east london
- Local Club: london and surrey
Posted 05 August 2012 - 10:48 AM
#17
Yoda
-

- Traders
-
- 1,958 posts
Camshaft & Stage Two Head
- Location: Dartford, Kent
- Local Club: Medway mini club
Posted 05 August 2012 - 11:25 AM
Super. Michael will call you some time in the week. How you getting on with your build?
#18
gorillas1963
-
- Validating
-
- 73 posts
Stage One Kit Fitted
- Location: south east london
- Local Club: london and surrey
Posted 05 August 2012 - 09:25 PM
well i got the correct puller and its off so progress if ever so slight, few things ill have to test fit, how did micheal get on with making room for the turbo air filter, how much bulkhead did he remove because before i start weldin i want to make
sure theres enough removed
air filter + rad pipes + uprated actuator = no bloomin room
sure theres enough removed
air filter + rad pipes + uprated actuator = no bloomin room
#19
gorillas1963
-
- Validating
-
- 73 posts
Stage One Kit Fitted
- Location: south east london
- Local Club: london and surrey
Posted 18 August 2012 - 11:00 AM
got the bugger off, what a headache
#20
Yoda
-
- Traders
-
- 1,958 posts
Camshaft & Stage Two Head
- Location: Dartford, Kent
- Local Club: Medway mini club
Posted 18 August 2012 - 12:15 PM
Sorry, i missed your previous post regarding Michaels air filter. What we did ( turbo box was already fitted by previous owner ) was use a 90 degree bend hose on the end of the turbo and a short pipe straight up with a mushroom filter.No bulkhead cutting was needed. It was a tight fit with the actuator in place,(so i imagine with yours, it will be a pig) but it has been fine. Michael has already tried moving the filter a few times but it always ends up in the original position. He has now got a small ford intercooler and is waiting for payday to buy the necessary hose bends to install it in front of the servo. We have decided to go without oil cooler at the moment as running low boost, it really does not get very hot unless he rags it. He has also fitted a heat shield below the carb but it did not really make much difference. It has the usual difficult to start syndrome when hot, but foot on the loud pedal when cranking helps a lot.
Michael is away this weekend but i am sure he would be happy to visit and show off his handiwork when he is back some time.
Good luck and hope it all works out.
Michael is away this weekend but i am sure he would be happy to visit and show off his handiwork when he is back some time.
Good luck and hope it all works out.
Edited by Yoda, 18 August 2012 - 12:20 PM.
#21
gorillas1963
-
- Validating
-
- 73 posts
Stage One Kit Fitted
- Location: south east london
- Local Club: london and surrey
Posted 07 September 2012 - 01:35 PM
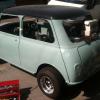
more progress recently ive test fitted the turbo with the 10psi actuator and it clears it - my only concern bein will there be enough room for the radiator hose, the air filter pipe and the actuator so the hole you see in the bulkheadhead now may be made larger after everyhting is test fitted
 IMG_0953.JPG 49.44K
14 downloads
IMG_0954.JPG 37.68K
1 downloads
IMG_0955.JPG 37.93K
10 downloads
IMG_0953.JPG 49.44K
14 downloads
IMG_0954.JPG 37.68K
1 downloads
IMG_0955.JPG 37.93K
10 downloads
also test fitted the carb and plenum and of corse they dont fit, so i need to do a slight cut to the top of the bulkhead where the clocks go, if you look closely you can see the pencil line where i will cut, i have no power in the garage so i and i needed to charge to cordless grinder batteries, job for the next weekend i have off
IMG_0950.JPG 31.26K
26 downloads
i fitted the revtec fan system to radiator which i think is a pretty cool little kit
IMG_0958.JPG 36.47K
8 downloads
once fitte to the radiator cowl and put in place i noticed that the cowl was hitting the breather on the casing, my usual modification here would need no more than a block of wood and a club hammer but i cant do that on this car so i made a small modification to the cowl as you can see
IMG_0956.JPG 82.8K
6 downloads
and now it all fits quite nicely, it looks very close so i may need to modify the inner wing to make sure the clearance is there for the revtec fan but with the dsn thermostat housing i think it looks good
IMG_0951.JPG 31.24K
18 downloads
also the steady parts from dsn, really chuffed with those
IMG_0952.JPG 44.21K
19 downloads
lastly for that weekend i got the callipers bolted on with all the blue hoses bolted on with copper washers, i had to spce the calliper away from the hubs ever so slightly with washers otherwise the wheels wont turn because it was all too close
IMG_0960.JPG 50.67K
14 downloads
IMG_0961.JPG 55.76K
16 downloads
IMG_0953.JPG 49.44K
14 downloads
IMG_0954.JPG 37.68K
1 downloads
IMG_0955.JPG 37.93K
10 downloadsalso test fitted the carb and plenum and of corse they dont fit, so i need to do a slight cut to the top of the bulkhead where the clocks go, if you look closely you can see the pencil line where i will cut, i have no power in the garage so i and i needed to charge to cordless grinder batteries, job for the next weekend i have off
IMG_0950.JPG 31.26K
26 downloadsi fitted the revtec fan system to radiator which i think is a pretty cool little kit
IMG_0958.JPG 36.47K
8 downloadsonce fitte to the radiator cowl and put in place i noticed that the cowl was hitting the breather on the casing, my usual modification here would need no more than a block of wood and a club hammer but i cant do that on this car so i made a small modification to the cowl as you can see
IMG_0956.JPG 82.8K
6 downloadsand now it all fits quite nicely, it looks very close so i may need to modify the inner wing to make sure the clearance is there for the revtec fan but with the dsn thermostat housing i think it looks good
IMG_0951.JPG 31.24K
18 downloadsalso the steady parts from dsn, really chuffed with those
IMG_0952.JPG 44.21K
19 downloadslastly for that weekend i got the callipers bolted on with all the blue hoses bolted on with copper washers, i had to spce the calliper away from the hubs ever so slightly with washers otherwise the wheels wont turn because it was all too close
IMG_0960.JPG 50.67K
14 downloads
IMG_0961.JPG 55.76K
16 downloads
Edited by gorillas1963, 07 September 2012 - 02:05 PM.
#22
gorillas1963
-
- Validating
-
- 73 posts
Stage One Kit Fitted
- Location: south east london
- Local Club: london and surrey
Posted 07 September 2012 - 02:05 PM
all comments welcome
#23
Yoda
-
- Traders
-
- 1,958 posts
Camshaft & Stage Two Head
- Location: Dartford, Kent
- Local Club: Medway mini club
Posted 07 September 2012 - 02:58 PM
Here's my comment!
Michael wants to meet up with you sometime to show you his handiwork LOL
Michael wants to meet up with you sometime to show you his handiwork LOL
#24
gorillas1963
-
- Validating
-
- 73 posts
Stage One Kit Fitted
- Location: south east london
- Local Club: london and surrey
Posted 07 September 2012 - 03:01 PM
i want to see his car, even to see the filter - i dont know if the mk1 bulkhead is a different shape/size but i seem to be havin a right palava with clearance
hes got myy number, theres a classic car show this weekend in kent i think im looking for it at the moment.
hes got myy number, theres a classic car show this weekend in kent i think im looking for it at the moment.
#25
Yoda
-
- Traders
-
- 1,958 posts
Camshaft & Stage Two Head
- Location: Dartford, Kent
- Local Club: Medway mini club
Posted 07 September 2012 - 03:33 PM
From the pictures, i would say your main issue is with the size of the actuator. M is not at home at the moment but will let him know to contact you soon. He is going to be out most of this weekend, but hey, he is a teenager!
#26
gorillas1963
-
- Validating
-
- 73 posts
Stage One Kit Fitted
- Location: south east london
- Local Club: london and surrey
Posted 08 September 2012 - 01:03 PM
fair play to him, least he can chase the girls quicker now hes turbo !!
#27
Yoda
-
- Traders
-
- 1,958 posts
Camshaft & Stage Two Head
- Location: Dartford, Kent
- Local Club: Medway mini club
Posted 08 September 2012 - 01:12 PM
He is outside doing a water pump and an engine mount at the moment and he has cancelled tonight's trip out so maybe he would like a run out later? I will ask him in a bit!
#28
gorillas1963
-
- Validating
-
- 73 posts
Stage One Kit Fitted
- Location: south east london
- Local Club: london and surrey
Posted 17 September 2012 - 01:33 PM
bit more progress on the bain of my life the bulkhead clearance issue, i decided to cut more out just to be safe so this is this weeks progress
IMG_1007.JPG 43.87K
6 downloads
IMG_1008.JPG 45.84K
5 downloads
IMG_1009.JPG 48.64K
3 downloads
IMG_1010.JPG 54.94K
11 downloads
IMG_1011.JPG 52.99K
13 downloads
IMG_1012.JPG 50.24K
9 downloads
IMG_1014.JPG 34.45K
11 downloads
IMG_1015.JPG 19.62K
11 downloads
ive noticed already that the paint has reacted it one little spot so thatll need fixing, then onto bigger bolt ons, looking forward to the next stage
IMG_1007.JPG 43.87K
6 downloads
IMG_1008.JPG 45.84K
5 downloads
IMG_1009.JPG 48.64K
3 downloads
IMG_1010.JPG 54.94K
11 downloads
IMG_1011.JPG 52.99K
13 downloads
IMG_1012.JPG 50.24K
9 downloads
IMG_1014.JPG 34.45K
11 downloads
IMG_1015.JPG 19.62K
11 downloadsive noticed already that the paint has reacted it one little spot so thatll need fixing, then onto bigger bolt ons, looking forward to the next stage
Edited by gorillas1963, 17 September 2012 - 01:44 PM.
#29
twistedtorment
-

- Noobies
-
- 60 posts
Stage One Kit Fitted
- Location: Surrey
Posted 18 September 2012 - 10:23 AM
Looks good m8! very clean! hope that stops clearance issues and you can crack on with bigger better faster bits
#30
gorillas1963
-
- Validating
-
- 73 posts
Stage One Kit Fitted
- Location: south east london
- Local Club: london and surrey
Posted 20 September 2012 - 08:22 AM
Looking forward to seeing more of this one. I like the early cars.
ive followed your build and commented on some bits, what a build that was - just goes to show you can save what you want to save i was lucky with mine it was dry stored for over 20 years


1 user(s) are reading this topic
0 members, 1 guests, 0 anonymous users


