At last an update.....
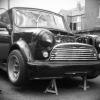
Bonnet - Like a mirror (apart from the dust specs) Boot lid after re prepping is coming along great, best results so far are the front wings and nearside (not done the offside yet)
Skortchio....I upped my ratio of paint to white spirit, now something more like 70 /30 and coverage is spot on and despite my early reservations re settling (it never settles when your staring at it!!!) it settles down lovely and smooth.
Roof....not happy but think that is down to my mis boughtopaint so will flattten back and start liquid gloss it with sdame ratio as above.
Will be taking pics tomorrow so watch this space!!
Oh I got 2.5ltr of a mixed colour from dulux (Gleddel i think) at £18 all in there are loads of colour options that they mix for the same price!

Roller Painting With Hammerite
Started by
L16m
, Apr 06 2012 01:24 PM
227 replies to this topic
#196

Big Man
-

- Members
-

- 1,002 posts
Put your trousers on---You're Nicked!!
Posted 30 August 2012 - 10:51 PM
#197
Skortchio
-

- Members
-
- 1,596 posts
Camshaft & Stage Two Head
- Location: Basildon
- Local Club: EMC
Posted 31 August 2012 - 09:46 AM
Nice to hear you're making progress, dude!
I know exactly what you mean about it settling, watching it and willing it to level and it just sits there!
I have to admit, my wings seem to be coming up best too. Although it might just be the contour giving that appearence.
I'm up to around 80:20 found that the more I do it and the more coats are on the more paint I can apply without losing quality of finish.
Yesterday was coat number 6 but how much remains after the wind, dust and rain I won't know until I go check.
Also go the first coat on the boot, scuppering myself from doing any other work by hanging it over the tool boxes...
I did pop in and ask the chap in the Dulux centre about the weathershield paint in terms of durability, he was inclined that it's main advantage was anti mould properties more than actual toughness. At least on a cost / benefit level. So I've stuck with the remaining 2L of paint, at least I won't be short of repair material
My roof is looking... I don't actually know.
But I did figure a way to get a coat of paint on it:
#198
Big Man
-
- Members
-
- 1,002 posts
Put your trousers on---You're Nicked!!
Posted 31 August 2012 - 06:11 PM
lol now thts a good way to get the roof done....why did I not think of that !!!
All I have doen today is prep prep and more prep....sanding every bit of rough paint on the whole car and filling a few holes. Oh and need to do my rear subframe too (bug g e r)
Oh and also changed the fuel filter on my Talivan and took an age to bleed the system and run right!
Finish work at three in the morning and will have another good day on the mini tomorrow hopefully get an all over coat of paint on !
Still not happy with my black roof though so it may go orange! or white....
#199
Skortchio
-
- Members
-
- 1,596 posts
Camshaft & Stage Two Head
- Location: Basildon
- Local Club: EMC
Posted 04 September 2012 - 05:34 PM
Penultimate coat went on today! (Hopefully).
A few small changes as my technique and confidence have improved, mostly in regard to the amount of paint going on per coat.
I'm only thinning maybe 10% now at most and using about 4 times the paint per coat than I started with. I think it's 2 part why, partially the earlier coats giving a uniform level to work upon and also I'm begining to trust the paint more, instead of trying to level it on application I'm throwing it on much heavier, moving onto another panel and then coming back to catch any runs / uneven patches.
Seems to be working so far, but had to rush the coat a little today (lift was waiting). Tomorrow will tell how it worked out.
But I've also cut back on the sanding between coats too, on comparing the difference between fairly flatted paint and quickly rubbed over, the difference after another coat was too small to notice. So more time saved there!
If all goes swimmingly tomorrow, I'll be done with painting for a week or so at which point I'll mask off the line between the colours and put the last coats of black on there. Then leave it all for a month before some polishing.
On the clear coat front, I can confirm that halfords clear lacquer and 1k ready to use clear coat are both out of the question. Unless you want crinkle cut paint!
#200
jakejakejake1
-

- Members
-
- 644 posts
Super Mini Mad
- Location: East Northants
Posted 04 September 2012 - 09:40 PM
Well done, I do have to say your car is looking fantastic!
#201
Skortchio
-
- Members
-
- 1,596 posts
Camshaft & Stage Two Head
- Location: Basildon
- Local Club: EMC
Posted 06 September 2012 - 07:23 PM
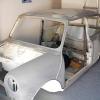
Aaaaaaaaaaaaand rest.
That's me done painting for a while (hopefully). Last coats are on, now to leave them a month or so to really cure before some polishing. I might... might, put one more coat on, thinned a little to get a nice finish while I wait.
The thicker coats seem to have given it a bit more knock resistence, although it didn't help much when I knocked the A panel with the end of a torque wrench earlier.
On the plus side, it only took a flick with some paint and it's completely covered. Silver lining, eh.
Overall, I'm pretty happy with how it's gone. I think that my concerns over the durability of the paint may be unfounded, after all cellulose will come off if you knock it with a sharp edge too. Factory paint is bomb proof (and covered in a cr*pload of lacquer), which skews the perspective a little.
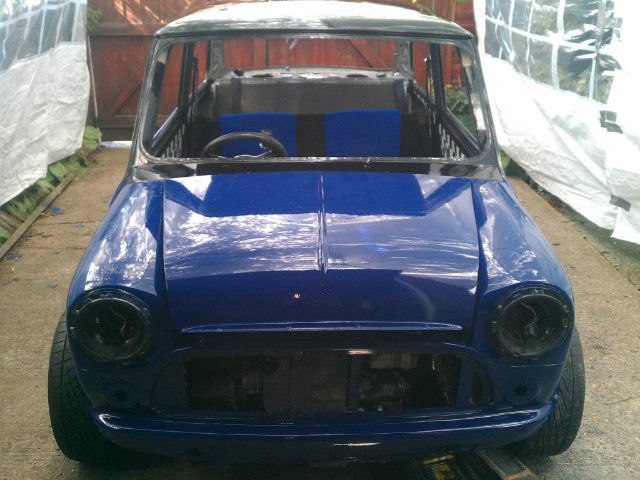
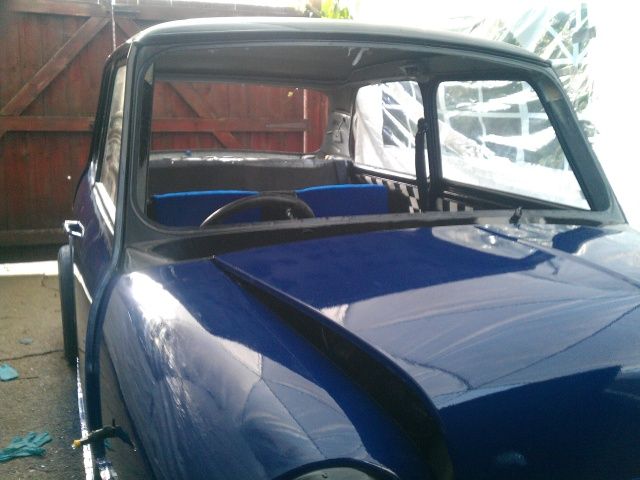
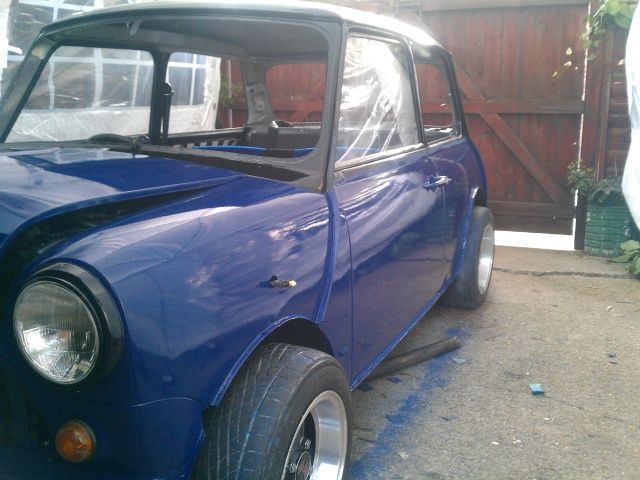
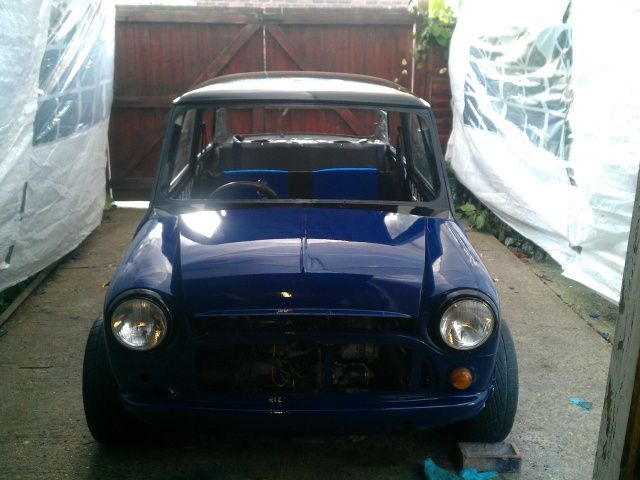
Here's some shots, there's still dust on the final coat which I'll probably take off with something gentle like Tcut in a week or so when I mask up to paint the line between the colours.
The finish looks a little orange peeled on the N/S but it's no worse than factory finish and I was expecting it due to the heavier coats.
That's me done painting for a while (hopefully). Last coats are on, now to leave them a month or so to really cure before some polishing. I might... might, put one more coat on, thinned a little to get a nice finish while I wait.
The thicker coats seem to have given it a bit more knock resistence, although it didn't help much when I knocked the A panel with the end of a torque wrench earlier.
On the plus side, it only took a flick with some paint and it's completely covered. Silver lining, eh.
Overall, I'm pretty happy with how it's gone. I think that my concerns over the durability of the paint may be unfounded, after all cellulose will come off if you knock it with a sharp edge too. Factory paint is bomb proof (and covered in a cr*pload of lacquer), which skews the perspective a little.
Here's some shots, there's still dust on the final coat which I'll probably take off with something gentle like Tcut in a week or so when I mask up to paint the line between the colours.
The finish looks a little orange peeled on the N/S but it's no worse than factory finish and I was expecting it due to the heavier coats.
Edited by Skortchio, 09 September 2012 - 09:15 AM.
#202
Minidarren83
-

- Members
-
- 1,207 posts
One Carb Or Two?
- Location: Stanford Le hope
Posted 06 September 2012 - 09:10 PM
I've got to say that looks fastastic looks like you got a real good Finnish on it well done For appointing yourself official Guinea pig to roller painting
#203
Skortchio
-
- Members
-
- 1,596 posts
Camshaft & Stage Two Head
- Location: Basildon
- Local Club: EMC
Posted 06 September 2012 - 09:23 PM
The finish has got a little more rough since I loaded the coats more, but that was a trade off for better depth and it will flat back easily.
(I hope)
It's pretty good overall, but I'm quite conscious of it being 'fresh' so ******* footing around it, haha!
(I hope)
It's pretty good overall, but I'm quite conscious of it being 'fresh' so ******* footing around it, haha!
#204
Big Sam
-

- Members
-
- 853 posts
One Carb Or Two?
- Location: Merseyside
Posted 09 September 2012 - 12:35 AM
Great thread, inspirational!
#205
conlad
-
- Noobies
-
- 2,054 posts
Previously known as ct16mini.
- Location: West midlands
- Local Club: Hilltop Minis
Posted 09 September 2012 - 08:44 AM
Skortchio, cracking work!! 
From starting the prep work to now how long would you say its taken?
From starting the prep work to now how long would you say its taken?
#206
Skortchio
-
- Members
-
- 1,596 posts
Camshaft & Stage Two Head
- Location: Basildon
- Local Club: EMC
Posted 09 September 2012 - 09:28 AM
Skortchio, cracking work!!
From starting the prep work to now how long would you say its taken?
Too long!

It's taken me personally, probably 3 weeks or more. But there's been a lot of other factors involved, both mini and personal that have slowed matters down.
In terms of the painting, you could probably calculate it as something like this.
(Assuming sound paintwork and repairs / filling done)
Stripping, masking, rubbing down: 1 day (full day, also if you just mask around the glass that would speed things up a touch).
Then it's a case of: Number of coats desires X days
My routine was something like this.
90 minutes to prep between coats: For me, this meant wet sanding the coat with 4-600 grit to remove any dust / bugs, washing with soapy water and then wiping down with spirits.
Cup of tea.
60 minutes to apply paint: Tacking the panel before hand, I'd lay a slightly thinned coat on fairly heavily getting good coverage all round. Then move onto panel 2. Once I'd covered panel 2, move back to panel 1 and catch any runs / sags / air bubbles / fish eyes / patchy bits / etc.
You could probably get 2 coats a day on if you were inclined to get up early and do one before work then one mid evening. But the paint would be a little soft so you'd need a garage to minimise dust etc and reduce the rubbing down phases to 1 per 2 coats.
Admittedly, when I started it took probably closer to 90 minutes just to put the blue coat on. By the end it was closet to 45 for both colours. It's mostly about learning how much paint you can apply at a time and trusting the paint to level itself and not watching it,

#207
conlad
-
- Noobies
-
- 2,054 posts
Previously known as ct16mini.
- Location: West midlands
- Local Club: Hilltop Minis
Posted 09 September 2012 - 12:00 PM
Sounds good! I love the DIY jobbies on here...
Definitely food for thought!
Definitely food for thought!
#208
jdawg558
-

- Noobies
-
- 39 posts
On The Road
- Location: Somerset
- Local Club: still looking
Posted 09 September 2012 - 06:25 PM
Let me know how it goes because i'm seriously considering doing mine in rustoleum. I've watched some stuff online and people seem to get a good finish so long as each coat is flatted back properly.
#209
Skortchio
-
- Members
-
- 1,596 posts
Camshaft & Stage Two Head
- Location: Basildon
- Local Club: EMC
Posted 09 September 2012 - 06:43 PM
Sanding between coats is only really necissary to remove bugs and dust that have settled while the paint dried and to remove any major imperfections in the surface, runs and such.
I semi flatted the paint every 4 coats, just to bring the high points down a little but that was all. If you flat too much you don't ever add any material
Getting the paint to lay down well is the key, better it lays the less you have to fix the next day.
I semi flatted the paint every 4 coats, just to bring the high points down a little but that was all. If you flat too much you don't ever add any material
Getting the paint to lay down well is the key, better it lays the less you have to fix the next day.
#210
tractor
-
- Members
-
- 662 posts
Super Mini Mad
Posted 10 September 2012 - 12:13 AM
Hi guys love your thread been following it for a while now and I thought I’d have a little go myself.
I’m nowhere near brave enough to do a whole car so I’ve started with the fuel tank, I’ve hand painted it with hammerite smooth and I’m pretty happy with it.
There are few marks tho which I hope will wet sand and polish out, my question is how long should I leave it until I can do this? I’ve read above you sometimes flat between coats so you must only leave it a couple of days at the most but then I’ve also read somewhere that you need to leave the paint a full month before you can wet sand.
How long will guys leave the paint to cure before you give it the final wet sand and polish?
Keep up the good work it's quite inspiring
Thanks
Trac


1 user(s) are reading this topic
0 members, 1 guests, 0 anonymous users


