three words. superb, and holy jesus! i know the feeling of stripping and building a car, but to do it in such a small timescale! hats off to you, only wish i had thwe funds to do the same!

General overhaul
Started by
Sprocket
, Apr 02 2006 10:22 PM
131 replies to this topic
#91

steveobennet
-

- Members
-

- 944 posts
One Carb Or Two?
- Local Club: stu's turbo club
Posted 04 July 2006 - 06:40 PM
#92
Sprocket
-
- Members
-
- 7,266 posts
Great on Injection faults
- Location: Warrington
- Local Club: Manchester Minis
Posted 06 July 2006 - 09:41 PM
Thanks for all the comments people, much apreciated 
As for progress, well thats now in the hands of the suppliers. Waiting on an input gear nose bearing for the gearbox, a primary gear thrust washer, a brake line and a heater valve blank plate. Hoping to get the engine in and running sunday and paint the rest of the panels in the evenings of next week. This may swap about depending on the parts turning up, but looking good for te MOT on friday now. If it fails then I'm going to sack it for getting the car to Avon, but I will still be going
As for progress, well thats now in the hands of the suppliers. Waiting on an input gear nose bearing for the gearbox, a primary gear thrust washer, a brake line and a heater valve blank plate. Hoping to get the engine in and running sunday and paint the rest of the panels in the evenings of next week. This may swap about depending on the parts turning up, but looking good for te MOT on friday now. If it fails then I'm going to sack it for getting the car to Avon, but I will still be going
#93
miniboo
-

- Members
-
- 9,327 posts
Lord of Original Thinking
Posted 06 July 2006 - 09:48 PM
now i may have missed something but what engine is going in at the moment?
1399 spi with turbo added later on?
looking good by the way
1399 spi with turbo added later on?
looking good by the way
#94
Sprocket
-
- Members
-
- 7,266 posts
Great on Injection faults
- Location: Warrington
- Local Club: Manchester Minis
Posted 06 July 2006 - 10:59 PM
This IS the engine that is going in. 1399cc normaly aspirated SPi.
The turbo SPi will be standard 1275 and is a project not yet started. But, in the mean time there is the 1275 16valve multi point fuel injected turbo sat on the shelf waiting to be finished
The turbo SPi will be standard 1275 and is a project not yet started. But, in the mean time there is the 1275 16valve multi point fuel injected turbo sat on the shelf waiting to be finished
#95
Mincento
-

- Members
-
- 443 posts
Speeding Along Now
- Location: Stoke-On-Trent
Posted 07 July 2006 - 01:25 AM
amazing project mate the time scale is truly astonishing i know of accidnt repair centres that could never hope to do it in that amount of time
the engine(S) sounds good especially the 1275 16v turbo thats the beemer head one isnt it?
wayne
the engine(S) sounds good especially the 1275 16v turbo thats the beemer head one isnt it?
wayne
#96
GraemeC
-

- TMF+ Member
-
- 7,440 posts
Crazy About Mini's
- Location: Carnforth
Posted 07 July 2006 - 07:08 AM
Some strange questions - just to see if I can make life easier for myself in the future!
I assume the gearbox and drive casing are assembled to allow you to measure and set endfloats etc. Can the block be added when they are as shown or do you have to take them apart again?
Will you have to remove the pot joint gaiters to replace the drive shafts? They look freshly installed on the pot joints, but how can you get the inner clip/cable tie onto the driveshaft? Or do you run without that clip/cable tie?
#97
Sprocket
-
- Members
-
- 7,266 posts
Great on Injection faults
- Location: Warrington
- Local Club: Manchester Minis
Posted 07 July 2006 - 09:33 AM
As you say the transfer case has been bolted up to the gearbox to check idler gear clearance, this will have to be removed again to fit the engine, there is no other way. I think this is the best and more acurate way to do it as you are measuring the gap in a real situation, the gasket has compressed up when torqued up.
The pot joints are pre assembled, the boot attaches to the center rose that the drive shaft slides into, it is a seperateble seald unit, no need to disturb it again, the drive shaft mearly pushes straight into the joint.
The pot joints are pre assembled, the boot attaches to the center rose that the drive shaft slides into, it is a seperateble seald unit, no need to disturb it again, the drive shaft mearly pushes straight into the joint.
#98
miniboo
-
- Members
-
- 9,327 posts
Lord of Original Thinking
Posted 08 July 2006 - 10:49 PM
i have been fitting the brace to my front end after chopping it off and wondered what you did about the hole for all the tubes that go to the carbon cannister. I only ask because one of the holes for the bar to be screwed on is directly over the hole!!
#99
Sprocket
-
- Members
-
- 7,266 posts
Great on Injection faults
- Location: Warrington
- Local Club: Manchester Minis
Posted 08 July 2006 - 11:23 PM
The brace bars I have fitted just come to the edge of the hole, one of the bolt holes is open to the big hole. The pipes still go through where they originaly did
You could just weld on a plate. I did this on the air vent hole in the front panel as one of the bolts for the lamp bracket would be fixed to nothing otherwise
You could just weld on a plate. I did this on the air vent hole in the front panel as one of the bolts for the lamp bracket would be fixed to nothing otherwise
#100
miniboo
-
- Members
-
- 9,327 posts
Lord of Original Thinking
Posted 09 July 2006 - 08:06 PM
So is the engine in then?
#101
Sprocket
-
- Members
-
- 7,266 posts
Great on Injection faults
- Location: Warrington
- Local Club: Manchester Minis
Posted 09 July 2006 - 10:13 PM
Aye it is 
Didnt have the time to get it running. It seems I am running in to more problems now then I have across the whole project. These just set you back and back. So it will be tomorrow for a run
One thing i am a little concerned about is the oil pressure is 90 psi when cranking over with the plugs removed and new 20w50 Penrite running in oil. Going to wait and see what its like when its running and has warmed up. I did fit a new Ball and spring and did notice that i had to compress the spring quite a bit. If its still a problem, I'll rob the piston and spring out the engine i took out and see if that makes any difference.
Everything works electricaly other than the indicators and the head light flasher. I have changed the stalks as the clip was broken. I got these from Mini and Metro spares in Warrington, so, chances are its the stalk that is actualy faulty, knowing them.
Not going to have the time to get paint on all the doors so will only be doing the bits that actualy need it for now. It'll be a bit of a harlequin of different whites. LOL
#102
Mincento
-
- Members
-
- 443 posts
Speeding Along Now
- Location: Stoke-On-Trent
Posted 10 July 2006 - 12:22 AM
Looks good and with the problems is still good progress, keep it up
wayne
wayne
#103
Sprocket
-
- Members
-
- 7,266 posts
Great on Injection faults
- Location: Warrington
- Local Club: Manchester Minis
Posted 10 July 2006 - 03:58 PM
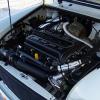
Fitted the fuel tank and had a go at starting the engine at lunchtime. after the first try, noticing the ignition timing was 180 degrees out when it backfired into the inlet. swapped the plug leads round and, woo hoo, it started. No leaks, no missfire no oil smoke, injection system running nicely.
Got to blead the brakes agian and also the clutch, fit the other driveshaft to the gearbox, tighten up the CV joint nuts and adjust the brakes. Thats the task list for tonight.
Got to blead the brakes agian and also the clutch, fit the other driveshaft to the gearbox, tighten up the CV joint nuts and adjust the brakes. Thats the task list for tonight.
#104
Pooky
-

- TMF+ Member
-
- 5,691 posts
Crazy About Mini's
- Location: Sunny Sussex
Posted 10 July 2006 - 04:11 PM
Sounds great mate!
Nice work! Bet you can't stop grinnin! and can't wait to take it out again!
Woo!
Nice work! Bet you can't stop grinnin!
and can't wait to take it out again!Woo!
#105
clarks.2006
-

- Members
-
- 545 posts
Super Mini Mad
Posted 10 July 2006 - 04:30 PM
Loving this project keep the pics coming cant wait to see it done. Cant remember the torque for the CV joint nuts but i know there a lot


0 user(s) are reading this topic
0 members, 0 guests, 0 anonymous users


