I'm going to do a step by step guide in fitting a Electronic Ignition Kit to a Mini with a 45D Lucas Distributor as the example but the Lucas 25/59Ds are done in exactly the same way.
I'm using a Powersparks Kit Model No K4 in my own Distributor as a example.
Important points before we start is
Reversing the Red and Black ignition wires will destroy the ignition module and void the warranty.
Using a coil with too little primary resistance can cause the ignition module to overheat and fail, thus voiding the warranty. This
Will Be Covered In The Install Guide.
Included in the Kit is:
The Ignition Module
The Trigger Ring
Small Cable tie
Heat Transfer Paste.
1. Remove the Distributor Cap And Rotor Arm, Check inside the Distributor Cap for cracks and condition of the segments for corrosion
2. Remove the Points and Condenser and the LT lead through the Distributor body and disconnect the wire from the connector.
3. Be Careful of the earth wire between the Baseplate and Distributor body
4. Apply a covering of the Thermal Paste to the bottom of the Trigger unit and secure to the Baseplate (This gives heat transfer away from the module)
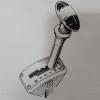
5. Install the module as shown in Picture 3 (I have removed the Baseplate only to show a better picture) You can do yours in place.
6. Once the Trigger Module is installed correctly and secured with the retaining screws, feed the wires and locate the cable grommet in the Distributor Body
7. Ensure the Red and Black cables have a run inline with the Distributor Body and are not pulled tight, this would not allow the Vacuum Advance to work if to tight. You can secure the 2 cables together with the small cable tie as required
8. Install the Trigger Ring onto the Distributor Shaft by locating the 4 cut outs correctly with the cam lobes and push down fully.
9. Install the supplied new Red Rotor Arm and replace the cap
Your now ready to connect the wiring. Negative Earth Vehicles
10.Connect the Black wire from the Module with the Male 6.3mm Spade Terminal into the wire you disconnected your points from.
11.Check the Vehicle Wiring on the Coil + (Positive) if you have one White Wire then your coil should be a 12v and connect it as per Picture 1
12. If you have a White/Pink and a White/ Yellow wire on the coil + (Positive) your car has a Ballasted Ignition System See below
Ballasted Ignition Wiring
13. Ballasted Ignition wiring is as follows. The Black wire from the Trigger Module remains the same on the Coil - (Negative) LT Wire
14. The Red Wire from the Trigger Module is Connected to a new 12v Ignition Feed from the Fuse Box.
Converting To A 12v Ignition System
15. You could if you bought a Kit convert the Ignition to a 12v System and then the White/Pink and White/Yellow wires are removed and the new 12v feed onto the + Terminal of the new coil.
Double Checking The Coil
16. How to test the Resistance of the coil, Place a Multimeter across the + and - of the Coil Terminals and a Ballasted Coil reads approx 1.5 Ohms and a standard Coil read approx 3 Ohms
I Recommend doing the conversion to a 12v Coil as the standard Ballast wiring the resistor has been known to overheat and damage the vehicles wiring loom
17. You are now ready to start the engine.
Start the engine and it is now time to check the Ignition Timing, This is because the Trigger Module and The Trigger Ring most likely has a different point in switching the Coil compared to the mechanical heal of the old Points.
Once you have set the timing in accordance with the Manufactures Specification its time to test the vehicle.
FAQ.
Can I increase my Plug Gaps? You can if you have a High Output Coil and the rest of your Ignition (Leads, Plugs, Cap) is in Good Condition Try 28/30thou as a starter and reduce if you get a misfire.
I have a Lucas 59D Distributor Does the small pin that moves the Blue Type points need to be removed? , Yes it does it prevents the Trigger Module From Locating Correctly See Picture 2 Below. I would remove the Baseplate and Cut the Post down, some have suggested bending it but I'd Nor Recommend That, as it could distort the Baseplate and prevent the Vacuum Advance from working.
If you require any more Information check out Powersparks website FAQs Here http://www.simonbbc.com/faq-page
Or Speak To Simon on 01527 889453 Which Is Always A Good Thing Being Able To Speak To A Supplier In The UK
Update
If after fitting your engine refuses to fire bring the trigger ring up below the rotor arm, or buy the rotor arm with the trigger ring made on it.
Attached Files
-
 powersparks2.png 141.78K
253 downloads
powersparks2.png 141.78K
253 downloads
-
Powersparks 3.png 186.78K
284 downloads
-
 pOWERSPARKS 1.jpg 66.72K
387 downloads
pOWERSPARKS 1.jpg 66.72K
387 downloads
Edited by KernowCooper, 15 August 2013 - 09:33 AM.