Jump to content


Photo
- - - - -

Time To Get My Mini Back To Its Best.


  • Please log in to reply
66 replies to this topic

#1 JamesGodfrey1992

JamesGodfrey1992

    Speeding Along Now

  • Members
  • PipPipPipPipPip
  • 422 posts
  • Location: West Lothian

Posted 25 November 2013 - 07:35 PM

Its been 4 years since my little mini has seen any daylight and i have decided that now its time to get it looking exactly how i want with maybe some unique touches along the way. 

This is how it was looking 4 years ago : 
IMG00245-20100317-1440-1.jpg

IMG00243-20100317-1439_Snapseed.jpg

IMG00250-20100317-1442.jpg

TheRear.jpg

IMG00336-20100720-1919.jpg


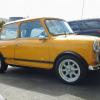
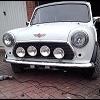
And This is how its looking currently: 
 

6DDC3DFB-3FC6-4BB1-A682-AD69B0D9B1D7.jpg

IMG_0669.jpg

IMG_0667.jpg

IMG_0668.jpg


My Plans are to completely strip and the interior and start from square one again and resorting to a 2 seater with a neat looking install where the rear seats would be and replace the current rover tomcat front seats for more supportive bucket seats. Currently the engine is a 998cc, but i have a 1380 metro turbo in the garage that i would love to get fitted by next year, i just need to get more knowledge on whats required to do so. 

Parts on the way this week are : 
new radius arms
1.5 negative degree lower arms
Complete polybush kit
New 8.4" brake discs and pads
Ngk spark plugs

8mm Ht Leads
4x New shock absorbers
2x Ball joints
2x Track rods
Service Kit 
Adjustable Tie-arms
Wipac Led Angel Eyes with Hid Bi-xenon kit
Wax oyl to

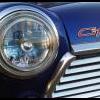
I'm also considering Vinyl Wrapping it for a fresh new look, however the imperial blue when polished looks stunning  :proud:


#2 the beasts

the beasts

    Stage One Kit Fitted

  • Noobies
  • PipPipPip
  • 80 posts
  • Location: christchurch

Posted 25 November 2013 - 07:40 PM

wow ! Great bones to start a restore with, Im watching this thread constantly , awesome mini you have mate. :D


#3 HarrysMini

HarrysMini

    I do not have short legs!!!

  • Members
  • PipPipPipPipPipPipPipPipPip
  • 3,352 posts
  • Location: .

Posted 25 November 2013 - 07:41 PM

Looks good, I'll be following.


Is that that the Ford Imperial blue?


#4 steven

steven

    One Carb Or Two?

  • Banned from Buying/Selling
  • PipPipPipPipPipPipPip
  • 1,195 posts
  • Location: Uk

Posted 25 November 2013 - 07:44 PM

Looks like a nice mini

Will be better if it's got a turbo engine

Good luck !

#5 JamesGodfrey1992

JamesGodfrey1992

    Speeding Along Now

  • Members
  • PipPipPipPipPip
  • 422 posts
  • Location: West Lothian

Posted 25 November 2013 - 07:44 PM

wow ! Great bones to start a restore with, Im watching this thread constantly , awesome mini you have mate. :D


Thanks mate, its a solid shell just the underneath stuff needs refreshing more than anything  :proud:


Looks good, I'll be following.


Is that that the Ford Imperial blue?


Thank you, 

Yeah thats the one  :D


#6 HarrysMini

HarrysMini

    I do not have short legs!!!

  • Members
  • PipPipPipPipPipPipPipPipPip
  • 3,352 posts
  • Location: .

Posted 25 November 2013 - 07:54 PM

Nice, that's the colour mines going to be. Looking forward to some pictures of it polished up (if you're keeping it, that is).


#7 JamesGodfrey1992

JamesGodfrey1992

    Speeding Along Now

  • Members
  • PipPipPipPipPip
  • 422 posts
  • Location: West Lothian

Posted 06 December 2013 - 04:14 PM

The Stripping down has started and so far its going really well, there's been a few trouble some nuts and bolts, nothing the angle grinder cant sort out though. 

I've started on the rear and once that whole area is complete i will get the front subframe and engine out and start the whole refurbishment on that area. 

1st job was to drop the complete subframe ready for stripping and ready for the new radius arms, rear drum assembly's, all bushes replaced for powerflex ones and to complete seal the underneath with anti stone chipping paint then wax oyl. 
 

IMG_0692.jpg

Next up was to remove the radius arms and rear drum assembly, both of these are being replaced with new parts which will hopefully be here by tomorrow. 

IMG_0694.jpg

IMG_0715.jpg

IMG_0712.jpg


Next up i wire brushed the subframe to find its in solid condition with light surface rust. 

IMG_0713.jpg


Then primer'd it ready for a coating of anti stone chipping paint and after that i will paint it in black hammerite. 


IMG_0717-1.jpg


Coated with anti stone chipping paint. 


IMG_0725.jpg


And whilst all that was drying a gave the underneath of the shell a clean and a thick coating wax oyled, making sure the arches are completely sealed. 


IMG_0720.jpg

IMG_0723.jpg


I will be given them another coat once its all dry. 
Hopefully i will have more updates by sunday evening  :D


#8 JamesGodfrey1992

JamesGodfrey1992

    Speeding Along Now

  • Members
  • PipPipPipPipPip
  • 422 posts
  • Location: West Lothian

Posted 20 December 2013 - 11:53 AM

Been a few weeks since i updated this as i was waiting on a few parts arriving. Thankfully they turned up before the christmas and that let me continue with the refurb of my mini. 

All the new parts compared to parts getting replaced : 

New Radius Arms:
 

IMG_0732.jpg


Replacement rear assemblies: 

photo1.jpg?t=1387539706


New brake drums to replace the tacky red ones :


photo2.jpg


Before fitting the parts i gave them a protection coat of black hammerite: 


IMG_0735.jpg


____


Next up was to get the subframe back onto the shell and start reassembling it  : 


IMG_0750.jpg


Hi Lo kit fitted and you can see the replacement polybushes fitted:


IMG_0747.jpg


Next up the radius arm, Alloy handbrake quadrant and 1.5 degree camber bracket :


IMG_0749.jpg


Where i got to before the end of the day was fitting the shock absorbers, rear assembly's and the hubs: 


photo3.jpg


So far so good  :D


#9 wilz1234

wilz1234

    Stage One Kit Fitted

  • Noobies
  • PipPipPip
  • 89 posts
  • Location: Westbury, Wilts

Posted 20 December 2013 - 12:20 PM

Looks fantastic! Very tidy :D


#10 JamesGodfrey1992

JamesGodfrey1992

    Speeding Along Now

  • Members
  • PipPipPipPipPip
  • 422 posts
  • Location: West Lothian

Posted 20 December 2013 - 10:47 PM

Thanks mate :)


#11 JamesGodfrey1992

JamesGodfrey1992

    Speeding Along Now

  • Members
  • PipPipPipPipPip
  • 422 posts
  • Location: West Lothian

Posted 15 January 2014 - 10:37 PM

The stripping of the front has started and so far everything has went really smoothly.


I started by removing the Calipers and then the Swivel hubs as there getting new balls joints and painted up to look good as new.


IMG_0730.jpg

IMG_0797.jpg
IMG_0796.jpg

Old Ball joints compared to new ones :

IMG_0798.jpg

Next up i drained the engine of all of its oil, most it was over the gearbox anyway due to the seals being perished in every possible place, as your be able to see in the next couple of pictures where i'm removing the gearbox rod

IMG_0828.jpg
IMG_0829.jpg

Finally i removed the last pieces around the engine which will allow me to remove it with ease. (Manifold, brake servo, distributor cap, leads, alternator, engine steady bars etc.)

IMG_0830-1.jpg
IMG_0831.jpg

And now the little 998cc is already for me to remove it

IMG_0832.jpg


#12 JamesGodfrey1992

JamesGodfrey1992

    Speeding Along Now

  • Members
  • PipPipPipPipPip
  • 422 posts
  • Location: West Lothian

Posted 15 January 2014 - 10:41 PM

Once the engine is removed i will likely start the rub down of the body work and get it all prepped for its fresh new look which i'm hoping i can pull off :)


#13 JamesGodfrey1992

JamesGodfrey1992

    Speeding Along Now

  • Members
  • PipPipPipPipPip
  • 422 posts
  • Location: West Lothian

Posted 16 January 2014 - 02:55 PM

Well i got the engine out this morning along with the front subframe which came at the price of some slices in the fingers. censored.gif mini's! laughing.gif

Engine tied up ready to be lifted :

IMG_0833.jpg

In progress :

IMG_0834.jpg

And its out D.gif

IMG_0835.jpg
IMG_0836.jpg

Next up to get the subframe out:

IMG_0837.jpg
IMG_0838.jpg


Next up is to get bodywork prepped for painting and to strip down the subframe, repaint it and get the polybushes fitted ).gif


#14 megamini_jb

megamini_jb

    Crazy About Mini's

  • Members
  • PipPipPipPipPipPipPipPipPipPip
  • 5,491 posts
  • Name: Jamie
  • Location: -

Posted 16 January 2014 - 03:06 PM

Cool, looks like you're making good progress. Will be following

#15 JamesGodfrey1992

JamesGodfrey1992

    Speeding Along Now

  • Members
  • PipPipPipPipPip
  • 422 posts
  • Location: West Lothian

Posted 17 January 2014 - 06:49 PM

Cool, looks like you're making good progress. Will be following


Thanks mate :)


1 user(s) are reading this topic

0 members, 1 guests, 0 anonymous users