Fiat Punto 1.2 16V Conversion......... Time To Get It Finished!
#1
Posted 29 November 2013 - 03:40 PM
The conversion is complete and it drives under its own power...... but that was pretty much as far as I got with it in 2009 after changing jobs and loosing my workshop.
So now I'm settled into my new workshop and have loads of space I want to get cracking on her and FINALLY get her to the high standard I want :)
Here's a link to the old thread I had from the first load of work I did on her:
http://www.theminifo...fast-road-mini/
A bit of history on the old girl....
I bought my Mini Advantage in 2006 with a stage 1 kit fitted and having apparently been "restored" over the previous 2 years. Being 16 at the time and excited about getting my 1st car I didn't have much of a look round it as it looked pretty enough :s
It had been painted with spray cans and had some Hammerite in the boot but I think that was about it. So in 2008 I bought a 1275 metro and began building a 1293 with all the extras, which made just under 100bhp thanks to the beautiful Catcam I had in it.
I repaired the floors, put on a new front end, rear valance and debumpered it. Painted her in BMW dolphin grey with a black roof, black sportspack arches and satin black ultralites. (All of which can be seen in the link up there ^^^)
In my haste to get it ready for the 2010 L2B I rushed to get it all back together and was never really happy with all of it. Then..... a week before the L2B the gearbox blew on the 1293 as the idles gear bearing gave up and threw teeth between every other gear in the box so I threw in a 998 I had for the L2B to which the head gasket went as I arrived in crystal palace. Grrrrrr
So with my new found hatred of A series engines I tightened the head bolts as much as I could and thrashed the hell out of it the next morning heading towards Brighton doing my best to destroy the engine.
.........I succeeded and the AA picked me up near the Gatwick turning on the a23 :)
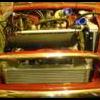
So after that I hid the mini away for a while in a dark barn. Then I needed a final year engineering project so started looking into engine conversions. Working at an automotive engineers I'd see a vast range of engines and cylinder heads come through the door. The Fiat Punto 16v 1.2 caught my eye as although it's only a 1.2 they are 80bhp standard and just over 110lb-ft of torque, they're also tiny so would fit under a standard front end, hydraulic clutch and cable gear linkage. Oh and 5 gears.
Yeh I know they've got their problems these engines and I'm sure someone will have to say "why even bother, it's a 1.2" or something about them being Italian and made of chocolate. Don't bother, I've heard it and I don't care. If u want to go put a 1000bhp engine into your mini then you crack on :) I wanted a fairly pokey daily drive.
I carried out the conversion and was in, running and driving. However when I changed jobs I couldn't keep it there anymore and no longer had my workshop. Unfortunately the only place I could store it was up my friends yard, outside where it sat for just under a year!
Heres a link to a few of the photos I put up on the 16v mini club of the conversion. There's not a massive amount there but I'll add some more detailed ones to this post at some point. http://www.16vminicl...?t=22201&page=2
Anyway, I've been in my workshop a few months now but haven't had a chance to work on the mini as I'm trying to save for a mortgage so been turning round a few other cars. Now I'm ready to crack on and have loads of new ideas for the old girl. Power steering and electric seats to name a few.
So here's how it's been sitting for the last 8 months, a mattress on the roof, half my girlfriends clothes in sacks inside it along with a double duvet, two picture frames, a suitcase and a double bed (in bits)
image.jpg 54K 18 downloads
Last night I was up the workshop and moved her into the larger of the two bays I've got and had a good sort out and clean up. This is where she's sitting now.
image.jpg 55.21K 14 downloads
image.jpg 71.57K 146 downloads
image.jpg 57.68K 14 downloads
I'll keep posting pictures as I go. Mainly to keep myself inspired and it's always handy to have the input of a load of people with some things :)
Oh and I'm also going to look at fitting this bad boy
image.jpg 60.05K 48 downloads
And will be purchasing a steering column from a Vauxhall Corsa soon for the EPS conversion.
So anyway, next update will be next week I expect once I've been up the workshop and started stripping it down!
#2
Posted 29 November 2013 - 04:50 PM
You won't hear any grumbles from me about the engine. I'm all for different ideas as apposed to normal run of the mill conversions. Its nice to see something different.
Good luck with it.
Ben
#3
Posted 29 November 2013 - 04:51 PM
#4
Posted 29 November 2013 - 05:48 PM
good lump for turboing!
#5
Posted 29 November 2013 - 06:33 PM
In for a penny, as they say!!!
(Or it might even make for a cheap trackday Cinque - sacrilege, I know!)
#6
Posted 30 November 2013 - 09:44 AM
#7
Posted 30 November 2013 - 10:08 AM
How are the gear ratios on this engine. At the end of the day, the box is half of the conversion...
IIRC the Cinque sporting box is set up to use 165/55/13 tyres, so very similar to 175/50/13s
#8
Posted 30 November 2013 - 11:32 AM
yeah, ratio's are about right, if you wanted somthing shorter for racing then the punto 6 speed box fits and is a bit lower geared in top.
the 1.4 is a different block, but the heads might be interchangable, I looked into this as the 1.2 head can be grafted onto the mini block, and I had visions of using the fiat 500 arbarth head and bits...
the 500 arbarth (which is a 1.4) chucks out about 130hp with factory upgrades to 160 and 200 hp.... apparently you can get them to 250 hp with no internal engine mods!
#9
Posted 02 December 2013 - 02:19 PM
I'm up the workshop this evening and hope to have most of the front end stripped out as well as what's left of the interior. Still not sure whether to keep the roll cage or not. I love the look through the rear windows but don't want to have to make extra cut outs in the Ka dash to fit round the cage. If anyone's seen photos of one of these dashboards fitted with a cage please send me the pics!!
#10
Posted 02 December 2013 - 02:34 PM
So....... 1293 with capooted gearbox out....
image.jpg 105.25K 22 downloads
Quick skim through eBay bought be this...
image.jpg 71.62K 25 downloads
image.jpg 53.18K 16 downloads
Engine, gearbox and pretty much everything I needed bar driveshafts and gear linkage for £150. Bargain!!
Then we had a shed load of snow which slowed down working out doors,
image.jpg 47.06K 7 downloads
But when it finally cleared I got to offer it up for the first time
image.jpg 71.41K 14 downloads
image.jpg 74.09K 19 downloads
And it clashed here....
image.jpg 62.96K 37 downloads
Here...
image.jpg 63.49K 21 downloads
Here...
image.jpg 70.24K 23 downloads
Oh and here...
image.jpg 56.71K 20 downloads
I'll upload some more photos once I've managed to sort through a load from my old memory stick!
#11
Posted 02 December 2013 - 02:55 PM
Started by trimming small bits off the subframe to see if I could keep any of it and strengthen it back after
image.jpg 82.89K 36 downloads
And got it to here
image.jpg 74.09K 12 downloads
Then though sod it, and cut it off from the turrets forward
image.jpg 63.41K 23 downloads
And it still didn't fit...... So a little more trimming and got it to here
image.jpg 68.28K 19 downloads
And then managed to hang the engine in the hole roughly where I wanted
image.jpg 76.4K 15 downloads
image.jpg 67.06K 7 downloads
image.jpg 60.34K 15 downloads
image.jpg 49.11K 9 downloads
#12
Posted 02 December 2013 - 04:49 PM
For some reason I can't find the photos of the subframe once it was complete. Any way here's some photos of the first bits of steel I lashed together.
I've just posted in the 'wanted' section as I'm after a front subframe or jig. In my haste I built this one in the car without making a jig first. Really not happy with the tie bar mounts at the front so wanting to cut the front off and jig it up!
IMG_0292.JPG 66.93K 10 downloads
IMG_0290.JPG 73.11K 10 downloads
IMG_0305.JPG 58.45K 22 downloads
IMG_0303.JPG 58.62K 10 downloads
IMG_0311.JPG 48.27K 27 downloads
Not a clue where the photos are once it was finished(ish) but had triangulated supports both sides and seam welded throughout.
The I bought some land rover engine mounts from ebay and made some mounts for this. I've seen the land rover ones used quite a lot as they're nice and simple
Only have a piccy of one side though the other bolts to the turret
Photo0326.jpg 68.93K 14 downloads
And this was the evening it was sitting in there with out the help of the crane!
Photo0329.jpg 60.85K 26 downloads
Photo0331.jpg 48.02K 12 downloads
#13
Posted 05 December 2013 - 11:44 PM
Mondays photos:
Rest of the interior out with just a few bits left
image.jpg 64.22K 4 downloads
Engine stripped down but couldn't lift it out as I couldn't find my socket for the hubs nuts so couldn't remove the driveshafts
image.jpg 72.45K 30 downloads
A quick shot of the boot, yes that is Hammerite, and yes someone has gone round the fuel tank
image.jpg 55.74K 14 downloads
And this is how I left her Monday night......
image.jpg 62.01K 3 downloads
So this evening......
Engine out
image.jpg 68.07K 2 downloads
Front subframe out, need to find another one now to make a jig and rework the front of this!
image.jpg 83.12K 36 downloads
Rear subframe out
image.jpg 61.19K 2 downloads
It was an absolute pig to get out! Two of the bolts snapped at the heel board and then to top that off the broken bolts that were left it the holes were so corroded to the mounts that my 1mtr level bar wouldn't even part them! In the end I had to get medieval with it so need to repair the heel board
The interiors completely stripped and the wiring looms out, not sure whether to take the pedal box out yet but I'll come to that later....
image.jpg 65.88K 5 downloads
And here is the ever growing pile of bits!
image.jpg 67.21K 8 downloads
Just the glass to come out now and I think I'll be ready so get it on the spit!
Next update will be this time next week I expect
#15
Posted 03 January 2014 - 04:06 PM
Upon the spit...
image.jpg 55.22K 5 downloads
And rolled completely over (scared the crap outta me the first time)
image.jpg 47.2K 6 downloads
The rear valance is completely gone at both ends. Really annoying as it was only put on 4 years ago but it's my own fault really as it didn't have a boot seal fitted when it was stored outside so the waters just seeped onto it
image.jpg 48.41K 3 downloads
The heel board needs repair sections welding in after having to get medieval to remove the rear subframe!
image.jpg 78.16K 3 downloads
So.... Rear valance, heel board, battery box and both sills and the I can get the underside sprayed and protected and then be able to start on the rest of the body
1 user(s) are reading this topic
0 members, 1 guests, 0 anonymous users