Jump to content


Photo
- - - - -

Three Classics. One Passion.


  • Please log in to reply
160 replies to this topic

#1 Stu.

Stu.

    One Carb Or Two?

  • Members
  • PipPipPipPipPipPipPip
  • 912 posts
  • Location: My workshop.

Posted 10 November 2014 - 10:45 PM

Hello,
 
I've been reading other members project posts for a good while now and have always been grateful for the photos and comments about their projects. I've learnt a huge amount from reading them.
 
I also thought that it must be good to have a record of work to look back on and keep the inspiration flowing.
 
So I've decided to do one for myself to keep a record of my progress.
 
I've got a 1979 850 which I'm trying to lightly restore without a full stripdown, and that's going well, and I've recently aquired another Mini, this time a 998 Auto which came in bits with the shell partly done. Well I say partly done, it's had a lot of patch repairs, some not too bad and some quite shocking, same old story really I suppose.


EDIT (27 June 2016) - I also now own a black Austin A30 which may make an appearance in these pages from time to time as I do work on him.
 
Anyway, it was not supposed to be a quick fix, as I wanted something to keep me quiet for a good few years, so it's all good really.
 
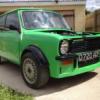
Below is Molly, my 850, currently just passed MOT and back on the road. I've done a lot to it over the past 18 months, recently tidying up the engine and engine bay.
 
640795F4-C0EC-46FE-8C77-B2821669B503.jpg
 
48773E32-3BDB-4B75-8685-6E6DEBA2AF0F.jpg
 
E2DF2AEE-C892-4173-9AF7-EAFABD9D3BE8.jpg
 
 
and this is Felix below. I'll be due to start on it very soon, but need to make / buy a rollover jig before doing too much, but I''ll see how it goes for now.
 
2CC4E63E-5E92-438D-8391-B37C3BF6F363.jpg
 
00F875EE-4F0E-4CB9-A464-26666F2C2981.jpg
 
D6045650-42DB-42B3-B027-405A1632FCB9.jpg
 
I've got a complete car, it's just all squirelled away wherever I can store it all for now, but I'll be concentrating on the shell till it's finished before doing anything else, and I recon that'll take a few years.
 
I'll post regular updates when I've made any significant progress, which I hope will be fairly often. Thanks for looking .........


Edited by Stu., 11 December 2016 - 09:10 PM.


#2 Carlos W

Carlos W

    Mine is purple, but I have been told that's normal

  • TMF+ Member
  • PipPipPipPipPipPipPipPipPipPipPip
  • 10,114 posts
  • Location: Sittingbourne, Kent

Posted 10 November 2014 - 10:56 PM

It looks like a good basis for a project. I've got parts hidden away under the bed and all sorts

#3 Stu.

Stu.

    One Carb Or Two?

  • Members
  • PipPipPipPipPipPipPip
  • 912 posts
  • Location: My workshop.

Posted 10 November 2014 - 11:07 PM

Yeah know what you mean.

Edited by Stu., 19 April 2015 - 07:04 PM.


#4 Stu.

Stu.

    One Carb Or Two?

  • Members
  • PipPipPipPipPipPipPip
  • 912 posts
  • Location: My workshop.

Posted 15 November 2014 - 06:18 PM

Started stripping off whats left of the sound deadenning to the tunnel and rear seat panel. Found some small areas of corrosion. This shells had lots of patch repairs with filler plastered over the welds instead of grinding them back. I suppose this is understandable as the interior would still have been in if local patches were done so grinders would be a no no due to the fire risk from the sparks.

226B758E-4713-4C68-9247-F1E198F07C81.jpg

Below is a photo of the drivers side arch repair. Looks like the corrosions been cut out and a new section planted on from the outsideE86A9DCD-D2F1-4138-8FDE-614D54FA298B.jpg

Some of the fillers pretty thick in places. Here at the floor to arch section its about 6mm thick, or should I say was, as Ive removed it all now. Ill need to strip everything back on the whole shell to see whats been done and whether Ill need to take it out or not.

D1BD09DB-CCF4-469B-A6B1-A610B9EDE627.jpg

This inner sill repais not too good. Its been welded on the top flange with the door step but its bare minimum welding to say the least. I know Ill need to take out the floor edge, inner and outer sill both sides and fit the full replacement section from M machine. Lots more to come I think082B8C7A-372C-4F8C-A9A0-690153C22EE4.jpg

Edited by Stu., 04 December 2014 - 11:38 PM.


#5 Stu.

Stu.

    One Carb Or Two?

  • Members
  • PipPipPipPipPipPipPip
  • 912 posts
  • Location: My workshop.

Posted 16 November 2014 - 07:59 PM

The curse of oversills strikes again. Looking forward to cutting the things off !

82D8403C-E235-44FF-9F1A-E0914B788062.jpg

#6 Stu.

Stu.

    One Carb Or Two?

  • Members
  • PipPipPipPipPipPipPip
  • 912 posts
  • Location: My workshop.

Posted 02 December 2014 - 09:14 PM

Not done much at all apart from making some bridge ramps to stop the castor wheels dropping into the gravel in front of the drive when I roll out the shell.

76421E20-F2A7-45DA-80C7-8D655C6855E4.jpg

I'm hoping my rollover jig will be delivered tomorrow from Handling Solutions :)

I'll need to get it painted before mounting the shell on it so I'm hoping it'll be delivered in the morning.

#7 Ben_O

Ben_O

    Mill Road Garage

  • Paint Doctor
  • PipPipPipPipPipPipPipPipPipPip
  • 9,794 posts
  • Location: Isle of Wight

Posted 02 December 2014 - 09:51 PM

shame about the previous 'repairs'


I was lucky with mine as it had only had outer sills (narrow thankfully) and a wing fitted in it's life apart from a few naughty patches on the drivers front floor pan.


I hate removing other peoples patches, you never know what you are going to find.


Yours looks ok though!


Hope it all goes smoothly mate


Ben


#8 Stu.

Stu.

    One Carb Or Two?

  • Members
  • PipPipPipPipPipPipPip
  • 912 posts
  • Location: My workshop.

Posted 02 December 2014 - 11:47 PM

Cheers Ben. Once its on the jig I'll know more I guess. The underside and arches have been finished in black hammerite and underseal so its difficult to tell whats good / bad, but I'm going to have to strip it all back to see whats been repaired and how good / bad it is.

I'll post up some pics once its on the rollover jig.

#9 Ben_O

Ben_O

    Mill Road Garage

  • Paint Doctor
  • PipPipPipPipPipPipPipPipPipPip
  • 9,794 posts
  • Location: Isle of Wight

Posted 02 December 2014 - 11:51 PM

that under seal goop is just awful. I scraped it off of mine and beneath was red raw with rust.


Good luck and i look forward to seeing your progress!


keep up the good work


Ben


#10 Stu.

Stu.

    One Carb Or Two?

  • Members
  • PipPipPipPipPipPipPip
  • 912 posts
  • Location: My workshop.

Posted 04 December 2014 - 09:34 PM

Parcelforce delivered my rollover jig this afternoon. If I've got time tomorrow I'll paint the parts before assembly

ADA81384-FAF2-4334-AF94-3EE4C4F83A3B.jpg

:)

#11 MINIMADrt

MINIMADrt

    Speeding Along Now

  • Members
  • PipPipPipPipPip
  • 465 posts
  • Location: oxford
  • Local Club: none at mo

Posted 04 December 2014 - 10:34 PM

Hello were did u order your jig from. Is it the scaffold bar one. Was it pricey sorry looking for a decent one my self.

#12 MINIMADrt

MINIMADrt

    Speeding Along Now

  • Members
  • PipPipPipPipPip
  • 465 posts
  • Location: oxford
  • Local Club: none at mo

Posted 04 December 2014 - 10:34 PM

Hello were did u order your jig from. Is it the scaffold bar one. Was it pricey sorry looking for a decent one my self.

#13 Stu.

Stu.

    One Carb Or Two?

  • Members
  • PipPipPipPipPipPipPip
  • 912 posts
  • Location: My workshop.

Posted 04 December 2014 - 11:18 PM

No, it has front and rear frames which bolt to fixing points removing the need for the pole. It was quite expensive compared to others but it should be properly balanced when set up. I've had experience with pole jigs before but find they cant give 360 degree free balance like this one. Handling Solutions make them (they have a web site). Once I've painted and assembled it I'll post up some pics and let you know what I think of it.

Edited by Stu., 04 December 2014 - 11:47 PM.


#14 MINIMADrt

MINIMADrt

    Speeding Along Now

  • Members
  • PipPipPipPipPip
  • 465 posts
  • Location: oxford
  • Local Club: none at mo

Posted 05 December 2014 - 07:00 AM

Ok perfect thank you

#15 Stu.

Stu.

    One Carb Or Two?

  • Members
  • PipPipPipPipPipPipPip
  • 912 posts
  • Location: My workshop.

Posted 06 December 2014 - 07:55 PM

So before I put the jig together, I painted it with Bonda Rust Primer with zinc, to stop the metal developing surface rust.

03510CC1-077F-4BB2-8D06-79CEF273E01C.jpg

Then I made up the A frames.

2E9438E7-1B21-4A91-B1EC-2B4262B0346E.jpg

I also bought the castor set as I wanted the jig to be mobile so I can roll it in and out the garage.

A337D0E6-1B0C-49A5-AD3F-F8F146E7ABC9.jpg

FF4EFD01-9028-4BB5-B1A1-823331BAF6B2.jpg

4CE12AA7-7002-49A3-BC10-0AE187C10AA8.jpg

I've got to say I'm very impressed with the jig. The shell sits very high, which has given me a few headroom issues in the garage, but nothing I cant get over. It's all very very solid, spins really easily and is perfectly balanced in all positions.

It certainly wasnt the cheapest jig out there, but im more than happy with it bearing in mind the shell will be on it for a few years. I can also spray the shell while its on once I've completed the bodywork.

Edited by Stu., 06 December 2014 - 08:20 PM.


1 user(s) are reading this topic

0 members, 1 guests, 0 anonymous users