Great work on the subframe plates.


95 Sprite Rebuild & 16V Conversion
Started by
alchall
, Nov 11 2014 05:27 PM
691 replies to this topic
#257

alchall
-
- Just Joined
-

- 604 posts
Super Mini Mad
- Location: Chorley
Posted 10 May 2016 - 11:31 AM
Those doors dont look to bad seen worse :) hope you get em done soon.
My second hand doors were in worse condition than those. At least they are easy to repair
Yep, I was really expecting them to be in much worse condition, especially considering how damp they seemed to be inside when I first took the thing apart!
Great work on the subframe plates.
Thanks mate!
#258
alchall
-
- Just Joined
-
- 604 posts
Super Mini Mad
- Location: Chorley
Posted 27 June 2016 - 01:35 PM
Over the past few weeks work has got in the way so I've not been able to get a whole lot done.
I have done most of the seam sealing now, a few area's need to be done and a small number of places need an extra blob where I had missed a bit, a few photo's....


A couple of spots will need tidying up before going to paint but at least there's some extra protection in place now.
I also took the skin of the boot lid, I was quite shocked to find so much rust in here as it looked good on the surface.
I was also amazed to find a thick coat of filler on the outside of the boot skin too, I uncovered this when I took the grinder to the spot welds from the skin side to avoid damaging the frame....

I assume it must have had some kind of bump at the rear and it's been patched up with filler, it's very thick!
I also found that around the edge there had never been any paint on the frame which explains the shocking rust, for example....

This is what the rust looked like when the skin popped off....

So I decided to take the wire cup brush to it to find out how bad this is....


As you can see, very badly pitted and quite extensive so I'm going to have much more of a repair job to undertake here than I anticipated!
Edited by alchall, 02 September 2017 - 08:51 AM.
#259
ger
-
- Just Joined
-
- 233 posts
Mini Mad
- Location: The Land Of Song
- Local Club: M4 Minis
Posted 27 June 2016 - 03:39 PM
Great work. Just doing my bootlid and bonnet. Not quite as much rust as yours but still had to patch the lip near one side by the hinges. And yes there was less paint on my frame than yours.
Ger
#260
minimissions
-

- Members
-
- 3,427 posts
Up Into Fourth
- Location: North West
- Local Club: M.M.O.C
Posted 28 June 2016 - 05:45 AM
Nice work as always this is really coming along now :)
#261
blueovalcraig
-

- Members
-
- 193 posts
Mini Mad
- Location: Rothesay, Isle of Bute
Posted 28 June 2016 - 09:08 AM
Cracking job you are doing. want to do mine too?
#262
alchall
-
- Just Joined
-
- 604 posts
Super Mini Mad
- Location: Chorley
Posted 28 June 2016 - 12:59 PM
Great work. Just doing my bootlid and bonnet. Not quite as much rust as yours but still had to patch the lip near one side by the hinges. And yes there was less paint on my frame than yours.
Ger
Thanks! I was surprised to find no protection whatsoever on the edges of the frame, especially as the inside of the frame itself had clearly had both primer and base coat applied.
Nice work as always this is really coming along now :)
Cheers!
Cracking job you are doing. want to do mine too?
Haha I can only imagine the trouble I would be in if I brought another one home to do, especially if it wasn't mine!
#263
alchall
-
- Just Joined
-
- 604 posts
Super Mini Mad
- Location: Chorley
Posted 12 July 2016 - 03:35 PM
Last week I had a few days off so was able to spend a bit of time on the mini, I did a bit of touching up of the seam sealer (no photo's), repaired and primed the boot lid frame, made a start on repairs to door frames and did a bit of spray paint practice! I'm intending to at the very least do all the prep and priming myself, may see how good a job I can do at painting then decide whether or not to get it done professionally or have a stab myself, if I can get a good finish with a base coat and 1K lacquer (Upol Smart Clear seems to get good press) then I may do it my self but will need to be absolutely sure before I head in that direction.
Anyway, onto some repairs, first up much cutting out rust and stitching in fresh steel around the edge of the boot lid frame, I did this in sections and was careful to use the pieces I cut out as a template for the new to ensure I got the profile right.
First part cut out, stitched in and ground down....


Looks good, so I made may way all the way around, a few sample photo's....


I then broke out the Deox Gel to give the remainder a thorough de-rust, some bits of pitting but not enough to make me feel inclined to carry out any further repairs, ended like this....


Then I completely stripped it of paint...


And then a blast of Electrox for protection....
[

After a bit of paint practice (I'll get back to that shortly), I then gave the inside of the frame a couple of coats of Epoxy Primer, more of Bilthambers finest (I've had good results with all their products to date so decided to stick with them for this despite not being the cheapest available).

I then turned to one of the door frames, I found that this actually was bent at the hinge end so I had to do some hammering to get it straight, I didn't take photo's before or straight after but it's more or less right but will need some filler to finish it off.
Having cleaned up the gunk and wax oil from inside the frame as best I could I turned my attention to this bit of damage / rust....

Cut it out and created a new piece....

And these seem to be the only photo's I took of the finished article...


You can see in that photo some of the remaining damage where the frame was bent and I've hammered it back straight and I had also Deox Gelled the edges (the bottom part I have a repair piece on order for).
I think I'm going to have to do some more drastic deconstruction of the door frame however as there is rust lurking in places such as the stiffening plates so I gave up for the time being.
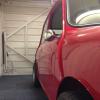
So a few words now about my first attempt at spraying, I have kept hold of the old door and boot skins for exactly this purpose, so I cleaned and sanded one down, and then used some panel wipe followed by a tack cloth to get it ready.....

And my first attempt was actually not too bad, it went on nice and evenly but it has some orange peal so I did a bit of tinkering with settings on the gun, and gave it another go the next day, here's the first attempt....


The next day I flatted it back to remove the orange peel effect then applied another couple of coats, slightly better but still not perfect, decided it was good enough for inside the boot frame as it'll never be seen but going to have another crack next weekend, I'm going to use a larger needle in the gun and some different thinners, I'd used Xylene which the instructions say are ok but it recommends 2K thinners so I have some on order. The result of my second attempt....


So the orange peel is less pronounced but I have collected some dust as it was a windy day and I was painting with the garage door open, anyway, more practice required but considering it's my first attempt I'm fairly pleased.
Edited by alchall, 02 September 2017 - 08:58 AM.
#264
James_eaton_thewholething
-

- Members
-
- 1,063 posts
One Carb Or Two?
- Location: Manchester
Posted 12 July 2016 - 03:55 PM
Is that primer you sprayed. If so what type was it ?
Repairs look good though
Repairs look good though
#265
alchall
-
- Just Joined
-
- 604 posts
Super Mini Mad
- Location: Chorley
Posted 12 July 2016 - 04:02 PM
Is that primer you sprayed. If so what type was it ?
Repairs look good though
Thanks!
And yes primer, Bilthamber epoxy mastic - http://www.bilthambe...gs/epoxy-mastic
I also have some of their flat face high build primer, 1 litre of flame red base coat and 1 litre of Upol Smart Clear 1K to give everything a shot, will enjoy giving it a go at the very least!.
I also want to use the base coat as well as primer inside the frames and skins to ensure adequate protection.
#266
James_eaton_thewholething
-
- Members
-
- 1,063 posts
One Carb Or Two?
- Location: Manchester
Posted 12 July 2016 - 04:35 PM
What size fluid tip are you using to spray the primer with of you don't mind me asking ?
#267
alchall
-
- Just Joined
-
- 604 posts
Super Mini Mad
- Location: Chorley
Posted 12 July 2016 - 04:46 PM
What size fluid tip are you using to spray the primer with of you don't mind me asking ?
That was a 1.4 - I have 1.3, 1.4 and 1.8, I'm going to try the 1.8 next
#268
James_eaton_thewholething
-
- Members
-
- 1,063 posts
One Carb Or Two?
- Location: Manchester
Posted 12 July 2016 - 04:49 PM
1.8 is good for primer as its thicker. I use a 1.5 for everything. I get what looks like factory paint with it.
#269
Daz1968
-

- Members
-
- 2,058 posts
Up Into Fourth
- Location: Dudley
Posted 12 July 2016 - 05:12 PM
A larger nozzle like 1.8 or 2.0 mm will be better for thick primer, but it's not really a problem as it needs flatting anyway and should be easy to flat, I have used upol 1k clear before and found it pretty good and flats and polishes very easy.
#270
alchall
-
- Just Joined
-
- 604 posts
Super Mini Mad
- Location: Chorley
Posted 13 July 2016 - 07:51 AM
A larger nozzle like 1.8 or 2.0 mm will be better for thick primer, but it's not really a problem as it needs flatting anyway and should be easy to flat, I have used upol 1k clear before and found it pretty good and flats and polishes very easy.
I will try the 1.8 this weekend and see how I get on....


2 user(s) are reading this topic
0 members, 2 guests, 0 anonymous users


