Nice work on the bootlid and door. Just doing this with mine atm.
Ger


Mini Mad

Posted 13 July 2016 - 12:05 PM
Nice work on the bootlid and door. Just doing this with mine atm.
Ger
Super Mini Mad
Posted 13 July 2016 - 05:43 PM
Nice work on the bootlid and door. Just doing this with mine atm.
Ger
Thanks!
Looks like you've completely dismantled your door, think I'm going to have to go down that route too so it's a bigger job than I had hoped (that's hardly unusual though for this project!)
Mini Mad
Posted 14 July 2016 - 06:34 AM
I've found that it doesn't matter if the panels were original or heritage ones I've just bought there is no corrosion protection between welded panels, e.g. when I bought a new bulkhead crossmember I had to take the inner wing strengthners off it to fit Clubby ones there was nothing underneath.
Ger
Super Mini Mad
Posted 14 July 2016 - 08:42 AM
I've found that it doesn't matter if the panels were original or heritage ones I've just bought there is no corrosion protection between welded panels, e.g. when I bought a new bulkhead crossmember I had to take the inner wing strengthners off it to fit Clubby ones there was nothing underneath.
Ger
That's shocking! I noticed when I removed brackets from then new floor that there were some area's missing protection, I think if I do this again I'll go with parts that aren't assembled and for parts that do have some bits assembled I'll do what you have and take them apart myself.
Super Mini Mad
Posted 29 August 2016 - 09:22 PM
Once again I've left it a while for an update and it will be a it of a lengthy one, also probably the last for a few more weeks as I'm going to be moving house soon so it's all getting packed away, good news is I have double the garage space to work in though at the new place!
Well the door repairs are taking quite some time and still not done, turning into a fiddly job.
One last update on the boot lid frame though, gave it a coat of base coat in flame red, the colour the car was originally and will be going back to....

I'm still waiting for the boot skin to arrive so that's on hold for now.
I decided that there was clearly rust lurking around in the door frame so I took it upon myself to take it all apart, and there was even more rust that I anticipated so a good thing I did this.


After some mechanical rust removal and Deox C soaking I got the rust off the parts and I cleared the rust off the frame using Deox Gel.
Quite a bit of pitting but only one area of the parts removed was of concern but I patched this up by applying some weld rather than cutting and replacing as it's a thickness of steel I didn't have to hand and was only a small area.
Cleaned up...


The bad area of pitting....

Some parts of the frame were also badly pitted so some bits and pieces did need cutting out and replacing, some examples....


Then it was on with the repair piece at the bottom, first out out and ready to fit....

And welded in....

I also dismantled the other door and cleaned up the parts that I removed, the panel itself was put to one side for the time being.
But all the parts removed cleaned up nicely, this side wasn't quite as bad but as rusty.

I also cleaned up the rust on the top parts of the frames where the fit into the main door section, no pictures of these though.
All then cleaned up and given a coat of Electrox....


After leaving it a few days I then applied some epoxy primer...


And base coat...


Today I started welding then parts back together for the frame on the first door, all welds cleaned up and then a coat of electrox, will get a coat of primer and base coat as before on the edges that will meet the frame / be out of reach when together before I finish assembling this door....


Also today I made a start on the repairs to the other door, top corners needed patching...


And a bottom repair section, this one needed a different repair piece as the damage was different, the magnum panel was quite a large section and not really a perfect match so I cut it back to the minimum that I really needed....


So that is where I have left it, the welds all need tidying up and there's some re-shaping to do where the repair panel isn't a perfect match for the original door and it all needs a good clean up, strip back and de-rust before it can be painted ready for re-assembly.
Edited by alchall, 02 September 2017 - 09:07 AM.
Mini Mad
Posted 30 August 2016 - 11:35 AM
Nice work as always
Ger
Up Into Fourth

Posted 30 August 2016 - 01:04 PM
Wow that is some serious door repairs there, it will be 100% rust free at the end of this build.
Mill Road Garage

Posted 30 August 2016 - 06:58 PM
The door repairs look great!
They certainly do take a lot of time though don't they.
Keep it up!
Ben
Super Mini Mad
Posted 30 August 2016 - 09:20 PM
The door repairs look great!
They certainly do take a lot of time though don't they.
Keep it up!
Ben
Cheers, and yes, surprisingly time consuming, and I was surprised to find so much rust hidden away to be honest, although quite why I'm surprised when I turn up any rust after all this is beyond me 
Super Mini Mad
Posted 03 April 2017 - 02:44 PM
Finally after a few months away from the mini I've managed to make a start again, I moved house and now have a much better and bigger garage to work in which took me a little time to get ready (sufficient power sockets, lighting etc.).
So here she is in her new home....

Where I left off I had made a good start at repairing the doors, which turned into a much bigger job than I had anticipated, anyway, back on it I have started to re-assemble, one of which is almost there with the exception of the skin, needs some welds grinding down and some tidying up and painting before the skin goes on....

And I have applied some repair patches to the bottom of the other, this needed more work and isn't perfect so is going to need some filler to tidy it up properly....


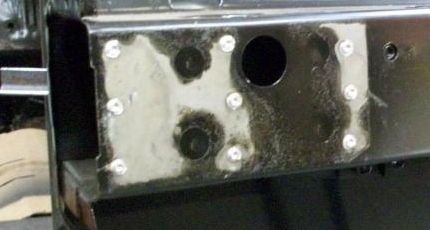
I also drilled some holes on the underside for the fuel pipe brackets and p-clips for the brake lines....

I also cleaned up the fuel line brackets and found that the lines themselves are badly corroded so will have to make up some new ones I think to be on the safe side.
That's about it really but two other updates....
Some time back I had attempted re-creating this crusty old relay bracket from the front bulkhead...


Which was not easy, but I recently noticed that they are available from Somerford, a bit expensive for a small part but better than me botching something together, as you can see, looks far better!

And I have also been looking for a new front subframe, I decided that the original was not worth trying to salvage, I wasn't happy that it appeared to have some repair plates and I had also noticed one of the top bolt holes was bent slightly. I had been considering buying new but they're very expensive so I have kept my eye out for a good quality used example and this weekend one turned up, after a good clean up I think I've landed what must be one of the best examples I could have found, it's from a '94 car so the right vintage and clearly had been far better looked after and was only £65....


There's some rust where you would expect it but it's not excessive and everywhere else has a really good original paint finish still in place, my old one had pretty much no paint and was rusty everywhere!
Edited by alchall, 02 September 2017 - 09:40 AM.
Super Mini Mad
Posted 03 April 2017 - 02:48 PM
Oh and I'm not sure what's going on with my photo bucket, all my old photos' don't show despite my account suggesting they are all there, they are using space, I just can't see them!
Super Mini Mad
Posted 24 April 2017 - 12:44 PM
So it looks like all my old photo bucket photo's are gone for good, they say they had a problem that affected a small number of users and have no outlook for fixing it.
Anyway, back to the car!
I am nearly done with the door frames now, both fully built up, one all painted inside the other just needs a lick of paint to finish off...


I applied some paint to the inside of the door skins (badly, so thankfully it will never be seen!) and stuck in some sound deadening so they are now ready to be fitted....

Next up I adjusted the passenger side A panel that didn't quite fit properly, extended with a length of filler rod....


Doesn't look to bad and after a bit of a skim of filler should be fine, hopefully not too much of this treatment will be needed for the doors to look half decent!
And the car is now finally off the rollover jig, don't think I need that anymore so will probably sell it on.
I knocked up a little trolley to move the car around on, pretty easy to make and slightly stronger than a pallet but didn't cost very much....

It's pretty neat and is really easy to manoeuvre, the car really does look small in the garage now!
The eagle eyed may spot the new bonnet on the wall behind, I decided against taking the old one completely apart to get rid of the rust so bit the bullet and bought this, it's a genuine part and thankfully fits nicely, in fact I would say it's better than the original although the gaps are now quite tight at the front so it's probably just slightly different.
So with it off the jig I fitted the new relay bracket to the bulkhead, looks quite neat....

Also, in the boot I decided to fit a MK1 spare wheel boss to keep it nicely wedged in when on the move, was a fairly cheap addition.

So that's pretty much it for the main shell now, a couple of little tidy ups to do but otherwise it's ready to go to a paint shop so need to start my research. I'm going to leave them to strip the roof, far too messy a job to contemplate in my nice new garage
I'm back on to the doors now, I cleaned up the hinges and found that not only were they very rusty (cured that problem) but the studs were in some cases quite badly bent....

So after a bit of research, out they came and new ones screwed in and tack welded from behind, look quite nice but the welding could have been neater, found it a bit tricky to do....


One of them was also very loose and the pin didn't seem to move in the same way in relation to the hinge as the others, so I knocked the pin out, much rust lurked inside and the pin is rotten...

So the hinge is back in the deox C to be un-rusted inside and I've ordered a set of new pins, I may replace all 4, will see how this one goes back together first.
That's it for now, I will probably be out of action again now for a month as I'm off on holiday for 3 weeks next week so back on to finishing doors and boot when I return and a major milestone should then be reached!
Edited by alchall, 02 September 2017 - 09:44 AM.
Up Into Fourth
Posted 24 April 2017 - 12:54 PM
Nice to see you back on this build, just love and clean and tidy all the work is. Very jealous of your nice big garage to...
Crazy About Mini's

Posted 24 April 2017 - 02:15 PM
Amazing work! What material are your replacement studs on the hinges?
Super Mini Mad
Posted 24 April 2017 - 04:13 PM
Nice to see you back on this build, just love and clean and tidy all the work is. Very jealous of your nice big garage to...
Cheers, and yes it's great to have the space, makes all the difference!!
Amazing work! What material are your replacement studs on the hinges?
Thanks! studs are just 1/4 inch UNF bolts with the heads cut off, I filed the edges carefully so they would screw in from the cut end therefore leaving the nice tidy end exposed. They're zinc plated, which I think probably you should not really be welding as they give off some noxious fumes but I did it outside and it was only a one off so hopefully I won't wake up dead one day as a result.


0 members, 1 guests, 0 anonymous users


