Jump to content


Photo
- - - - -

95 Sprite Rebuild & 16V Conversion


  • Please log in to reply
691 replies to this topic

#376 alchall

alchall

    Super Mini Mad

  • Just Joined
  • PipPipPipPipPipPip
  • 604 posts
  • Location: Chorley

Posted 30 January 2018 - 09:50 AM

Looks good! I haven't been on the forum for a while, you may well beat me getting a sprite back on the road!


Thanks! I still have some way to go but got a bit more momentum again now, looks like you've got some real motivation to get yours done, congratulations boy the way!


#377 minisilverbullet

minisilverbullet

    Up Into Fourth

  • TMF+ Member
  • PipPipPipPipPipPipPipPipPip
  • 3,799 posts
  • Name: Craig
  • Location: Sweden

Posted 30 January 2018 - 10:30 AM


Looking very good buddy, getting to the fun bit of timing in the cams. Don't know what SC have told you what cam lift to set too, but John mentioned to me around 1mm, unless this has changed, but there's a lot of debate on that subject, depended of what torque or horsepower you want, me personally, i would prefer torque over Bhp, as I don't want to be reving the hell out it.


Its like you read my mind, there seems to be quite a lot of different opinions on this subject, like you Im more interested in the torque curve, one of the big attractions to me for this conversion was being able to build a reasonably powerful engine whilst maintaining usable torque for use on the road, Ill be taking to John about it shotlly but I think 1mm probably fits the bill as far as I can tell.

Spoke to John again at Minifair regarding the cam lift, and he was still saying to set them to 1mm lift, for a good torquey road engine, unless of course you want to rev the hell out off it!


After messing around with with cam timing. My experience is:


I started with at 1mm, then 2.4mm and currently 1.7mm - the car did feel best at 1mm


The power/torque seems so much lower down in the rev range when set to 1mm. 


Thanks guys, that's really helpful, looks like I'll be going for 1mm, looks like a slightly tricky operation so better set aside a clear day for it :-)


I will be retiming mine to 1mm. I am going to see if it is possible using just the adjustment on the vernier pulleys. Probably not though. 


#378 alchall

alchall

    Super Mini Mad

  • Just Joined
  • PipPipPipPipPipPip
  • 604 posts
  • Location: Chorley

Posted 30 January 2018 - 12:07 PM

Done a bit of work over the last week, painted the crank damper with some chassis black, this was badly corroded and I've been thinking of replacing, nowhere seems to stock them new and second hand ones don't look to be much better than this one, I may replace before I'm done but for now this is getting fitted....


mini-824.jpg


I also gave my fuel rail another coat of paint as I'd managed to not quite fully cover part of it, now looks like new....


mini-823.jpg


Turbo oil pump primed and fitted, I also checked the end float on the primary gear (could have done this ages ago!), it's between 7 and 8 thou so have ordered a thicker thrust washer, should come this week so hopefully this weekend I can get this end built up....


mini-825.jpg


I've also popped my 180degree water pipe on the end here, just a trial fit, think I may trim it down a bit before I'm done.


Back to the front of the engine and I modified and fitted the new water pump, one of the upgraded mini spares items which seems good value. It didn't need much taking off the top to fit under the top plate and I've removed some material from the fins so they don't foul the cam belt and given it a bit of a clean up....


mini-826.jpg


I popped the cam belt on, along with the tensioner and water pump pulley, think I need to take a little more off the lower fin but difficult to tell until I've properly fitted and tensioned the belt, I'm also waiting on the idler pulley to return from SC as it had to go back to them to have the ring re-fitted. It also looks awfully close to the bolts on the pump, but again this may not be a problem depending on where it goes when fully tensioned. I also will have to modify the tensioner to miss the alternator bolt.


mini-827.jpg


New injectors arrived so fitted these along with the fuel rail, also I had painted and fitted the throttle cable linkage to the TB's, I may need to fashion something new here as this isn't going to work if I go with a sausage type filter with back plate.


mini-828.jpg


So here it now stands, looking better with each week that passes!


mini-829.jpg


#379 72hump

72hump

    Mini Mad

  • Members
  • PipPipPipPip
  • 200 posts
  • Location: Nairn
  • Local Club: IMOG

Posted 30 January 2018 - 01:28 PM

Done a bit of work over the last week, painted the crank damper with some chassis black, this was badly corroded and I've been thinking of replacing, nowhere seems to stock them new and second hand ones don't look to be much better than this one, I may replace before I'm done but for now this is getting fitted....
 
mini-824.jpg
 
I also gave my fuel rail another coat of paint as I'd managed to not quite fully cover part of it, now looks like new....
 
mini-823.jpg
 
Turbo oil pump primed and fitted, I also checked the end float on the primary gear (could have done this ages ago!), it's between 7 and 8 thou so have ordered a thicker thrust washer, should come this week so hopefully this weekend I can get this end built up....
 
mini-825.jpg
 
I've also popped my 180degree water pipe on the end here, just a trial fit, think I may trim it down a bit before I'm done.
 
Back to the front of the engine and I modified and fitted the new water pump, one of the upgraded mini spares items which seems good value. It didn't need much taking off the top to fit under the top plate and I've removed some material from the fins so they don't foul the cam belt and given it a bit of a clean up....
 
mini-826.jpg
 
I popped the cam belt on, along with the tensioner and water pump pulley, think I need to take a little more off the lower fin but difficult to tell until I've properly fitted and tensioned the belt, I'm also waiting on the idler pulley to return from SC as it had to go back to them to have the ring re-fitted. It also looks awfully close to the bolts on the pump, but again this may not be a problem depending on where it goes when fully tensioned. I also will have to modify the tensioner to miss the alternator bolt.
 
mini-827.jpg
 
New injectors arrived so fitted these along with the fuel rail, also I had painted and fitted the throttle cable linkage to the TB's, I may need to fashion something new here as this isn't going to work if I go with a sausage type filter with back plate.
 
mini-828.jpg
 
So here it now stands, looking better with each week that passes!
 
mini-829.jpg


This is what I did to fit my ITG filter

#380 alchall

alchall

    Super Mini Mad

  • Just Joined
  • PipPipPipPipPipPip
  • 604 posts
  • Location: Chorley

Posted 30 January 2018 - 04:18 PM


Looking very good buddy, getting to the fun bit of timing in the cams. Don't know what SC have told you what cam lift to set too, but John mentioned to me around 1mm, unless this has changed, but there's a lot of debate on that subject, depended of what torque or horsepower you want, me personally, i would prefer torque over Bhp, as I don't want to be reving the hell out it.


Its like you read my mind, there seems to be quite a lot of different opinions on this subject, like you Im more interested in the torque curve, one of the big attractions to me for this conversion was being able to build a reasonably powerful engine whilst maintaining usable torque for use on the road, Ill be taking to John about it shotlly but I think 1mm probably fits the bill as far as I can tell.

Spoke to John again at Minifair regarding the cam lift, and he was still saying to set them to 1mm lift, for a good torquey road engine, unless of course you want to rev the hell out off it!


After messing around with with cam timing. My experience is:


I started with at 1mm, then 2.4mm and currently 1.7mm - the car did feel best at 1mm


The power/torque seems so much lower down in the rev range when set to 1mm. 


Thanks guys, that's really helpful, looks like I'll be going for 1mm, looks like a slightly tricky operation so better set aside a clear day for it :-)


I will be retiming mine to 1mm. I am going to see if it is possible using just the adjustment on the vernier pulleys. Probably not though. 


Be interesting if you still feel that 1mm is best when you go back to it!


#381 alchall

alchall

    Super Mini Mad

  • Just Joined
  • PipPipPipPipPipPip
  • 604 posts
  • Location: Chorley

Posted 30 January 2018 - 05:10 PM

Interesting, that isn't quite how I'd envisaged this working, I was thinking that the back plate would be sandwiched between the ram pipes and throttle bodies in that small gap and the ram pipes would be contained completely inside the filter. Will you loose some benefit from the ram pipes with it configured as you have it?


#382 72hump

72hump

    Mini Mad

  • Members
  • PipPipPipPip
  • 200 posts
  • Location: Nairn
  • Local Club: IMOG

Posted 30 January 2018 - 07:59 PM

Interesting, that isn't quite how I'd envisaged this working, I was thinking that the back plate would be sandwiched between the ram pipes and throttle bodies in that small gap and the ram pipes would be contained completely inside the filter. Will you loose some benefit from the ram pipes with it configured as you have it?


Possibly will loose some benefits, but it is a road engine after all , and I can't afford any muck to get into the engine.

Edited by 72hump, 30 January 2018 - 09:09 PM.


#383 johnR

johnR

    Up Into Fourth

  • Members
  • PipPipPipPipPipPipPipPipPip
  • 2,246 posts
  • Location: Dorset

Posted 30 January 2018 - 08:15 PM

That's a lovely looking engine! Good job.

#384 alchall

alchall

    Super Mini Mad

  • Just Joined
  • PipPipPipPipPipPip
  • 604 posts
  • Location: Chorley

Posted 31 January 2018 - 09:40 AM


Interesting, that isn't quite how I'd envisaged this working, I was thinking that the back plate would be sandwiched between the ram pipes and throttle bodies in that small gap and the ram pipes would be contained completely inside the filter. Will you loose some benefit from the ram pipes with it configured as you have it?


Possibly will loose some benefits, but it is a road engine after all , and I can't afford any muck to get into the engine.


Definitely don't wan't to risk it by having no filtration that is for sure! I'm still undecided what route to take myself


#385 Steve220

Steve220

    Up Into Fourth

  • Members
  • PipPipPipPipPipPipPipPipPip
  • 4,896 posts
  • Location: Shropshire
  • Local Club: BMC

Posted 31 January 2018 - 11:56 AM

Great work! How are you going to check the tolerance in the idler gear? Or did you do this before fitting the engine to the gearbox?


#386 alchall

alchall

    Super Mini Mad

  • Just Joined
  • PipPipPipPipPipPip
  • 604 posts
  • Location: Chorley

Posted 31 January 2018 - 12:59 PM

Great work! How are you going to check the tolerance in the idler gear? Or did you do this before fitting the engine to the gearbox?


Thanks!


I realise now that I should have done it before really, I tried using the DTI but having fitted block to box and found it to be practically impossible so I've used the two sets of feeler gauges method, new washer has arrived today so I may pop it on and re-check it again this evening. Minispares quote a tolerance of about 2 thou for the washers so worst case I may have to adjust the backing ring a little with some wet and dry on a nice flat surface if I find it's gone the other way.


#387 Steve220

Steve220

    Up Into Fourth

  • Members
  • PipPipPipPipPipPipPipPipPip
  • 4,896 posts
  • Location: Shropshire
  • Local Club: BMC

Posted 31 January 2018 - 01:36 PM

I ended up using plastigauge as I did the same thing. Tolerance was right on the minimum so flattened them off a little. Happy that itll be ok now!

#388 alchall

alchall

    Super Mini Mad

  • Just Joined
  • PipPipPipPipPipPip
  • 604 posts
  • Location: Chorley

Posted 03 February 2018 - 10:00 AM

Had a day off yesterday so cracked on with flywheel and clutch, fitted the new primary gear thrust washer and it was pretty close, I was aiming for 5 thou (seems to be the favoured clearance for a performance engine) and it was about 4, oddly it seemed to be different from one side to the other which appeared to be related the c clip (both c clip and backing ring I bought new). On close inspection there was a bit of a burr on one side of the c clip so I carefully filed it back and finished of with some oiled wet and dry which got me most of the way there. I then simply gave the backing ring a tickle with the wet and dry and I'm now bang on 5 thou and no strange off set.


Next up primary gear oil seal in the transfer case, I had two of these, the standard one that came with the mini spares gearbox rebuild kit and I also got their upgraded version which is where I started. I got it into the transfer case fine but I could not then get it on to the primary gear without it distorting and the garter inside popping off, so in the end I gave up, whipped it out and switched to the standard item and bingo, it goes on nicely, as long as I offered the case up closely aligned ot the end of the engine/box then it would slide over the primary gear with almost no distortion. I can only surmise that the internal diameter of the upgraded item is smaller than standard which in theory I guess could lead to a better seal, perhaps if I was installing in-situ with the proper tool it might have gone on successfully but it wasn't to be here.


So here it is fitted along with the plastic oil thrower that was standard on later models....


mini-830.jpg


The thread repair I had to make on the end of the gearbox worked a treat here which was a relief!


I have also bought a pair of Minispares ultimate gearbox steadies (one for each side, both of which face rearward), I've fitted this sides bracket as you can see above but I cannot see how then the front facing steady bracket will fit as it uses one of the same bolts, anybody used both and what have you done to get around this? I'm thinking a thick washer between case and bracket on the front and a longer bolt?


mini-831.jpg


Next up the clutch assembly, this is an MED STI pre verto assembly which is very noticeably lighter than the old verto injection assembly that came off, so here it is fitted including new MED crank shaft bolt, done....


mini-832.jpg


Next up the cover fitted along with the MED verto to pre verto conversion kit, I've also splashed out on some fancy DSN clutch cover bolts (slightly frivolous)) and hiding behind the water pipe is a DSN transfer case breather outlet, this will be fed into a catch tank ultimately along with the other breathers (location tbd).


mini-834.jpg


I'm not 100% sure where this spring is meant to attach, does the bracket fit behind the nipple on the plunger?


mini-835.jpg


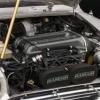
So here it is, also popped the coil pack on and I also trimmed the cam cover gasket so that's now ready for when I've completed the timing.


mini-836.jpg


My idler pulley has also returned from SC who re-fitted the ring for me which is now rock solid so I'll probably finish off the front end today so I'm ready to get it timed, I'm also going ot make a little wooden platform on castors to drop the engine onto so I can finish it off as the stand gets in the way, close now to dropping this into the car to work out what mods I need to make.


#389 Steve220

Steve220

    Up Into Fourth

  • Members
  • PipPipPipPipPipPipPipPipPip
  • 4,896 posts
  • Location: Shropshire
  • Local Club: BMC

Posted 03 February 2018 - 10:03 AM

I ditched the front lower stabiliser in favour of the 2 minispares rear ones.

#390 johnR

johnR

    Up Into Fourth

  • Members
  • PipPipPipPipPipPipPipPipPip
  • 2,246 posts
  • Location: Dorset

Posted 03 February 2018 - 10:25 AM

Did you decide to ditch the locktabs for the transfer case to gearbox bolts?


0 user(s) are reading this topic

0 members, 0 guests, 0 anonymous users