The return spring retainer fits onto the bleed nipple.


95 Sprite Rebuild & 16V Conversion
Started by
alchall
, Nov 11 2014 05:27 PM
691 replies to this topic
#391

Northernpower
-

- Members
-

- 2,414 posts
Mr. 7-Port
- Name: Graham
- Location: North Yorkshire (God's County)
- Local Club: Its out there somewhere
Posted 03 February 2018 - 10:44 AM
#392
alchall
-
- Just Joined
-
- 604 posts
Super Mini Mad
- Location: Chorley
Posted 03 February 2018 - 01:33 PM
I ditched the front lower stabiliser in favour of the 2 minispares rear ones.
Maybe overkill to have the front one as well as two rears I guess.
Did you decide to ditch the locktabs for the transfer case to gearbox bolts?
It didn't have them to begin with, in fact I think they were dropped in the early 80's - All the bolts have been put in with a drop of thread locker so should be secure.
The return spring retainer fits onto the bleed nipple.
Thanks, that's what I thought was most likely as I couldn't see anywhere else it could go but wanted to check.
#393
minisilverbullet
-
- TMF+ Member
-
- 3,799 posts
Up Into Fourth
- Name: Craig
- Location: Sweden
Posted 03 February 2018 - 03:24 PM
I am sure I kept the front stabiliser and the extra stabiliser. I will pop out and see. Good excuse to look at my engine.
#394
minisilverbullet
-
- TMF+ Member
-
- 3,799 posts
Up Into Fourth
- Name: Craig
- Location: Sweden
Posted 03 February 2018 - 07:17 PM
I am sure I kept the front stabiliser and the extra stabiliser. I will pop out and see. Good excuse to look at my engine.
So, I actually cut the long ear off the extra steady.
#395
alchall
-
- Just Joined
-
- 604 posts
Super Mini Mad
- Location: Chorley
Posted 04 February 2018 - 10:06 AM
I am sure I kept the front stabiliser and the extra stabiliser. I will pop out and see. Good excuse to look at my engine.
So, I actually cut the long ear off the extra steady.
I may do the same, still as two bolts, how long did you spend in the garage working that out? 
#396
alchall
-
- Just Joined
-
- 604 posts
Super Mini Mad
- Location: Chorley
Posted 04 February 2018 - 03:29 PM
Fitted the idler pulley and bottom pulley, both torqued up so another job ticked off the list...


I also painted the exposed ends, around the water pump at the front and between head and transfer case at the rear, with some black engine enamel, the blue isn't a standard colour that you can get off the shelf so decided to do these black, most of my ancillaries and billet pieces are black so doesn't look out of place.
That's it for this weekend.
#397
alchall
-
- Just Joined
-
- 604 posts
Super Mini Mad
- Location: Chorley
Posted 04 February 2018 - 03:32 PM
The return spring retainer fits onto the bleed nipple.
Does this look right, doesn't feel right that it is just loose and I can't tighten up that nipple any further....

Having finally managed to dig out some photo's from the web I can see I've fixed this to the opposite side to normal, easily fixed.
Also the plunger is at a bit of a downward angle, may be fine but not sure....

#398
GraemeC
-

- TMF+ Member
-
- 7,467 posts
Crazy About Mini's
- Location: Carnforth
Posted 04 February 2018 - 04:48 PM
Spring anchor is correct, it just loosely sits on the nipple as you have it.
Personally I odn't like the currently available return springs, they are far stronger than they need to be (or were originally). You should be able to easily fit them with your fingers.
I now use a throttle return spring: http://www.minispare...|Back to search
Push rod being at an angle is fine.
#399
mini13
-
- Members
-
- 3,811 posts
Up Into Fourth
Posted 04 February 2018 - 04:51 PM
yep, thats it,
that slave shaft will probably straighten out when the pedal is pushed as there iwll be an arc on the clutch arm travel.
Also, not sure it this will be an issue for you, but on my turbo ex manifold access to the nuts is a nightare and clearance non existant between the pipe and nut so I cant get a spanner on, so Ive gone for 10mm head nutsnas below
http://www.ebay.co.u...353.m2749.l2649
#400
72hump
-

- Members
-
- 200 posts
Mini Mad
- Location: Nairn
- Local Club: IMOG
Posted 04 February 2018 - 06:28 PM
Fitted the idler pulley and bottom pulley, both torqued up so another job ticked off the list...
I also painted the exposed ends, around the water pump at the front and between head and transfer case at the rear, with some black engine enamel, the blue isn't a standard colour that you can get off the shelf so decided to do these black, most of my ancillaries and billet pieces are black so doesn't look out of place.
That's it for this weekend.
One small question, you said you torqued up both pulleys, does your timing belt fit between the idler pulley and crank pulley, because mine doesn't!
#401
72hump
-
- Members
-
- 200 posts
Mini Mad
- Location: Nairn
- Local Club: IMOG
Posted 04 February 2018 - 06:31 PM
Just ignore the last, had a bit of a brain fart!Fitted the idler pulley and bottom pulley, both torqued up so another job ticked off the list...
I also painted the exposed ends, around the water pump at the front and between head and transfer case at the rear, with some black engine enamel, the blue isn't a standard colour that you can get off the shelf so decided to do these black, most of my ancillaries and billet pieces are black so doesn't look out of place.
That's it for this weekend.
One small question, you said you torqued up both pulleys, does your timing belt fit between the idler pulley and crank pulley, because mine doesn't!
#402
alchall
-
- Just Joined
-
- 604 posts
Super Mini Mad
- Location: Chorley
Posted 12 February 2018 - 04:47 PM
yep, thats it,
that slave shaft will probably straighten out when the pedal is pushed as there iwll be an arc on the clutch arm travel.
Also, not sure it this will be an issue for you, but on my turbo ex manifold access to the nuts is a nightare and clearance non existant between the pipe and nut so I cant get a spanner on, so Ive gone for 10mm head nutsnas below
I'll find out before too long but it could be that your turbo manifold is somewhat more complex than the na type, looks like I should be able ot get access to the nuts but will have to see what it's like when it's up against the bulkhead.
#403
alchall
-
- Just Joined
-
- 604 posts
Super Mini Mad
- Location: Chorley
Posted 12 February 2018 - 05:09 PM
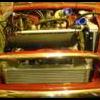
Small update for this week, firstly I fitted the front subframe so I can get the engine in to work on the mods I need to make to the engine bay as I'm close now to that point, was a bit of a pig of a job, I used my original subby when I built up the front end but I ditched it and got a replacement as the original I was not happy with (partly some odd plates welded on but partly one of the trunnions was a bit bent out of shape). It seems that my concern was probably founded as it didn't fit quite as glove like as the old one so some pushing and shoving was required, anyway, it's not so far off it doesn't fit it was just difficult, I can probably ease things a little by opening the holes on the toe board a tiny fraction giving me that little bit more wriggle room. Anyway, it's in now and it's solid, no photo's but it's a bit dull so you're not missing anything!
I also made myself a wooden table for the engine to sit on so I can finish the build (could not do this on the stand), it's pretty simple and has some little locking castors so I can move it around off it came....

That was a very easy job and now I've got full access to it, I have strapped it on to the bench so it's not likely to fall off! actually two straps now but only one showing on the next set of photo's.
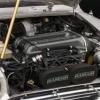
I've fitted the oil filter and connecting pipe, the three way oil union onto the block and the alternator bracket, you can see the alternator in place here but I need a new cap head bolt to fit it properly to the DSN bracket, the hex head doesn't fit inside the DSN bracket but looks like with a cap head I should be good but also need to alter the timing belt tensioner as well to finish the fitting of the alternator but it looks nice and looks like the belt should run perfectly around all three pulleys (which it should since I paid a bit of a premium for this from SC as it came with customised brackets to fit).
Also popped the timing belt on again just to see how it all fits together now and also the large diameter oil drain pipe from the front of the head, it's all very tight in there but the oil drain pipe has good clearance around the belt which seems different to other peoples builds so I'm thinking SC have altered this part for the better recently.


One other thing I've done recently is pull apart the starter motor, what a mess it was in there! chocked full of copper dust and grease, the brushes were almost none existent, 2mm or less remaining, and the commutator also badly worn, can be sorted but when I factor in the cost of new brushes, having them fitted (not a simple solder on at home job) and having the commutator tidied up I've decided I may as well just buy a new one, they're not that expensive in the grand scheme of things.
I also made myself a wooden table for the engine to sit on so I can finish the build (could not do this on the stand), it's pretty simple and has some little locking castors so I can move it around off it came....
That was a very easy job and now I've got full access to it, I have strapped it on to the bench so it's not likely to fall off! actually two straps now but only one showing on the next set of photo's.
I've fitted the oil filter and connecting pipe, the three way oil union onto the block and the alternator bracket, you can see the alternator in place here but I need a new cap head bolt to fit it properly to the DSN bracket, the hex head doesn't fit inside the DSN bracket but looks like with a cap head I should be good but also need to alter the timing belt tensioner as well to finish the fitting of the alternator but it looks nice and looks like the belt should run perfectly around all three pulleys (which it should since I paid a bit of a premium for this from SC as it came with customised brackets to fit).
Also popped the timing belt on again just to see how it all fits together now and also the large diameter oil drain pipe from the front of the head, it's all very tight in there but the oil drain pipe has good clearance around the belt which seems different to other peoples builds so I'm thinking SC have altered this part for the better recently.
One other thing I've done recently is pull apart the starter motor, what a mess it was in there! chocked full of copper dust and grease, the brushes were almost none existent, 2mm or less remaining, and the commutator also badly worn, can be sorted but when I factor in the cost of new brushes, having them fitted (not a simple solder on at home job) and having the commutator tidied up I've decided I may as well just buy a new one, they're not that expensive in the grand scheme of things.
Edited by alchall, 12 February 2018 - 09:37 PM.
#404
minisilverbullet
-
- TMF+ Member
-
- 3,799 posts
Up Into Fourth
- Name: Craig
- Location: Sweden
Posted 12 February 2018 - 08:36 PM
Looks great!
Thing with that large drain pipe is that you wont know how well it fits or rubs on anything until the engine is in the car. As it looks at the moment I am sure it will rub on the fan. Also looks like it will rub on the water pump pulley. Might even be too close the the manifold. I cut a fair bit off the length which goes to the rear drain.
It certainly wasn't a "bolt on part" for me. In fact I have used very little of that hose. I have used an aluminium tube to run parallel to the fan as it gives you an extra 10mm of clearance. It also 'firms' the hose up a bit.
#405
Northernpower
-
- Members
-
- 2,414 posts
Mr. 7-Port
- Name: Graham
- Location: North Yorkshire (God's County)
- Local Club: Its out there somewhere
Posted 12 February 2018 - 08:51 PM
Have you painted the trigger wheel?


0 user(s) are reading this topic
0 members, 0 guests, 0 anonymous users


