If there are any positives to our current situation it is that I've found myself with more time to crack on with the mini, there's not a lot else to do with the weekends and I'm home all week so get a bit of time in the evening as well.
So I've made some good progress, and more to come over the coming days and weeks should see me pretty well finished with the shell.
First up the subframe, this is now complete, I've fully welded in the spacer plates and added a second small plate on the outside for strength, I also added in a strip of 2.5mm steel along the rear where I cut away for the exhaust down pipe.


I used a lot of plug welds and some stitch welds to keep this all together, hopefully this should be plenty strong enough to cope!
Engine drops in nicely and I now have good clearance front to back.

You can just see on that photo above as well that I made up some brackets to fit the Jaguar XF bonnet catches, I had to strengthen the front panel a little to stop it all flexing but it's now solid and they work nicely, the cable between left and right is too long but I can shorten it later, I also had to fiddle around with the top hose to prevent the bonnet catch fouling it, but that was easily resolved by simply switching round the 90deg bends as one was longer than the other.
On the bonnet itself I had to make up some strikers and their respective mounting points on the bonnet from scratch.
First thing is I couldn't mount the catches themselves in exactly the same place on each side, on the left of the car I had to mount it hard up to the inner wing to prevent the fouling issue with the top hose I mentioned already, but on the right I could not do this or the wiring loom would not run nicely inside the top edge of the front panel as I want it to.
The upshot of this is that the mounting points on the bonnet are not the same, this took some effort to get right but they seem strong and look OK as long as you don't inspect the inside too closely as there's a bit of messy weld that I couldn't rectify in the small space. They also allow for fore/aft adjustment of the strikers which it turns out was definitely a necessary feature as some fine tuning of this is necessary to make the mechanism work perfectly, the catches on the front panel have plenty of adjustment side to side and slightly up and down too.
The strikers themselves took a few attempts, 3 to get them right including shape, size and diameter of the steel bar I used and the final one to get the working model to be a much neater looking finish. Anyway I ultimately got there, they and they are solid enough.
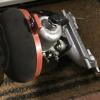
The picture below shows mk3 strikers fitted to their mounts...

Next up zinc plating, I dug the kit out which needed a bit of maintenance and some new buckets as some of the containers I was using for acid, alkaline cleaner and passivates were simply too small, I also was able to tidy up the whole wiring up of the anodes so it's now a much better kit than it started out as and actually seems to do a better job as a result....

And the result...

Not 100% perfect but perfectly respectable and you have to be looking very close to see the flaws, the "brushed" effect is intentional, polishing was practically impossible to get perfect and would show imperfections much more clearly. If you back up a bit again at the engine installed picture you'll see this all in place.
I also drilled the holes in my mounting points for the oil cooler and test fitted it, it is a good fit, I'll take a small piece of alloy off the area that the starter mounts to just to give a bit of extra clearance and I've since ordered some AN-10 pipes and fittings and a thermostatic sandwich plate take off for the oil filter to feed it, I ordered a couple of incorrect fittings for the type of pipe so am waiting for the replacements to arrive but it looks like it will all fit nicely, albeit with limited options for the way it will all fit.

So next up my problem with the left hand A post and the odd angle the door check runs at, this required some major surgery and replacing what was already perfectly good parts. So Had to take off the A panel, replace the whole of the A post and re-fit with new parts, I took this step by step, offering up the door multiple times as I went and the end result is very pleasing.
The door check now runs correctly, it looks neat and not at all obvious that I had to do this, in fact, it's seamless, and the added bonus is that the door gaps are now even better...


And the finished article, personally I would say that the gaps on this side is now about as good as it is possible to get without a lot more effort that probably is not worth it. See what you think!


On this side all I have left to do is close up the aerial hole (going roof mounted), fit the A panel to wing strengthener and fit a new riv nut in the new A panel for the wheel arch extension.
Up front a few small holes to fill that are no longer required and then the only major piece left to complete is refit the rear wing on the right hand side and re-fit the captive nut for the rear subframe. I've fitted the rear subframe (minus the one bolt I cannot fit) and it is still good and I can use that to fit the new captive nut when the time comes.
I decided that while I'm replacing that rear wing again I would also replace the waist rail, it's a bit of a mess on that side as I had to patch it up a lot, interestingly when I offered it up it doesn't quite fit, it's very tight, however, I think this is a good thing as the door gap at waist level on that side actuals is slightly wide preventing the door gaps from looking good, I think I might be able to nudge the B post forward slightly and fix all of this. I know the car had taken a knock on that side in the past, there was a big dent that had been badly patched up and filled that I found when I unpicked it so this could be a result of that.
So that's it for now roll on the weekend....