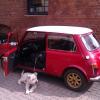
Shell is in great hands by the looks of it.


95 Sprite Rebuild & 16V Conversion
Started by
alchall
, Nov 11 2014 05:27 PM
691 replies to this topic
#616

g111mds
-

- Members
-

- 432 posts
Speeding Along Now
- Location: Edinburgh
Posted 17 June 2020 - 06:32 PM
#617
bpirie1000
-

- TMF+ Member
-
- 2,539 posts
Up Into Fourth
- Location: Aberdeenshire
- Local Club: Amoc
Posted 17 June 2020 - 07:36 PM
Nabbed my question in full.... bigger injectors?Hi,
May I ask why the K1200RS throttle body set is a better fit than the one of the K1100? I'm currently playing with a future project involving the same head swap.
Cheers,
Christian
#618
alchall
-
- Just Joined
-
- 604 posts
Super Mini Mad
- Location: Chorley
Posted 17 June 2020 - 07:55 PM
Hi,
May I ask why the K1200RS throttle body set is a better fit than the one of the K1100? I'm currently playing with a future project involving the same head swap.
Cheers,
Christian
Hi Christian, I found 4 benefits...
1) Throttle cable pulls from the top and has no protrusion towards the front, with the K1100 the cable sits forward and pulls downwards and fouls a sausage filter such as my ITG or a plenum
2) The fuel rail has a built in pressure regulator so no need to purchase or find a way to fit one
3) The throttle position sensor can be tilted much further as it has two sets of mounting holes, so no need to modify it
4) The new SC ram pipes fit to the filter back plate with screws so it's really easy and neat to fit, no messing with grommets etc. as I had with the K1100
One I found was also in fantastic condition so a good clean up and it's almost like new!
#619
alchall
-
- Just Joined
-
- 604 posts
Super Mini Mad
- Location: Chorley
Posted 17 June 2020 - 07:55 PM
Shell is in great hands by the looks of it.
It seems to be yes, can't wait to get it back!
#620
alchall
-
- Just Joined
-
- 604 posts
Super Mini Mad
- Location: Chorley
Posted 17 June 2020 - 07:57 PM
Nabbed my question in full.... bigger injectors?Hi,
May I ask why the K1200RS throttle body set is a better fit than the one of the K1100? I'm currently playing with a future project involving the same head swap.
Cheers,
Christian
Injectors are the same, but I've replaced mine with modern Bosch units, TB's are slightly larger but only slightly so unlikely to have any performance benefit, it's really just easier to use...
#621
no66
-

- Members
-
- 156 posts
Mini Mad
- Location: Saetre, Norway
- Local Club: NMCC (Norsk Mini Cooper Club)
Posted 18 June 2020 - 07:29 AM
Really nice. Keep up the good work.
As for reusing old fuel line, I would get a roll of new line and fit that. Such a pain if there is a corrosion pin hole. And trust me, it will be just under the rear subframe so you can't get at it. 
#622
MaximMini
-
- TMF+ Member
-
- 226 posts
Mini Mad
- Location: Hameln
Posted 18 June 2020 - 10:28 AM
Thanks for the detailed reply.
#623
alchall
-
- Just Joined
-
- 604 posts
Super Mini Mad
- Location: Chorley
Posted 18 June 2020 - 01:23 PM
Really nice. Keep up the good work.
As for reusing old fuel line, I would get a roll of new line and fit that. Such a pain if there is a corrosion pin hole. And trust me, it will be just under the rear subframe so you can't get at it.
Looks like I have to, having gone to the effort of rubbing them down and removing all the rust I decided to do a little test, a blast of brake cleaner down the pipe, and guess what, pin holes right as you predicted in the section that runs under the rear subframe. Going to be fun re-creating that complicated mess of bends!
#624
no66
-
- Members
-
- 156 posts
Mini Mad
- Location: Saetre, Norway
- Local Club: NMCC (Norsk Mini Cooper Club)
Posted 19 June 2020 - 07:01 AM
Good you found out now.
I had a brake pipe bust years ago in the same spot.
On the car I'm doing now, the fuel line broke just before the subrame. I've taken the subframe out and are replacing both fuel and brake line just to be safe.
In the pocess of making a tube straightener and the tubing is coiled up and pretty much impossible to get straight by hand.
Found some good vids on YT

Edited by no66, 19 June 2020 - 07:01 AM.
#625
alchall
-
- Just Joined
-
- 604 posts
Super Mini Mad
- Location: Chorley
Posted 19 June 2020 - 08:01 AM
Good you found out now.
I had a brake pipe bust years ago in the same spot.
On the car I'm doing now, the fuel line broke just before the subrame. I've taken the subframe out and are replacing both fuel and brake line just to be safe.
In the pocess of making a tube straightener and the tubing is coiled up and pretty much impossible to get straight by hand.
Found some good vids on YT
Be interesting to see how well that works, I've ordered a cheap one from eBay that has ends to suit various diameter of tubing, it's a very simple design and may not work well (you get what you pay for after all). If that doesn't work there is a more expensive tool that happens to be manufactured down the road from me which you have to buy specifically for one size of tubing which looks more like what you are putting together with rollers. It isn't silly money, there are certainly much more expensive ones but I'm reluctant to spend much on something I'll use maybe once and then throw in a cupboard never to see the light of day again.
#626
alchall
-
- Just Joined
-
- 604 posts
Super Mini Mad
- Location: Chorley
Posted 03 July 2020 - 11:44 AM
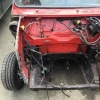
I've been pottering around a bit now, first up I had another think about how to route the fuel lines from the fuel rail, I decided I could probably route the braided hose around the top of the head and as I have to make up new hard lines anyway I can make them up to meet steel hose. More to follow when I start putting everything back together again but for the time being I knocked up a bracket that first the back of the head. There are unused mounting points on each side, one above the intake and the other above the exhaust, the aren't quite in line with each other but I thought I could make a bracket that wraps around the head fixing to each point and then spur of some mounts where p clips can attach to for the hoses, added benefit of being able to also use it for breather and oil hoses.
This is how it looks unpainted, you'll have to wait to see it in use!

I have also cleaned up, painted and assembled the swivel hubs complete with brand new ball joints and timken bearings...
You can also see here I re-painted the metal parts on the rubber springs, the paint on them was very thin and more or less wiped off with a bit of thinners!

Ball joints is a bit of a long job, shimming them to get them just right really takes some time, but not difficult. I did have to lap them in though, Haynes makes no mention of this and there seems to be a mixture of people say you should and others do not, but without doing this they were either too loose or solid / very notchy when greased.
I also purchased some matt black brake caliper paint to do the rear drums and as there was plenty of it I did the hubs on the discs and the exposed area of the drive flanges as well, but I made a mistake, instructions said 2 coats, and after two they were looking great, but with plenty paint to spare, and it being a 2 part paint so couldn't use it again later once mixed I decided to apply a third for good measure, this resulted in the hubs no longer being perfectly smooth. Anyway, still better than rusty and you'd have to be looking very carefully to notice.

And this morning I went to pick up subframes and various parts from the powder coaters, they've done a fantastic job here, really top quality finish, and have a zinc rich primer so should last well, I had them done satin black so they look very much OEM, in fact a lot of this looks brand new, only the areas of the front subframe and servo mount that were as usual badly corroded from stray brake fluid would give the game away.


And I also had the exhaust headers ceramic coated, this is Cerakote in a colour called glacier silver, looks really nice and should be extremely durable, this stuff has very good reviews and the guy at the coaters said he tested it thoroughly before deciding to sell it.

#627
rich_959
-
- Just Joined
-
- 568 posts
Super Mini Mad
- Location: East Yorks
Posted 03 July 2020 - 01:08 PM
This is looking great!
#628
johnR
-

- Members
-
- 2,318 posts
Up Into Fourth
- Location: Dorset
Posted 03 July 2020 - 05:40 PM
smart parts!
#629
72hump
-

- Members
-
- 200 posts
Mini Mad
- Location: Nairn
- Local Club: IMOG
Posted 03 July 2020 - 10:05 PM
Nice, powder coating looks spot on. Any word when your shell is been returned?
#630
tankertanker
-

- Noobies
-
- 53 posts
Stage One Kit Fitted
- Location: Gillingham dorset
Posted 03 July 2020 - 10:18 PM
Nicer than a nice thing


3 user(s) are reading this topic
0 members, 3 guests, 0 anonymous users


