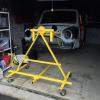
I have exactly the same jig, it is great isn't it especially moving the car around. Best buy for me. I have bought yellow paint for mine too, spooky!!!!

95 Sprite Rebuild & 16V Conversion
#121

Posted 04 August 2015 - 09:52 AM
#122

Posted 04 August 2015 - 12:05 PM
I have exactly the same jig, it is great isn't it especially moving the car around. Best buy for me. I have bought yellow paint for mine too, spooky!!!!
Haha and there was me thinking I'd created something unique!
#123

Posted 12 August 2015 - 03:16 PM
Small update today, I've knocked up a rear subframe jig so I can ensure all the mounting holes end up in the right place when I replace both the main and boot floor....
Hopefully will get the old floor out this weekend so I'm ready when the new floor eventually arrives!
Edited by alchall, 28 August 2017 - 06:54 PM.
#124

Posted 13 August 2015 - 02:30 PM
Fair play, when I fist started reading this thread I thought there might be some minor repairs.
But this has turned into a full shell restoration.
Good job, you'll definitely appreciate that jig once you get welding.
#125

Posted 13 August 2015 - 03:16 PM
Fair play, when I fist started reading this thread I thought there might be some minor repairs.
But this has turned into a full shell restoration.
Good job, you'll definitely appreciate that jig once you get welding.
I knew there were some rotten parts of the shell that needed replacement but it wasn't until I stripped the car down to the shell that the full extent of the damage revealed itself.
Part of the problem has been quick fix patching of rust that has been done previously with plates welded over the top of rust without the offending rust having been cut out, most of this wasn't visible or obvious when I bought the car.
#126

Posted 16 August 2015 - 03:41 PM
Had a good weekends work on the mini this week and I've removed the main floor, more or less finished prep for the new one to go in (lots of holes to drill for the welding yet!) and tidied up a couple of bits around the bulkhead that have been made easier by there being no floor and having the car on the jig!
So here it is floorless....
I've painted inside the door steps to give it plenty of protection (will be doing the same inside the sills before the floor goes in too), the silver is weld through on the edges that will join the floor, I masked these bits off before painting so I have a good clean surface to weld to....
I've filled a few small gaps in the edges of the bulkhead as it was accessible and also fitted the brackets for the heater, this was so much easier with the floor off and the car on it's side than it would have been otherwise....
And while it's on it's side I've had a good poke around at the boot floor, I'm glad I've ordered a new one, here's an example of how dodgy this car was....
Now that's a dodgy patch right at a critical point (the subframe mount), the heal board at each end was also complete rotten as was the floor in the rear corners, one side just fell apart, this thing was a bit of a death trap I think!
Anyway, that's it for now, waiting for the floor to arrive!
Edited by alchall, 28 August 2017 - 06:58 PM.
#127

Posted 21 August 2015 - 06:54 PM
Spent a couple of hours in the garage this evening, I've finally got round to finishing off that passenger side wheel arch sorted.
Thin triangular slither was cut out, the arch hammered up to close the gap and welded in....
[These photo's no this post have all been lost to the photo bucket gremlin]
Welds cleaned up (not quite perfect inside and didn't notice until I opened this photo so a little tickle with the dremmel to fix it tomorrow!)...
And all painted up with a coat of zinc....
I then set to cutting out and replacing the rot in the top corner of the gutter on the passenger side, I had bought a replacement roof corner to cut a peice out but in cutting it out I decided it was going to probably be better to fabricate a small piece myself, anyway this is a work in progress, here it was with the rot cut out and some Deox Gel brushed on to make sure all the rust was eradicated....
I have welded in new pieces but am still in the process of tidying them up, to say this is an enormously tricky job would the understatement of the year! but anyway, I will post a picture of it completed tomorrow!
Edited by alchall, 28 August 2017 - 07:11 PM.
#128

Posted 22 August 2015 - 01:38 PM
So this is my last update for a couple of weeks as I'm off on holiday next week but I've finished the gutter openings front and rear on the passenger side, the driver side doesn't look nearly as bad so that may take much less work (I certainly hope so)!
I didn't take any photo's of my welding of the fresh metal for the gutter on front but here it is cleaned up.
[All these photo's lost by photo bucket too!]
It was really tricky to tidy up into the tight corners even with small stones on the dremmel so I did end up finishing it off with a dash of filler, so with that done and a dash of zinc it's not looking too shabby, got it looking pretty much identical to the passenger side with it's original shape.
Then onto the rear, a small piece had to be cut out and the rest treated to a does of Deox gel just to be sure before a new peice was welded in.
All then tidied up and treated to a splash of zinc and the rear is also not looking to bad, both end could probably do with a final tidy up but that's a job for another day before it goes of to be painted.
I also treated the inside edge of the roof along the gutter line to a couple of coats of the internal frame coating as belt and braces and while I was at it also the inside of the bottom of the A posts, all the internal box sections including the full circumference of the roof inside the gutters will get this treatment.
So that is it for now, my new floor should arrive in a couple of days so when I get back from holiday I should be able to crack on with it!
Edited by alchall, 28 August 2017 - 07:12 PM.
#129

Posted 22 August 2015 - 02:38 PM
#130

Posted 22 August 2015 - 04:14 PM
Those gutter corners are a real pain to do. i have got to do all 4 corners on mine and i am dreading it.
You done well with yours ![]()
Have a good holiday mate
Ben
#131

Posted 23 August 2015 - 07:16 AM
Good work mate
Those gutter corners are a real pain to do. i have got to do all 4 corners on mine and i am dreading it.
You done well with yours
Have a good holiday mate
Ben
Thanks Guys!
Edited by alchall, 23 August 2015 - 07:18 AM.
#132

Posted 10 September 2015 - 11:17 AM
Well I'm nearly ready to get cracking again as my new floor has finally arrived! ![]()
I've already pretty much done the prep work for the main floor to go in, holes and all, so just a load of holes, prep and painting inside the sills to do before the new one can go in, going to be a busy weekend ![]()
I've also cleaned up the companion bins, some work to do on these too, going to strip all the paint from the outside and from the inside where it needs tidying up, also clearly I have some repairs to do where I made a bit of a mess getting them out, one was much worse than the other but this shouldn't be a difficult repair to undertake. They are otherwise in really good condition with very little rust, even along the bottom edge which is surprising given the state of the floor in the rear corners.
And also my main wiring loom that I had made up has arrived, not daunting at all! I'll hide that away for another month!
Edited by alchall, 28 August 2017 - 07:06 PM.
#133

Posted 26 September 2015 - 05:51 PM
After a couple of weeks not working on the mini I finally got round to prepping the floor ready to go in....
After cleaning it all up, removing paint from the edges to be welded and punching / drilling holes for welding I primed and seam sealed inside the sills and patched up a couple of area's where the e-coat was damaged with some electrox.
Then a few layers of top coat in the sills...
And finally some weld through on the bare metal and it's all ready to go in....
I also cleaned all the glue, bitchumen sound deadening and fluff stuck to the inside of the roof, I found a bit of rust under one of the sound deadening patches so will have to sort that out but but it's nothing serious thankfully, also cleaned up the rails all around the inside of the roof and they're all in great condition and have only the original paint on them which is nice so I won't bother stripping them all back to metal.
Edited by alchall, 28 August 2017 - 07:15 PM.
#134

Posted 27 September 2015 - 08:37 PM
Very happy today, got the floor in place and clamped up ready to weld, it took a bit of fettling to get it to slot into position and I'll have to use a couple of bolts to pull it up tight to the bottom edge of the toe board either side of the tunnel but it only took just over an hour and it all seems square and in exactly the right position according the measurements I took and the position of the cross member in relation to the struts that come down from the bracing.
Lots of pics from various angles below....
Edited by alchall, 28 August 2017 - 07:18 PM.
#135

Posted 28 September 2015 - 08:13 AM
Nicely done !!
Phil.
1 user(s) are reading this topic
0 members, 0 guests, 0 anonymous users
-
Bing (1)


