Nothing to bad, dealt with worse and its the home stretch. Last bit of body work then i can start prep for paint. :)


Jim The Advantage
Started by
Mad Max
, Jan 20 2015 04:24 PM
61 replies to this topic
#31

Mad Max
-
- Members
-

- 306 posts
Speeding Along Now
- Location: On a driveway under a car
Posted 05 April 2015 - 10:59 AM
#32
Mad Max
-
- Members
-
- 306 posts
Speeding Along Now
- Location: On a driveway under a car
Posted 19 April 2015 - 11:15 AM
So....
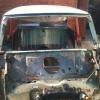
After repairing the inner sill and making good again including fabricating a crossmember jacking point I could weld on the final panel


So after a load of dressing of welds, painting por15 and general tidying I seam sealed then on with the stonechip


My plan then was to paint the engine bay so I could then assemble all the steering, suspension and brakes since the interior is not being repainted as its staying the same colour. This meant some prep was needed in the engine bay and then I could have a practise run with my new paint setup.

Really didn't come out to bad, plenty of good hard paint over everything with only a couple of runs. Its difficult because your trying to paint the inside of a cube with lots of crevices. I'm happy with the result as most of it will be covered and what isn't looks good.
Had a tiny mishap while spraying

#33
Mad Max
-
- Members
-
- 306 posts
Speeding Along Now
- Location: On a driveway under a car
Posted 19 April 2015 - 11:19 AM
I now started getting all the subframes ready and instantly hit a problem. The radius arm pins where well and truly worn out. 90,000 miles on the original pins isn't to bad I suppose. Quick trip to minispares and some wirebrush/paint later I have two reconditions arms ready for installation


I then rolled the car on its side (hopefully for the last time) to run the front to rear brake line and fuel line

Hopefully next update will see him back on his wheels.
#34
minimissions
-

- Members
-
- 3,427 posts
Up Into Fourth
- Location: North West
- Local Club: M.M.O.C
Posted 19 April 2015 - 02:07 PM
Looking really good some nice clean work and saving another advantage you don't see many if these about these days..
#35
chrisj
-
- Members
-
- 283 posts
Mini Mad
- Location: Leicestershire
Posted 19 April 2015 - 05:00 PM
Fantastic work!
Nice to see the repairs you have done, most would have just replaced the panels.
Looking forward to seeing it progress.
Nice to see the repairs you have done, most would have just replaced the panels.
Looking forward to seeing it progress.
#36
lukeagore
-

- Noobies
-
- 9 posts
Just On Tickover
- Location: Birmingham
Posted 19 April 2015 - 07:05 PM
Great to see another Advantage being restored, but what is it about them that makes them all so rotten! Mine was in a similar state 2 years ago and I have only seen one other in the flesh! Keep up the great work and keep us updated, I'll be following your progress :)
#37
Mad Max
-
- Members
-
- 306 posts
Speeding Along Now
- Location: On a driveway under a car
Posted 04 May 2015 - 07:07 PM
So, time for an update....
Heres the interior with a splash or paint

And the boot.

Built up the front subframe as the pins for the top arms had rusted through so was yet another trip to minispares


After many hours of sanding i got some primer on to then be followed by further wet sanding.


Waiting on some filters for my gun then will have a go at colour. Also need to prep boot and bonnet at some point. London to brighton is looking less likely by the day 
#38
Guest_johnylässig_*
Guest_johnylässig_*
-

- Guests
Posted 06 May 2015 - 08:49 AM
nice resto, cant wait to see it painted 
#39
Mad Max
-
- Members
-
- 306 posts
Speeding Along Now
- Location: On a driveway under a car
Posted 07 May 2015 - 01:05 PM
So been another few busy days on the mini. Pissed off that i got primer overspray in the boot but you won't see it when full running. But i'll know its there
Anyway a splash of colour


And started sticking all the old bits back in. Starting with loom, pedal box and brake master.


Also invested in some sound proofing to apply during the rebuild. It will never be a modern car but can't hurt.


Want to get the car rolling so i can move it outside and finish wet sanding and a good mop before sticking all the external trim on and windows. Also need to prep the boot and bonnet at some point.
#40
BritishRacingGreen
-
- Members
-
- 433 posts
Speeding Along Now
- Location: Hertfordshire
Posted 07 May 2015 - 01:22 PM
That's a nice job! the rust on mine isn't anywhere near as bad thankfully...
Just wondering how long it took and what methods you used to paint the body? did you just rough up the paint that was on there? take the old lacquer back? or sand all the colour off and start again?
I've got mine to do and I'm debating doing the whole car rather than just the rusty sections as though the majority of the paint is good it looks like a custom metallic colour and I'm concerned about the match.
Also what equipment/tools have you used?
Looks like a lovely finish though - anything special planned engine wise?
#41
Mad Max
-
- Members
-
- 306 posts
Speeding Along Now
- Location: On a driveway under a car
Posted 14 May 2015 - 03:48 PM
That's a nice job! the rust on mine isn't anywhere near as bad thankfully...
Just wondering how long it took and what methods you used to paint the body? did you just rough up the paint that was on there? take the old lacquer back? or sand all the colour off and start again?
I've got mine to do and I'm debating doing the whole car rather than just the rusty sections as though the majority of the paint is good it looks like a custom metallic colour and I'm concerned about the match.
Also what equipment/tools have you used?
Looks like a lovely finish though - anything special planned engine wise?
Hi,
I sanded back all the standard paint with 240 grit along with applying filler where needed. Got that smooth as possible, then blew it all over with high build primer. Wet sanded this with 600grit and then painted the whole thing with two coats of 2k.
It will need a wet sand and polish but its the best result I've had yet from a couple of spray jobs I've done. I'm by no means a professional and the car is a daily so wasn't to fussed about perfection. If you have fancy metallic paint then a whole repaint is probably best as even the best paintshops will struggle to match.
Just got a standard 1275 going in its only for the misses.
#42
Mad Max
-
- Members
-
- 306 posts
Speeding Along Now
- Location: On a driveway under a car
Posted 14 May 2015 - 03:56 PM
So time for an update.
First off the bad news, not going to make London to brighton. The front calipers are too rusty so am waiting for rebuild kit and the studs snapped on the thermostat housing so waiting for new ones of them. I have sold my tickets
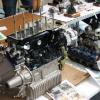
Anyway the engines in, along with a lot of the interior and electrics. I'll let the pictures do the talking:


Hopefully everthing will be here for the weekend to get it started and back on its wheels.
#43
Mad Max
-
- Members
-
- 306 posts
Speeding Along Now
- Location: On a driveway under a car
Posted 14 May 2015 - 03:58 PM
Oh i'm also looking for a passenger front "GREY" wheelarch. My partner decided to run it over on the motorway and turns out they are rare a rocking horse poop. So if any of you friendly bunch have a spare I would be very greatful :)
#44
Enzo
-

- Noobies
-
- 2 posts
Starting My Mini Up
Posted 18 May 2015 - 10:23 PM
Absolutely Fantastic Work! Looks Incredible, very well done 
#45
Mad Max
-
- Members
-
- 306 posts
Speeding Along Now
- Location: On a driveway under a car
Posted 24 May 2015 - 03:08 PM
Didn't realise i had left it so long. Basically been plugging away finishing off the interior, electrics, brakes and windows.


Was a bit of a struggle but managed to rebuild all the doors and stick all the windows back in.


Also spent most of today welding up brackets to fit these new (to us) seats. They are out of a MX5 and fit a treat.


0 user(s) are reading this topic
0 members, 0 guests, 0 anonymous users


