Another question while I have your attention knowledgeable people?
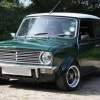
I am changing my crown wheel and pinion to a higher ratio so I have to some how get that nut off the main shaft which is torqued to 150lbs. Their is suppose to be a trick where you pull your gear selector shaft out then rotate it so you can lock in 2 gears at a time.
This trick doesn't seem to work on my A+ box, any ideas?
Thanks Brad
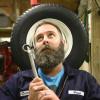
you've removed the selector shaft detente spring/sleeve/ball bearing from the side of the diff housing ?
if so, you should be able to rotate the selector shaft so the lugs are free of the forks. pull it rearward as far as it will go then you should be able move the synchro hubs independently to engage 1st gear and 4th gear
watch out when engaging 4th gear though, with the selector shaft disengaged the 3rd/4th synchro hub can overshoot releasing the springs & ball bearings - a real pain to get them all back in with the mainshaft in place. put some kind of block between the synchro hub and the case to stop it moving too far
disengaged it'll look like this

Edited by KTS, 05 June 2021 - 11:34 AM.


 Quaife diff cover changes.jpg 37.56K
0 downloads
Quaife diff cover changes.jpg 37.56K
0 downloads