You need the battery light to wake up the alternator, if the battery light doesn't work the vehicle will not charge. If I was in your position I'd try and get a proper tune, if you have just fitted a random carb then needle won't be correct so your fuelling will be all wrong and the car will run poorly.
As for an air leak on the head gasket??? A manifold gasket perhaps but the head gasket is a new one on me. Check make sure you manifold and carb is nice and tight, if so maybe a new gasket is required or if you have an aftermarket manifold sometimes the surfaces are uneven and need matching between the inlet and exhaust manifolds.
If the vehicle is overheating I wouldn't use it until you resolved that as you will just cause more problems and potentially damage the engine. Also running an a series without a thermostat is not a good idea as the coolant doesn't circulate around the block properly. I'd get a new thermostat and try that, if you still have an overheating problem I would then address that before anything else.


Italian Job Mini Project
Started by
supersimono
, May 21 2022 03:33 PM
52 replies to this topic
#47

supersimono
-
- Noobies
-

- 110 posts
Mini Mad
Posted 14 September 2025 - 02:15 PM
Tackling the cooling issue first - drain and flush of system.
I suppose that an engine sitting with just distilled water in for 2 years and infrequently run is going to have a bit of colour to it…
 IMG_1498.jpeg 48.35K
2 downloads
IMG_1499.jpeg 46.2K
2 downloads
IMG_1500.jpeg 60.13K
2 downloads
IMG_1498.jpeg 48.35K
2 downloads
IMG_1499.jpeg 46.2K
2 downloads
IMG_1500.jpeg 60.13K
2 downloads
Drained and ran a hose through the radiator, cylinder head and heater matrix til clear water came out. Got some radiator flush from halfords and ran that through.
Replaced the thermostat (88 degree) and new gaskets - thankfully the engine started and ran (although had to keep my foot on the accelerator to prevent stalling till it heated up enough). Drained again this came out:
IMG_1507.jpeg 55.51K
2 downloads
Ran the hose through again till clear water was running. Was in a rush to put radiator switch back in as it was raining and pushed the seal inside radiator, tried to get it out but no luck so I might have to take the radiator out to to that 😑 in doing so I found there is still sludge at the bottom of the radiator
IMG_1508.jpeg 49.77K
1 downloads
Seems like I’ve still got some flushing through to do before trying to fix my other issues…
I suppose that an engine sitting with just distilled water in for 2 years and infrequently run is going to have a bit of colour to it…
IMG_1498.jpeg 48.35K
2 downloads
IMG_1499.jpeg 46.2K
2 downloads
IMG_1500.jpeg 60.13K
2 downloadsDrained and ran a hose through the radiator, cylinder head and heater matrix til clear water came out. Got some radiator flush from halfords and ran that through.
Replaced the thermostat (88 degree) and new gaskets - thankfully the engine started and ran (although had to keep my foot on the accelerator to prevent stalling till it heated up enough). Drained again this came out:
IMG_1507.jpeg 55.51K
2 downloadsRan the hose through again till clear water was running. Was in a rush to put radiator switch back in as it was raining and pushed the seal inside radiator, tried to get it out but no luck so I might have to take the radiator out to to that 😑 in doing so I found there is still sludge at the bottom of the radiator
IMG_1508.jpeg 49.77K
1 downloadsSeems like I’ve still got some flushing through to do before trying to fix my other issues…
#48
supersimono
-
- Noobies
-
- 110 posts
Mini Mad
Posted 14 September 2025 - 02:19 PM
Tackling the cooling issue first - drain and flush of system.
I suppose that an engine sitting with just distilled water in for 2 years and infrequently run is going to have a bit of colour to it…
IMG_1498.jpeg 48.35K
2 downloads
IMG_1499.jpeg 46.2K
2 downloads
IMG_1500.jpeg 60.13K
2 downloads
Drained and ran a hose through the radiator, cylinder head and heater matrix til clear water came out. Got some radiator flush from halfords and ran that through.
Replaced the thermostat (88 degree) and new gaskets - thankfully the engine started and ran (although had to keep my foot on the accelerator to prevent stalling till it heated up enough). Drained again this came out:
IMG_1507.jpeg 55.51K
2 downloads
Ran the hose through again till clear water was running. Was in a rush to put radiator switch back in as it was raining and pushed the seal inside radiator, tried to get it out but no luck so I might have to take the radiator out to to that 😑 in doing so I found there is still sludge at the bottom of the radiator
IMG_1508.jpeg 49.77K
1 downloads
Seems like I’ve still got some flushing through to do before trying to fix my other issues…
I suppose that an engine sitting with just distilled water in for 2 years and infrequently run is going to have a bit of colour to it…
IMG_1498.jpeg 48.35K
2 downloads
IMG_1499.jpeg 46.2K
2 downloads
IMG_1500.jpeg 60.13K
2 downloadsDrained and ran a hose through the radiator, cylinder head and heater matrix til clear water came out. Got some radiator flush from halfords and ran that through.
Replaced the thermostat (88 degree) and new gaskets - thankfully the engine started and ran (although had to keep my foot on the accelerator to prevent stalling till it heated up enough). Drained again this came out:
IMG_1507.jpeg 55.51K
2 downloadsRan the hose through again till clear water was running. Was in a rush to put radiator switch back in as it was raining and pushed the seal inside radiator, tried to get it out but no luck so I might have to take the radiator out to to that 😑 in doing so I found there is still sludge at the bottom of the radiator
IMG_1508.jpeg 49.77K
1 downloadsSeems like I’ve still got some flushing through to do before trying to fix my other issues…
#49
supersimono
-
- Noobies
-
- 110 posts
Mini Mad
Posted 14 September 2025 - 02:20 PM
Tackling the cooling issue first - drain and flush of system.
I suppose that an engine sitting with just distilled water in for 2 years and infrequently run is going to have a bit of colour to it…
IMG_1498.jpeg 48.35K
2 downloads
IMG_1499.jpeg 46.2K
2 downloads
IMG_1500.jpeg 60.13K
2 downloads
Drained and ran a hose through the radiator, cylinder head and heater matrix til clear water came out. Got some radiator flush from halfords and ran that through.
Replaced the thermostat (88 degree) and new gaskets - thankfully the engine started and ran (although had to keep my foot on the accelerator to prevent stalling till it heated up enough). Drained again this came out:
IMG_1507.jpeg 55.51K
2 downloads
Ran the hose through again till clear water was running. Was in a rush to put radiator switch back in as it was raining and pushed the seal inside radiator, tried to get it out but no luck so I might have to take the radiator out to to that 😑 in doing so I found there is still sludge at the bottom of the radiator
IMG_1508.jpeg 49.77K
1 downloads
Seems like I’ve still got some flushing through to do before trying to fix my other issues…
I suppose that an engine sitting with just distilled water in for 2 years and infrequently run is going to have a bit of colour to it…
IMG_1498.jpeg 48.35K
2 downloads
IMG_1499.jpeg 46.2K
2 downloads
IMG_1500.jpeg 60.13K
2 downloadsDrained and ran a hose through the radiator, cylinder head and heater matrix til clear water came out. Got some radiator flush from halfords and ran that through.
Replaced the thermostat (88 degree) and new gaskets - thankfully the engine started and ran (although had to keep my foot on the accelerator to prevent stalling till it heated up enough). Drained again this came out:
IMG_1507.jpeg 55.51K
2 downloadsRan the hose through again till clear water was running. Was in a rush to put radiator switch back in as it was raining and pushed the seal inside radiator, tried to get it out but no luck so I might have to take the radiator out to to that 😑 in doing so I found there is still sludge at the bottom of the radiator
IMG_1508.jpeg 49.77K
1 downloadsSeems like I’ve still got some flushing through to do before trying to fix my other issues…
#50
supersimono
-
- Noobies
-
- 110 posts
Mini Mad
Posted 18 January 2026 - 04:13 PM
Right, I’ve made some good progress. Replaced the radiator and flushed the system out.
I was still getting the temperature gauge maxing out which I was concerned about, but when using a temperature probe it’s in a good range (I think). I think this might be to do with the voltage stabiliser bypass fitted as I’ve added the external one to bypass the one in the 3 dial clock. I assume ‘old’ does not work with the new temperature probe in the engine block? Someone correct me if wrong
IMG_2104.jpeg 46.87K
2 downloads
IMG_2110.jpeg 43.1K
1 downloads
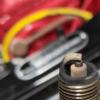
I’ve been meaning to look at the carb (HIF44) and what is inside it. As ive been having some issue with the idle and with the mods done to the engine, I thought to check. I also realised I was using BP6ESR so swapped those for BP6ES.
It was a refurbish eBay purchase and it as standard parts (red spring and BDL needle). As a tuned and 1310 with a fast road cam (can’t remember which though), the idle was pretty poor and a bit of research suggested that I should use a yellow spring with BDL or BDK. I started with a BDL but was sent the wrong spring from Minispares so tried this with a red spring.
It seemed to work ‘better’ but I was going to wait to test when got the yellow spring.
Yellow spring arrived and I made a silly mistake in dropping the piston and bent the needle….
Fortunately had BDK, so tried this with the yellow spring and seemed ok. At this point I booked in AC Dodd for tuning.
IMG_2165.jpeg 48.96K
2 downloads
IMG_2166.jpeg 51.04K
2 downloads
Checking my plugs, 1 and 4 are very lean, 2 and 3 are sooty. More research suggested that I should use BP7ES so went to try those, will continue in a new post as this is where I need some help…
IMG_2138.jpeg 49.83K
2 downloads
I was still getting the temperature gauge maxing out which I was concerned about, but when using a temperature probe it’s in a good range (I think). I think this might be to do with the voltage stabiliser bypass fitted as I’ve added the external one to bypass the one in the 3 dial clock. I assume ‘old’ does not work with the new temperature probe in the engine block? Someone correct me if wrong
IMG_2104.jpeg 46.87K
2 downloads
IMG_2110.jpeg 43.1K
1 downloadsI’ve been meaning to look at the carb (HIF44) and what is inside it. As ive been having some issue with the idle and with the mods done to the engine, I thought to check. I also realised I was using BP6ESR so swapped those for BP6ES.
It was a refurbish eBay purchase and it as standard parts (red spring and BDL needle). As a tuned and 1310 with a fast road cam (can’t remember which though), the idle was pretty poor and a bit of research suggested that I should use a yellow spring with BDL or BDK. I started with a BDL but was sent the wrong spring from Minispares so tried this with a red spring.
It seemed to work ‘better’ but I was going to wait to test when got the yellow spring.
Yellow spring arrived and I made a silly mistake in dropping the piston and bent the needle….
Fortunately had BDK, so tried this with the yellow spring and seemed ok. At this point I booked in AC Dodd for tuning.
IMG_2165.jpeg 48.96K
2 downloads
IMG_2166.jpeg 51.04K
2 downloadsChecking my plugs, 1 and 4 are very lean, 2 and 3 are sooty. More research suggested that I should use BP7ES so went to try those, will continue in a new post as this is where I need some help…
IMG_2138.jpeg 49.83K
2 downloads
#51
supersimono
-
- Noobies
-
- 110 posts
Mini Mad
Posted 18 January 2026 - 04:27 PM
So with AC Dodd booked, I went to Minispares to get new plugs (BP7ES). I had a quick chat about breather hoses as some of mine had split and the said that I should delete the charcoal cannister while doing it.
So I’ve done that today with the new plugs (gapped at 35 thou) and I’ve now can not start the car. Tried 25 thou and still didn’t work. Adjusted the mixture all the way to max but wouldn’t start. I could get ignition with easy start but wouldn’t run on after that.
Have I done something wrong in my set up? I’m worried I’ve messed up the breather hoses/vacuum hoses in doing this and with AC booked next month I’d like to have it running before.
My old setup had the float chamber overflow open as it was not connected to my charcoal canister, so I think this might have been an air lead. I then had the breather hoses connected to charcoal canister. Vacuum lines were from carb to manifold temp probe, and from there to dizzy and charcoal canister.
 IMG_2179.png 348.72K
2 downloads
IMG_2179.png 348.72K
2 downloads
Using what Minispares suggested, I now have breather system only connected to engine, overflow blocked off, and vacuum from carb to dizzy
IMG_2185.jpeg 67.3K
4 downloads
As mentioned, after all these changes, the car dos not start, even on max mixture adjustment. Can someone advise?
So I’ve done that today with the new plugs (gapped at 35 thou) and I’ve now can not start the car. Tried 25 thou and still didn’t work. Adjusted the mixture all the way to max but wouldn’t start. I could get ignition with easy start but wouldn’t run on after that.
Have I done something wrong in my set up? I’m worried I’ve messed up the breather hoses/vacuum hoses in doing this and with AC booked next month I’d like to have it running before.
My old setup had the float chamber overflow open as it was not connected to my charcoal canister, so I think this might have been an air lead. I then had the breather hoses connected to charcoal canister. Vacuum lines were from carb to manifold temp probe, and from there to dizzy and charcoal canister.
IMG_2179.png 348.72K
2 downloadsUsing what Minispares suggested, I now have breather system only connected to engine, overflow blocked off, and vacuum from carb to dizzy
IMG_2185.jpeg 67.3K
4 downloadsAs mentioned, after all these changes, the car dos not start, even on max mixture adjustment. Can someone advise?
#52
sonscar
-

- Members
-
- 3,220 posts
Up Into Fourth
- Location: crowle
- Local Club: none
Posted 18 January 2026 - 05:35 PM
You cannot block off the float bowl vent.I am not familiar with hif carbs so you could be ok but worth checking.Have you introduced an air leak? Steve..
#53
lsto
-
- Members
-
- 710 posts
One Carb Or Two?
- Location: Essex
Posted 18 January 2026 - 11:01 PM
As above id unblock the overflow and leave it open.


4 user(s) are reading this topic
0 members, 4 guests, 0 anonymous users


