Jump to content


Photo
- - - - -

Italian Job Mini Project


  • Please log in to reply
52 replies to this topic

#31 supersimono

supersimono

    Mini Mad

  • Noobies
  • PipPipPipPip
  • 110 posts

Posted 31 December 2022 - 02:11 PM

Final bit of work for the year for me is a bit of painting.

I’ve painted the petrol tank (after a petrol leak while changing rubber cones and the paint was stripped off) and brake servo.

One new year is out the way i’ll sort out a new carb, front wiring loom and rubber fuel/cooling hoses and then hopefully that should get me in a state to start it up 😊 Luckily I’ve had some Xmas and birthday money so I can put it all towards that.

Attached Files


#32 supersimono

supersimono

    Mini Mad

  • Noobies
  • PipPipPipPip
  • 110 posts

Posted 19 January 2023 - 11:37 AM

Been a while since I posted but I hope everyone had a good new year and getting stuck into their projects!


Thanks to all my Christmas and birthday money I was able to take a trip to Minispares to but some more bits!


First thing I purchased was the a new manifold LCB (C-AEG368) with a new stainless RC40 (C-STR811S). For some reason I thought I had a catalytic converter on my old exhaust and could re-use it but I didn't so I'll have to see if Minispares have downpipe that fits between the manifold and the box.


Next big purchase was a new front wiring loom (YMC12010). It's a bit daunting going to replace the wiring loom as I'm learning everything as I go but hopefully I can identify all the wires and label them before I put it in. I'm going to get some self adhesive cable labels so it's easier to identify if I ever need to find a specific cable/connector. I did notice that my loom didn't come with the bulkhead and dash grommets fitted so I assume I can take them off the old one and fit or buy new? 


To complicate it further I've decided to add some extra protection/improve the aesthetics of the loom by adding a braid over the visible parts of the loom in the engine bay and under the dash. I watched the YT series by Total Car Reviews where he braided his loom and it looked really good so I thought I would give it a go..


I bought a few sizes of cable braid sleeve (10mm, 20mm, 32mm) so that should get over all the connectors. I'll then be heat shrinking the ends for a nice finish. See images below of my first attempt - the heat shrink really finishes it well. I'll figure out what to do where the loom splits and make a better cut through the braid but this will be covered with insulation tape to protect it.


I still need to figure out what to do with my carburettor - I plan to go from HIF38 to HIF44 but not yet purchased a second hand one off eBay (I bought a service kit in preparation for it).


I still need to buy the flexible tubes for fuel lines but that's for the next shopping trip. I'll probably buy the braided type as they look cool!

Attached Files


#33 supersimono

supersimono

    Mini Mad

  • Noobies
  • PipPipPipPip
  • 110 posts

Posted 28 January 2023 - 03:23 PM

Update on the wiring loom - I've pretty much finished the braiding of my new front loom where I can and think that it will be visible. Had some difficulty getting the 30mm braid over the alternator fuse holders abd then having to created an opening for those to pass through but everything else was straight forward. 


Thankfully I labeled pretty much all the conenctions so it should be straight forward connecting it back up....


I noted that there were some differences on my look compared to the one I removed:

  • bulkhead grommets were missing
  • some connectors missing (see image) - I transplanted this to the now loom
  • my old loom had the indicator bulds attached. Again I will transplant this on to new loom
  • some connections I haven't figured out yet but since I've worked out everything connected before I'm assuming they are not used in new loom  =]

Since I've replaced the front loom I think it would be wise to do teh headlight loom. I'll have to figure out where it is on Minispares to order.

Attached Files


#34 supersimono

supersimono

    Mini Mad

  • Noobies
  • PipPipPipPip
  • 110 posts

Posted 30 January 2023 - 01:25 PM

This weekend I started working on the cooling system fitting the new hoses that I purchased from MED as I liked the look of the cloth wrap. The kit doesn't appear to come with all the hoses but I connected the radiator/water pump hoses. Can someone sense check my hose route as I forgot to take photos (see marked up image) for the heater matrix hoses?


I then intended to fir the steering column back. Bought new shear bolts for the dash rail bracket and when I came to fit the thread was binding. I didn't want to force it any further since I was afraid it would shear. I originally thought that the thread on the shear bolt was metric or different pitch but after checking an M8 bolt at work and measuring the thread pitch I soon realised that it the thread pitch was in fact a fine thread (5/16 - 24 UNF). I checked my recent order with Minispares only to realise that I'd ordered the steering column das bracket/drop bracket (51K4001) rather than steering column dash bracket/dash rail (51K4001) - what an idiot!!


Attached Files


#35 supersimono

supersimono

    Mini Mad

  • Noobies
  • PipPipPipPip
  • 110 posts

Posted 06 February 2023 - 09:30 PM

My recent eBay purchase anrrived end of last week - bought a refurbished and vapour cleaned/polished HIF44 carb. It’s running a BDL needle and has all new parts. I think it was worth paying a little extra for this rather than buying a used one and servicing myself so I’m pretty happy with it considering the price of new carbs 😅

Attached Files


#36 supersimono

supersimono

    Mini Mad

  • Noobies
  • PipPipPipPip
  • 110 posts

Posted 20 February 2023 - 12:51 PM

Got a chance to do some work on the mini this weekend after many weekends of having to work over the weekend  :mmkay:


Fixed the issue with the shear bolts on the steering column/dash - I hope I never have to go through that process again! I've kept the heads of the shear bolts on just in case :P


The major work done this weekend was fitting the wiring loom. I've not completely finished routing and reconnecting everything but it's a major step towards 'hopefully' driving her this year.


My only concern is that my loom didn't come with a bulkhead rubber grommet si I might have to salvage that from my old loom - unless anyone has some fancy suggestions?

Attached Files


#37 supersimono

supersimono

    Mini Mad

  • Noobies
  • PipPipPipPip
  • 110 posts

Posted 15 April 2023 - 03:50 PM

Been a while since updated, haven’t really done as much as I’d like but made some progress on finishing installing the wiring loom. 


I have two Wipac spotlights fitted and I’ve decided to replace this part of the loom as what I was seeing didn’t really make sense to me (not that I’m in anyway an expert in electrics) as there were two relays fitted one of which has four wires connected but two didn’t attach anywhere and it had a fuse in it which made me think some mods have been made in its previous life.


I’m replacing it with the spotlight look kit from minispares but before I commit to fitting it I’d appreciate if someone can someone my wiring diagrams. I’ve drawn the old and new diagrams and I think it would work. The kit said to attach the red wire (with 15A inline fuse) to power but on my old I think this went to terminal 4 on my fuse box. Not sure if that is correct.


apart from this I’ve been trying to figure out breather hose routes, vacuum lines etc to hopefully get it started soon. I don’t know if it’s going to start so I might need to get it checked over if anyone knows of someone in the Berkshire area?


Attached Files


#38 KTS

KTS

    Up Into Fourth

  • Members
  • PipPipPipPipPipPipPipPipPip
  • 2,490 posts
  • Location: Herts

Posted 16 April 2023 - 10:18 AM

personally i would take the power for the new loom direct from the battery cable post in the engine bay.  this avoids adding any additional load to the existing wiring


Conventionally, terminal 30 is power in and 87 is power out, with 86 & 85 being signal and signal earth.


from the diagram it's not entirely clear what' going on : 


terminal 85 appears to connect to the spotlights using a cable BL.  if that's supposed to be power to the lamps then it should be connected to terminal 87 not 85


likewise terminal 87 appears to be connected to the existing mainbeam circuit using a G cable.  if that's supposed to be the switch signal for the relay then it should connect to terminal 85 not 87


hope this helps


#39 supersimono

supersimono

    Mini Mad

  • Noobies
  • PipPipPipPip
  • 110 posts

Posted 02 May 2023 - 11:55 AM

waiting for some bits to come from Somerford to finish of vacuum lines and breather hoses, but I finally found the source of my fuel leak last year  :ohno:

Attached Files


#40 supersimono

supersimono

    Mini Mad

  • Noobies
  • PipPipPipPip
  • 110 posts

Posted 15 May 2023 - 01:40 PM

Managed to get some time on the mini this weekend in between going to the Basingstoke festival of transport. Spotted a few minis and spotted a very green Italian job, first time I've seen one!


My parts from Somerford arrive and I've attempted to finish off vacuum lines and breather hoses. I forgot to take pictures when it was removed so I've had to try and figure it out but could someone confirm that it looks correct? I've got to feed the fuel overflow through the wing to and attach to the charcoal canister.


Does anyone have some advise on routing? It's not show quality, but I'd like it to be a bit more presentable if I could..


Apart from a few electical bits to reconnect and a once over so I haven't missed anything I think I'm finally there to start her up!  :proud:

Attached Files


#41 supersimono

supersimono

    Mini Mad

  • Noobies
  • PipPipPipPip
  • 110 posts

Posted 28 October 2023 - 04:21 PM

So it’s been a while since I posted, but some major update - the engine has been fired up for the first time in 2 years! Still a bit to do (tube, minor electrics, interior etc) but getting close to finishing

https://drive.google...cuF97OM1RLBf_2'>first start

Still having a problem though, I’ve put a new slave cylinder in and the engine was rebuilt with a new clutch but I’m not getting any bite point. I’ve bled the slave with and eezieblead kit and get a full stroke in the pedal, looks like it’s got a good stroke on the clutch but it won’t go into gear - any help?

https://drive.google...w?usp=drivesdk'>clutch

#42 sonscar

sonscar

    Up Into Fourth

  • Members
  • PipPipPipPipPipPipPipPipPip
  • 3,195 posts
  • Location: crowle
  • Local Club: none

Posted 28 October 2023 - 07:42 PM

Use a G clamp to clamp the slave cylinder fully retracted and re bleed.The pedal should then be rock hard with no travel.hold the pressure for a minute and see if it moves.Movement shows failed master cylinder.Free to check.Steve..

#43 supersimono

supersimono

    Mini Mad

  • Noobies
  • PipPipPipPip
  • 110 posts

Posted 29 October 2023 - 08:24 AM

Use a G clamp to clamp the slave cylinder fully retracted and re bleed.The pedal should then be rock hard with no travel.hold the pressure for a minute and see if it moves.Movement shows failed master cylinder.Free to check.Steve..


Thanks sonscar! I wasn’t sure where the arm should start or stop so I’ll try that today. I bought a new master cylinder and a braided hose to replace the metal/rubber tube so I might as well replace it all anyway and start fresh fingers crossed it works!

Edited by supersimono, 29 October 2023 - 08:24 AM.


#44 supersimono

supersimono

    Mini Mad

  • Noobies
  • PipPipPipPip
  • 110 posts

Posted 06 September 2025 - 04:10 PM

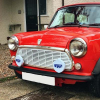
As most projects go, life and everything got in the way but I have somewhat finished the car! The kick in the backside was to get it ready for my wedding, which it did! although it wasn’t without issues… (ended up being towed and pushed to the venue)

Attached File  A17D1700-5922-48D5-8BF1-F49942618401.jpeg   53.18K   1 downloads

Since my last update there were some minor electrical and brake issues to fix:
- the new loom I had purchased from Minispares had incorrect plug wiring for the indicator stalk, it took me ages to figure out the issue but without the proper tools to swap the pins I’ve swapped the wires on the indicator stalk to get it to work.

Attached File  IMG_0083.jpeg   69.85K   2 downloads

-there is an issue with the connector that goes into the clocks, as it is 3D printed I think it is slightly loose so unless I push it the warning and ignition lights do not come on. I’ve checked my voltage stabiliser which is working and replaced the PCB so I’m pretty confident it is the connector, so I’ve fitted something temporary to get them to come on. Am I right in thinking that if the red light does not come on this does not engage the charging circuit? I’ve had to buy a second new battery as the I drained the other one till the point it could not hold charge.

- I had accidentally fitted the brake caliper the wrong way I.e. the bleed nipples were at the bottom rather than the top. Again spent ages bleeding the system with no improvement but something made me think to check and ended up doing is at 10pm day before my MoT..

- I have upgrades and exterior lights to LED and replaced the halogens unit with Wipac LED headlights, I wanted to changed the chrome to a black finish so blasted and painted them - I think it looks pretty nice!

Attached File  IMG_1316 2.jpeg   66.32K   0 downloads

- and finally managed to source a complete set of Italian job seat cushion to replace the rear cushion that had soaked up my a full petrol when the pipe split while doing my suspension

Now as I said, the aim was to get the car to be running for my wedding day and drive my groomsmen to the venue, and this is where work still needs to be done and I really need some help…

Edited by supersimono, 07 September 2025 - 08:06 AM.


#45 supersimono

supersimono

    Mini Mad

  • Noobies
  • PipPipPipPip
  • 110 posts

Posted 06 September 2025 - 04:50 PM

The carburettor I have fitted is a HIF44, previously a HIF38. I don’t know exactly what needle is fitted or anything in it but the car ‘had’ been running ok and I had intended to get the car tuned after getting back on the road.

I successfully drove the car to MoT which passed (they had to do some adjustment to pass emissions but changed it after to run ‘better’) and then managed to drive home. That evening I had to get my dad to jump start me and that is where I’ve had the start of poor running issues….looked at the spark plugs that evening and they were all black(suggesting rich mixture). I assume the issue with the connector on the dash and not charging the battery was giving me a bad spark and not burning correctly, so as I continued to drive and more carbon build up it would get worse?

I called someone out to tune the car as I couldn’t drive it back to the garage that did the MoT. He checked everything and suggested that there was an air leak somewhere, likely the head gasket. During the tuning we maxed out the temperature gauge. It ran ‘ok’ but wasn’t perfect.

This is where I need some advise as to what to check:
- Should I focus on the air leak first? I’ve retorqued the cylinder head to the correct torque value (50Nm - 55Nm)
- The tuning guy did a compression test and said that it was ok. We did see cylinders 2 and 3 getting very hot.
- I’ve checked the thermostat - it was faulty so I’ve removed it but I would have thought it could still run but sadly it seems to have got worse
- how critical is the connections to the charcoal canister? The only one I have not connected is the carb fuel overflow to charcoal canister, could that be an air leak?
- should I drain the water and flush through, fill with water/coolant and then ‘burp’ the system in case there is an air lock?
- could my dizzy and coil be faulty? I have a 65D which ‘has’ been working (I assume if I’ve driven it to/from MoT that means it has been fine recently?)

I’m kind of stumped as to what and where to start so any help would be appreciated…


4 user(s) are reading this topic

0 members, 4 guests, 0 anonymous users