
what trigger wheel is taht then? is it a KAD one?

The KAD rebuild thread......
Started by
danwebster
, Mar 26 2007 08:20 PM
637 replies to this topic
#377

danwebster
-
- Members
-

- 637 posts
Super Mini Mad
Posted 01 July 2007 - 04:48 PM
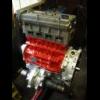
Yeah its the KAD one.
#378
lvm18
-
- Members
-
- 164 posts
Mini Mad
- Local Club: Midas Owners Club
Posted 01 July 2007 - 04:51 PM
Hi Dan
......really nice electric water pump outlet you have there.
Is that what KAD makes now? The one I saw on the channel islands KAD mini had a modified water pump with an outlet welded where the pulley used to go.
What is the position of the timing for your system is it at TDC? Mine uses the EDIS system which is 90 degrees (or 9 teeth) BTDC.
Kind regards,
David
#379
danwebster
-
- Members
-
- 637 posts
Super Mini Mad
Posted 01 July 2007 - 04:54 PM
David,
The water outlet is by SH engineering, you may have spotted SH painted on the grilles of a few miglia and seven racers?
The omex ECU i'm running enables you to put the sensor anywhere you like and adjust it within the setup, as long as its no closer than 90° BTDC.
Cheers,
Dan
The water outlet is by SH engineering, you may have spotted SH painted on the grilles of a few miglia and seven racers?
The omex ECU i'm running enables you to put the sensor anywhere you like and adjust it within the setup, as long as its no closer than 90° BTDC.
Cheers,
Dan
#380
JetBLICK
-

- Members
-
- 1,222 posts
One Carb Or Two?
- Local Club: myspace.com/worcesterretro
Posted 01 July 2007 - 05:02 PM
TV in the workshop!! .... now thers an idea 
#381
lvm18
-
- Members
-
- 164 posts
Mini Mad
- Local Club: Midas Owners Club
Posted 01 July 2007 - 05:05 PM
The outlet looks great. Nicely fabricated. Will make a note of that.
Handy having the ability to fix the sensor anywhere.
The Megajolt could be I guess, although the 10 degree backup 'limp home' mode would be lost then.
Looks like my trigger wheel is the same as yours, albeit mine is fitted to back of pulley.
I spent today stripping down the existing 7 port engine in the convertible. If I get a chance I might swap them over next weekend if the weather is nice (as I will have to put the car half in/half out of the garage so I can move the crane about).
Then all I need to do is make a new gear mechanism and loom for the ignition.
Incidently, I cant get my 10mm plug down the spark plug hole. Do you use a special one?
Also, what do you use for a dipstick. I tried to get my special prebent one in, which works OK on the 7 port under the carbs, but I just cant get the right angle with the KAD. Do use a flexible one?
Kind regards,
David
#382
lvm18
-
- Members
-
- 164 posts
Mini Mad
- Local Club: Midas Owners Club
Posted 01 July 2007 - 05:06 PM
I have a TV in mine too (Digital). Nice background noise. Its lonely doing those engine builds.
#383
danwebster
-
- Members
-
- 637 posts
Super Mini Mad
Posted 01 July 2007 - 06:23 PM
David, I use a standard metal dipstick, it just fits down between the centre 2 inlet tracts on my long inlet manifold.
No problems getting the spark plug socket in for me, I think our heads are different in that area from what you were saying though?
No problems getting the spark plug socket in for me, I think our heads are different in that area from what you were saying though?
#384
lvm18
-
- Members
-
- 164 posts
Mini Mad
- Local Club: Midas Owners Club
Posted 01 July 2007 - 06:45 PM
....looks like I'm going to have to get my plug socket machined down a bit then. It fits....just, but I dont think it will pull out once the plugs are in.
Im going to have to work out what to dip for a dipstick
Im going to have to work out what to dip for a dipstick
Edited by lvm18, 01 July 2007 - 06:45 PM.
#385
fikus01
-

- Members
-
- 1,910 posts
Camshaft & Stage Two Head
- Local Club: SMAG - Southend Mini Action Group
Posted 01 July 2007 - 06:56 PM
dan is that a ford or a rover tps? im in the process of being brave enuf to fit my megajolt and im a bit stuck for choice as our local scrappy has loads!! id just like you to narrow down my options a little!!
#386
lvm18
-
- Members
-
- 164 posts
Mini Mad
- Local Club: Midas Owners Club
Posted 01 July 2007 - 07:14 PM
...looks like a weber alpha TPS to me. Same as mine.
#387
danwebster
-
- Members
-
- 637 posts
Super Mini Mad
Posted 02 July 2007 - 04:28 PM
Its a pretty standard TPS I believe, same as the one my brother got with his DTA setup, and evidently the same as your Weber one. I got mine direct from Omex with the rest of the gear.
Today I have removed one sill completely, drivers side front floor, inner sill and inner wing completely, and tomorrow will set about welding the new panels in.
Managed to almost slice my middle finger off on the razor sharp left over metal too, which was nice.
Also removed the old cage which was collected by its new owner. Once the floors are sorted I will start to tack the new cage in place before getting it welded professionaly, needs to be done by a coded welder to get MSA / FIA certification.
#388
mini93
-

- Members
-
- 8,615 posts
He's just too casual!
- Location: Warwick
- Local Club: Medievil minis of Warwickshire
Posted 02 July 2007 - 04:31 PM
you going to have chassis strengthners in around the A and B pillers? basicly swaged plates of metal that are welded from the cage to the pillers sparently make quite a bit of difference aswell
got piccys also?
got piccys also?
Edited by mini93, 02 July 2007 - 04:31 PM.
#389
danwebster
-
- Members
-
- 637 posts
Super Mini Mad
Posted 02 July 2007 - 04:39 PM
Yep the cage will be stiched in all around the shell, in fact i'd started to stitch my old cage in when i decided to get a new one, so the first job of today was cutting the cage out.
Pics to follow tomorrow
Pics to follow tomorrow
#390
danwebster
-
- Members
-
- 637 posts
Super Mini Mad
Posted 03 July 2007 - 04:40 PM
Today has been a little bizarre, I seem to have done almost nothing, even though i've been on it all day.
Of course, if it wasn't for this bad boy i'd have got nothing done!

So far i've cut the sill off, the drivers floor and inner wing. I've cut it to suit the replacement panels, and borrowed a joggler with a clever forming tool on the back which creates a step to lap over the new panel. Can't think of the name for it right now......


Tried out my POR15 rust preventer paint too, this stuff is pretty pokey. Says on the tin that after opening you must seal the lid with plastic sandwich wrap, otherwise you will NEVER get the lid off again. I will paint this stuff inside all of the sills etc to give it a chance of resisting rust!

Oh, and this is what happens when you try and grab a very thin shard of metal after grinding away metal.....

Did that yesterday and its only just stopped bleeding
Of course, if it wasn't for this bad boy i'd have got nothing done!
So far i've cut the sill off, the drivers floor and inner wing. I've cut it to suit the replacement panels, and borrowed a joggler with a clever forming tool on the back which creates a step to lap over the new panel. Can't think of the name for it right now......
Tried out my POR15 rust preventer paint too, this stuff is pretty pokey. Says on the tin that after opening you must seal the lid with plastic sandwich wrap, otherwise you will NEVER get the lid off again. I will paint this stuff inside all of the sills etc to give it a chance of resisting rust!
Oh, and this is what happens when you try and grab a very thin shard of metal after grinding away metal.....
Did that yesterday and its only just stopped bleeding
Edited by danwebster, 03 July 2007 - 04:41 PM.


1 user(s) are reading this topic
0 members, 1 guests, 0 anonymous users


