Jump to content


Photo
- - - - -

Rear Subframe Repair - After Some Advice ...

suspension

  • Please log in to reply
20 replies to this topic

#1 Sabre75

Sabre75

    Learner Driver

  • Noobies
  • PipPip
  • 21 posts
  • Location: South/South-West

Posted 25 January 2015 - 02:22 PM

Afternoon folks  :-)


I've been a member for a while now and have made good use of lots of existing threads for troubleshooting various issues, but now I'm after a bit of advice ...


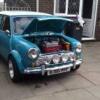
Last year my girlfriend bought herself this 90/94 1.3 SPi Mayfair/Sidewalk (I'll cover *that* in a different thread; coming soon!)

16362516942_f489442e20_z.jpg

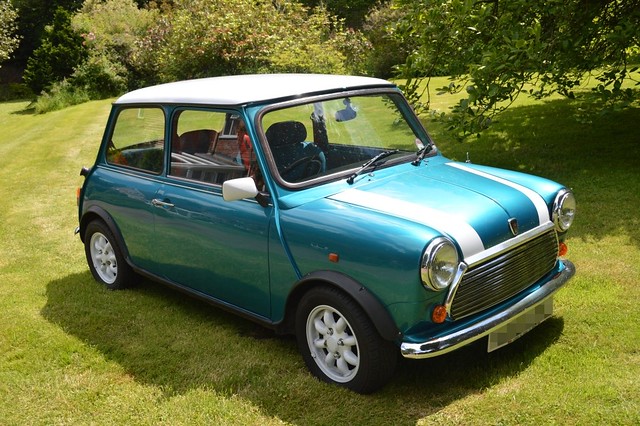
Mini_no-reg by Sabre75, on Flickr


Foolishly she didn't hide the keys from me, so it currently looks like this ...

16337448386_d9e21831a4_z.jpg

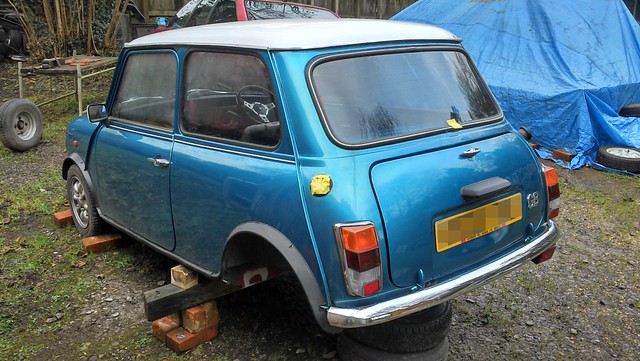
Mini_no-rear-subbie by Sabre75, on Flickr

I took the subframe off to repair an irritatingly located rust-hole; you can see the repair in the empty wheelarch.


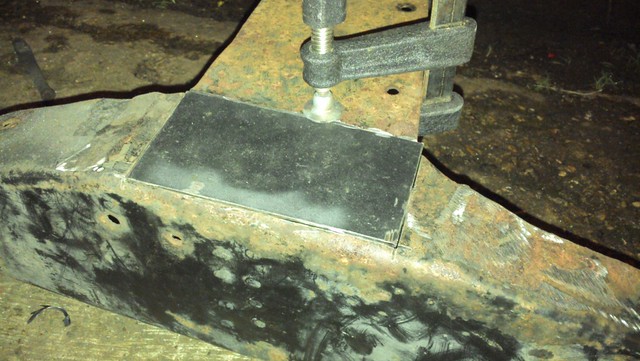
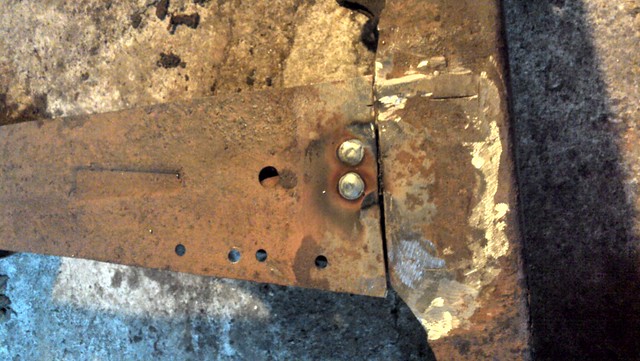
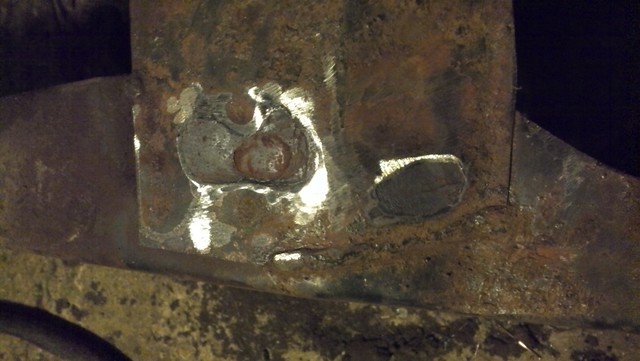
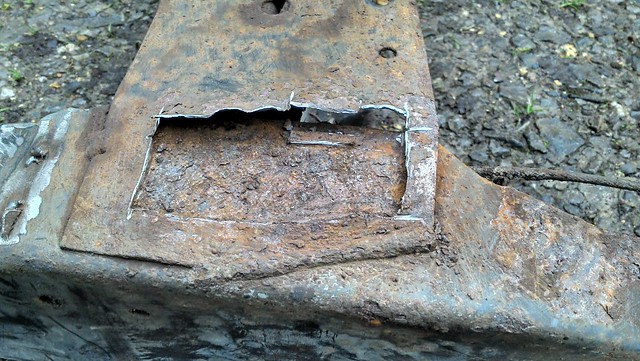
While the rear subbie was out I decided I'd tidy it up, give it a lick of paint etc. etc. - when I was cleaning it I noticed the rust damage on the frame, shown in the picture below:

15740969844_2d53a44f0a_z.jpg

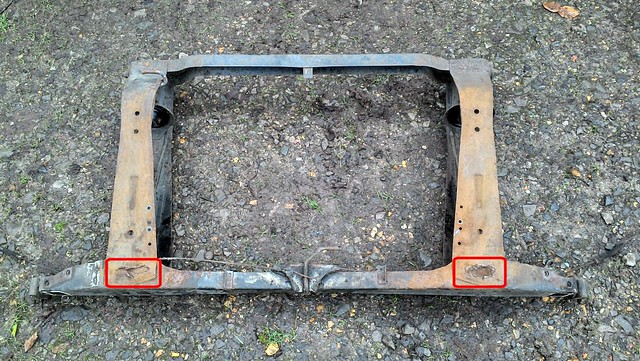
subbie_damage-marked by Sabre75, on Flickr
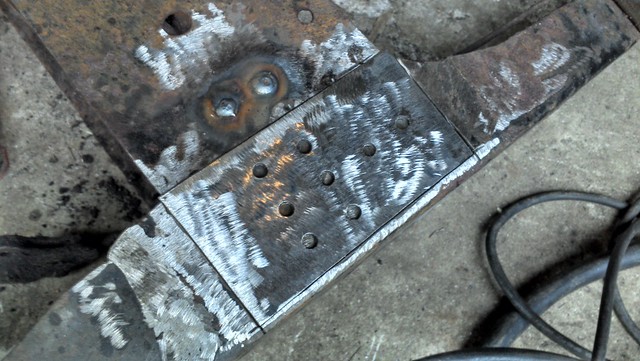
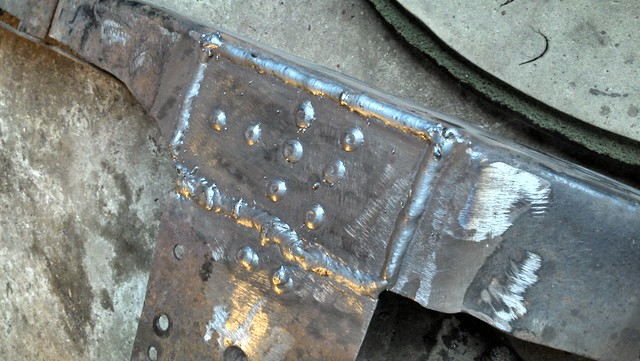
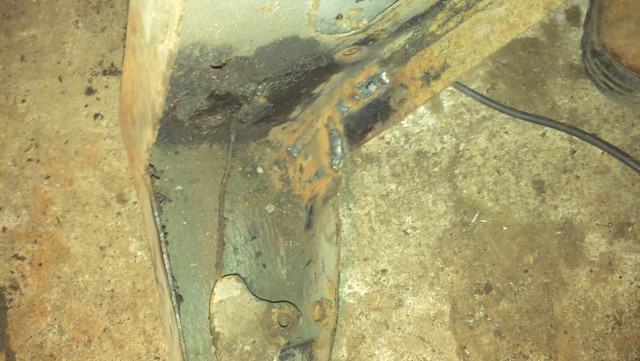
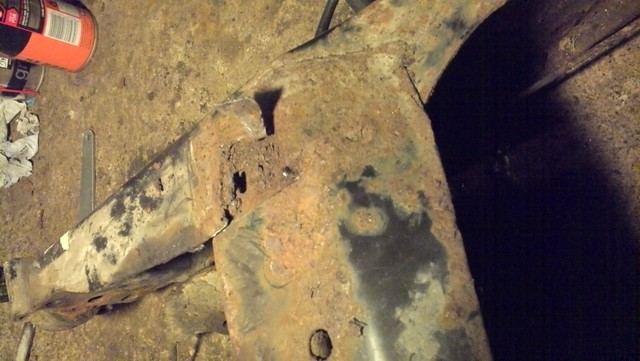
 

Close ups here:

16361675471_9693ba869c_z.jpg

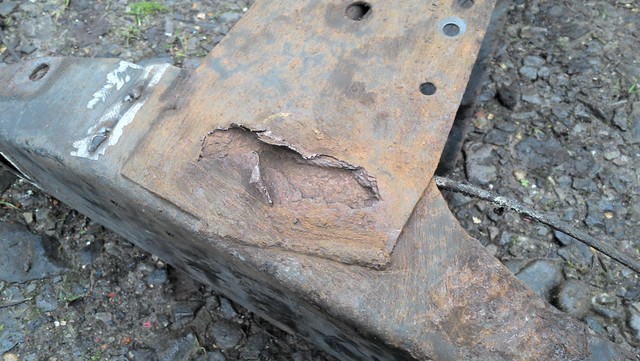
subbie-damage_ps by Sabre75, on Flickr

15740971904_aacde50807_z.jpg

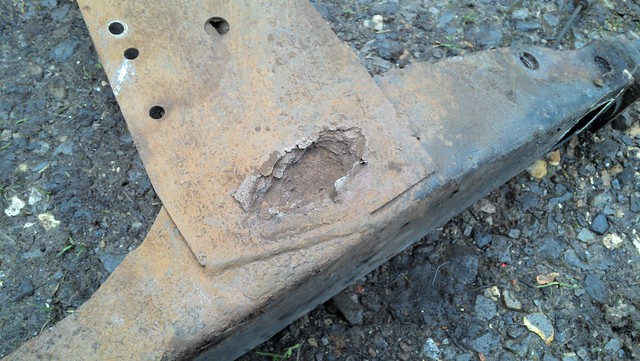
subbie-damage_ds by Sabre75, on Flickr


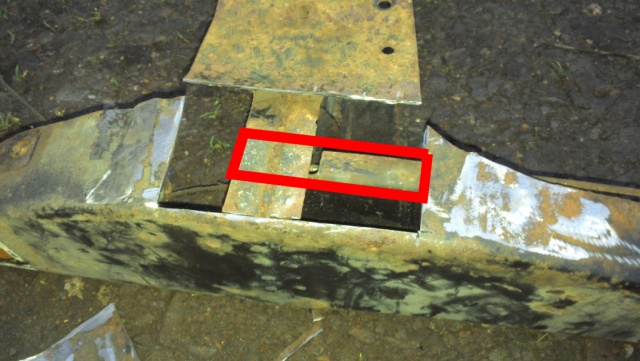
Now it looks like water has run down between the metal and rusted through - the piece 'underneath' the damage in the photo seems to be solid. Looking at how the subframe is constructed it seems the rust-damaged piece isn't carrying any load.

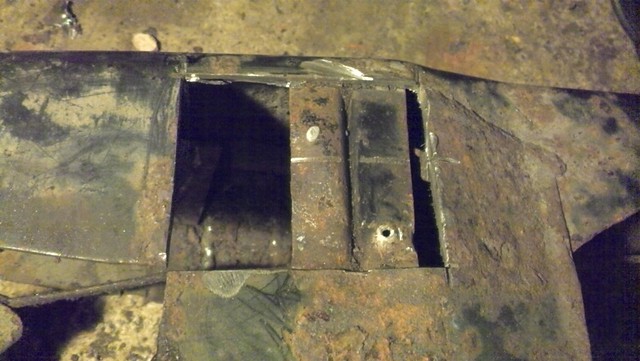
In the photo below the existing welds are show in red. I was planning to cut the damage away and re-weld the frame shown by the blue lines (welds underneath shown by dotted lines).

15740973804_30e6647868_z.jpg

subbie_proposed-repair by Sabre75, on Flickr


To my mind the repair will be stronger than the original construction, but I was just after some advice from people with more experience to see whether it's a good idea or not.


Many thanks,

Tom :D


#2 Jordie

Jordie

    Traders Area Specialist Mod, North and Scotland Area Manager

  • TMF+ Member
  • PipPipPipPipPipPipPipPipPipPipPip
  • 13,564 posts
  • Name: Jordan
  • Location: North East

Posted 25 January 2015 - 02:28 PM

Magnum panels make a repair piece, might be worth looking at those.


#3 mr cooke

mr cooke

    Mini Mad

  • Members
  • PipPipPipPip
  • 278 posts
  • Location: sunny stoke
  • Local Club: Any

Posted 25 January 2015 - 02:41 PM

I was told by my mot guy that you can no longer repair sub frames


#4 mr cooke

mr cooke

    Mini Mad

  • Members
  • PipPipPipPip
  • 278 posts
  • Location: sunny stoke
  • Local Club: Any

Posted 25 January 2015 - 02:43 PM

oh nice mini by the way


#5 cambiker71

cambiker71

    One Carb Or Two?

  • Members
  • PipPipPipPipPipPipPip
  • 1,050 posts
  • Location: Peterborough, Cambs
  • Local Club: Cambscustomclassics.com

Posted 25 January 2015 - 03:04 PM

Your MOT man is wrong mr cooke, you can't weld suspension components (like lower arms on modern cars for example)
Subframe repairs are fine if welded correctly, they're classed as small chassis sections.
This was a subject brought up on my tester refresher training last year.

#6 Jordie

Jordie

    Traders Area Specialist Mod, North and Scotland Area Manager

  • TMF+ Member
  • PipPipPipPipPipPipPipPipPipPipPip
  • 13,564 posts
  • Name: Jordan
  • Location: North East

Posted 25 January 2015 - 03:16 PM

Ideal time to put some reinforcement in for aid with jacking and stands. Seam weld the edges up etc...


#7 Sabre75

Sabre75

    Learner Driver

  • Noobies
  • PipPip
  • 21 posts
  • Location: South/South-West

Posted 25 January 2015 - 03:22 PM

Many thanks for all the replies so far, and I'm glad to know you can weld subframes otherwise I'd be knackered! (or at least down the cost of a new subbie).


I've now done a little angle-grinder assisted investigation and it seems my plan A was a little over complex. I'll make the most of the remaining daylight and post a few more pics/ideas later - watch this space.


#8 Sabre75

Sabre75

    Learner Driver

  • Noobies
  • PipPip
  • 21 posts
  • Location: South/South-West

Posted 25 January 2015 - 11:48 PM

Right - update as promised:


I cut the rust away and ended up with this ...

16341336866_e615718802_z.jpg

subbie_rust-removed-closeup by Sabre75, on Flickr


As you can see the metal underneath doesn't look too clever and 'frame' left by cutting the rust away is effectively doing nothing. As I'd gone this far I thought I might as well carry on so I cut & ground the rest of the frame away, and given the condition of the underlying metal I cut that out as well, which left me with this.

15744865624_641cdf7f4e_z.jpg

subbie_section-removed_inc-wreckage by Sabre75, on Flickr


Here's a close-up of the above. The plan is to cut a new section (shown by the solid blue line) and butt-weld it round all the edges (solid red lines). Not only should this give a strong repair it should also prevent the problem reoccuring, as it was caused by water getting between the layers and then the rust blowing through both sides. I'll also spot-weld (red triangles) it to the uprights, and seam-weld the edges (dotted red lines) where I can. And obviously I'll paint it and use seam-sealer to prevent the water getting back in.

16367504045_2dd24f9ff9_z.jpg

subbie_proposed-repair-b by Sabre75, on Flickr


I'll probably add some strengthening and incorporate jack points into that as Jordie suggested (cheers  :thumbsup:), probably using some square tube section or similar, but I'll have to be careful to avoid creating more water traps. I'll do that once I've rebuilt the section though.


Soooooo that's all of my evenings this week accounted for; I'll keep the updates coming as work progresses though.


Tom


#9 Sabre75

Sabre75

    Learner Driver

  • Noobies
  • PipPip
  • 21 posts
  • Location: South/South-West

Posted 26 January 2015 - 11:15 PM

Hello again folks - not alot of progress to report due to the inconvenience of having to go to work, but I did manage to grab an hour or two to get something done this evening.


Due to the fact I never throw anything away I managed to dig up some knackered old desk brackets that were made of just the right gauge steel ...

16190009119_097c136de5_z.jpg

scrap-metal-brackets by Sabre75, on Flickr


... so using the old cereal packet card template trick and bit of time with the angle grinder and fettling with a file I now have a nicely fitting repair panel  :proud:

16190346347_191204423b_z.jpg

subbie_repair-panel by Sabre75, on Flickr


Rather than rush it and balls everything up at this stage I thought I'd call it a night. I've got some offcuts to practice on to fine-tune the welder; using 0.6mm wire for this as the steel's only ~1-1.2mm thick and I don't want to blow holes through it  :(

I'll see if I can get it welded up tomorrow.


I've also had a think about the jack-point location. I'm thinking the best point for it will be over the vertical ribs within the frame, so once I've welded in the repair panel I'll probably weld a square tube section on in the location marked in red below, unless anyone's got any better suggestions or can see an obvious problem with this? ...

15756322393_56199b5a33_z.jpg

subbie_proposed-jackpoint by Sabre75, on Flickr


Right, that's it for tonight. My apologies if this isn't the world's most exciting thread but if I keep posting my progress it means I'm more likely to press-on and actually get it sorted!

Night folks


#10 Sabre75

Sabre75

    Learner Driver

  • Noobies
  • PipPip
  • 21 posts
  • Location: South/South-West

Posted 27 January 2015 - 11:20 PM

Evening folks - not alot of progress to report, although I did have a bit of a play to work out the settings for spot welding.

(Although technically it's not spot welding as I'm using a MIG; you drill through the top piece and then weld through onto the lower piece. I think technically that makes it plug welding).


Anyway the picture below shows the test piece (and some lovely lino flooring!). As you can see all the welds look fine from the top, but looking at the underneath you can see the welds on the left had zero-penetration into the lower piece and it just fell off! After a bit of experimentation I found the settings that worked (on the right, looking from underneath). You can see the discolouration on the lower piece from the welds.


If anyone's interested these are the settings I used on my Sealey MightyMIG 150. Power: MAX 2, Wire feed-speed: 6.


16196366548_0f6f736a1c_z.jpg

spot-weld_test by Sabre75, on Flickr


That's all for now; tragically I won't be spending all night in the garage tomorrow but I might have an update on Thursday  :-)


#11 sonikk4

sonikk4

    Twisted Paint Polisher!!!

  • Admin
  • PipPipPipPipPipPipPipPipPipPipPip
  • 15,897 posts
  • Name: Neil
  • Location: Oxfordshire

Posted 28 January 2015 - 08:39 AM

That looks ok, what size holes are you drilling?? For something like that I would be drilling 1/4" holes for max strength.

#12 Sabre75

Sabre75

    Learner Driver

  • Noobies
  • PipPip
  • 21 posts
  • Location: South/South-West

Posted 29 January 2015 - 08:15 PM

Hi sonikk4; the holes are 5/16" (I think!) - I bought a stud & spot welding kit for my MIG, and it came with a pair of double-ended drills, so that's what I used ... and because the standard drill set I had to hand was sh*te  :lol:

So that'd be 0.3125mm (5/16") rather than 0.25mm (1/4") - do you think it's worth dropping down to 1/4" then?


#13 sonikk4

sonikk4

    Twisted Paint Polisher!!!

  • Admin
  • PipPipPipPipPipPipPipPipPipPipPip
  • 15,897 posts
  • Name: Neil
  • Location: Oxfordshire

Posted 29 January 2015 - 08:21 PM

The bigger the hole the stronger the plug weld. I normally plug weld at 1 /4" everywhere i can but no smaller than 3/16". 5/16th is big but on a subframe will be fine.


#14 Sabre75

Sabre75

    Learner Driver

  • Noobies
  • PipPip
  • 21 posts
  • Location: South/South-West

Posted 01 February 2015 - 12:25 AM

Evening folks,


It's been a productive-ish day in the garage. I've managed to get the welding to the underneath of the subframe sorted.


So here's the patch patch prepped for welding. As sonikk4 suggested I used a 6.5mm drill; it was as close to a 1/4" as I had.

(also ignore the mm measurements in my previous post; it was late and I was reading the wrong part of the conversion table!)

16413726425_01a73037b6_z.jpg

subbie_repair-plate-drilled by Sabre75, on Flickr


And here it is plug- and spot-welded into place.

16413725715_5d0876d7b2_z.jpg

subbie_repair-plate-fully-welded by Sabre75, on Flickr


The other leg of the subframe wasn't as bad so I cut away the overlap and plug-welded the 'upper' piece to the subframe leg.

16411962441_3cd247bc92_z.jpg

subbie_repair2-spot-welds by Sabre75, on Flickr


I then butt-welded the 2 pieces back together; it's a fairly wide weld as I went over it a second time to strengthen it. You can also see the weld pentration from inside the subframe leg where I seam-welded the inner seams.

15793681493_e003dc808e_z.jpg

subbie_repair2-fully-welded by Sabre75, on Flickr


This is some of the seam welding inside the subframe leg. It's not my best work but it does the job.

16227502119_0e086297e5_z.jpg

subbie_outer-seam-weld by Sabre75, on Flickr


Unfortunately when I turned the frame over to weld the inner seams I spotted some more rust on the top. I dig a bit of digging and found this; and yes, that is a hole where I pushed a screwdriver though the metal!  >_<

16411959021_5f50e7f9fa_z.jpg

subbie_upper-damage by Sabre75, on Flickr


So once again I cut the rust out. Tomorrow's job; weld a new plate in here too.

16411957261_e8ce599474_z.jpg

subbie_upper-section-cutaway by Sabre75, on Flickr


The other side isn't as bad but it'll need a bit of work too.

16411959791_199b68b64d_z.jpg

subbie_upper-damage2 by Sabre75, on Flickr


I'm thinking a new frame would probably have been easier, but since I've come this far I might as well carry on!


Edited by Sabre75, 01 February 2015 - 12:31 AM.


#15 Shawbags

Shawbags

    Mini Mad

  • Members
  • PipPipPipPip
  • 159 posts
  • Location: birmingham

Posted 02 February 2015 - 05:17 PM

you've done a good job of that and saved a lot of money , nice one , hope I can get to that standard of welding .


Also tagged with one or more of these keywords: suspension

0 user(s) are reading this topic

0 members, 0 guests, 0 anonymous users