

Hi All,
Bit of a back story -
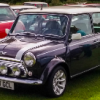
Our mini originally started its life as a 1979 Mini LE 1000. We picked it up in 2005, where the first thing that was done to it was all of the rust was cut out of it and the bodywork was refurbished, then the mini was painted a shade of pearlescent blue (actually a mazda colour).
We also acquired a 1275 A-Series engine from a 1979 Austin Allegro that was swapped into the car and made to run. We also got a set of 13" wheels which were put on at the same time with a bit of guard work being done to suit.
Fast forward a few years and I got the itch to begin upgrading. First we had 8.4" vented discs and 4-pot calipers from a MG Metro Turbo installed, and swapped out the HS4 Carb to a twin HS2 setup.
The car was running really well, then the opportunity came up to get the cylinder head ported out by a mechanic who spent years building race minis. I took the opportunity and had it done. because of the way the car was set up, it didn't really do much for it, in fact it made it worse to drive.
I then got a hold of an HIF44 carburettor and some lcb extractors (albeit they were for a small bore engine). this made a bit of a difference and the car stayed like this for a few more years.
EDIT: I forgot to mention before I had the car tuned on a rolling road at this point and it was producing 61HP at the flywheel.
Last year the mini began to drive like a heap and I was looking for a project to do, so I decided to rebuild and upgrade the mini myself. This was a bit daunting at first as I am an IT Professional by trade and this was quite a bit outside my comfort zone. I persevered and this is where Operation Mini Upgrade began.
I can't tell you how much this forum has helped me through the rebuild, so i thought i'd share it with you.
I will post some photos I was taking through the build up until now.
Edited by MordredNZ, 04 February 2016 - 08:29 PM.