Am so jealous right now! Keep up the good work!
Look forward to seeing it finished...

Type R Mini Van
Started by
v-tec van
, Jun 24 2009 10:10 AM
179 replies to this topic
#46

Twincam
-

- Members
-

- 1,742 posts
Camshaft & Stage Two Head
- Location: Londinium
- Local Club: SMAG
Posted 27 January 2010 - 12:16 AM
#47
rats in town
-

- Noobies
-
- 5 posts
Just On Tickover
Posted 07 March 2010 - 08:28 PM
hey Chris , how is progress?? pictures.??? just started a Vtec Van in the Netherlands........... regards Sven RATS IN TOWN
#48
v-tec van
-
- Noobies
-
- 97 posts
Stage One Kit Fitted
Posted 09 March 2010 - 07:04 PM
hey Chris , how is progress?? pictures.??? just started a Vtec Van in the Netherlands........... regards Sven RATS IN TOWN
Hi
Progress is slow at the moment too many projects on the go unfortunatly. should be getting back on it next week hopefully.
Im just waiting for Zcars to build me a raised tunnel, after reading some other project pages it looks/sounds like it makes life easier and looks neater later down the line.
Are you starting a 'project page' ??
Cheers
Chris
P.s good look with the build
#49
v-tec van
-
- Noobies
-
- 97 posts
Stage One Kit Fitted
Posted 25 May 2010 - 02:48 PM
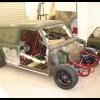
Long over due update.
coolant pipes are all in..
The raised tunnel is now welded in
 31032010137.JPG 2.43MB
230 downloads
31032010137.JPG 2.43MB
230 downloads
fuel system is nearly in.... ( quick question .... is the fuel pressure regulator plumbed in right? also what do i connect the small pipe to ontop of the regulator? )
23052010202.JPG 802.13K
249 downloads
The seats and dash are on order they should be here next week hopefully..
Just emailed z cars to sort me out a loom and ECU so i can start with the joys of auto sparking.
and finally i started to make the lower half of the bulkhead ( nicked the alli off dad ) The top half will be clear perspex eventually so the engine is on show for all to see.
23052010198.JPG 785.06K
256 downloads
Some loose ends to finish on the bits ive started ( hose clips - P clips etc ) until the loom arrives then hopefully when the electrics are in i shouldnt be far off seeing if the engine will run
Cheers
Chris
coolant pipes are all in..
The raised tunnel is now welded in
31032010137.JPG 2.43MB
230 downloadsfuel system is nearly in.... ( quick question .... is the fuel pressure regulator plumbed in right? also what do i connect the small pipe to ontop of the regulator? )
23052010202.JPG 802.13K
249 downloadsThe seats and dash are on order they should be here next week hopefully..
Just emailed z cars to sort me out a loom and ECU so i can start with the joys of auto sparking.
and finally i started to make the lower half of the bulkhead ( nicked the alli off dad
) The top half will be clear perspex eventually so the engine is on show for all to see.
23052010198.JPG 785.06K
256 downloadsSome loose ends to finish on the bits ive started ( hose clips - P clips etc ) until the loom arrives then hopefully when the electrics are in i shouldnt be far off seeing if the engine will run
Cheers
Chris
#50
cptkirk
-
- Members
-
- 1,799 posts
Camshaft & Stage Two Head
- Location: West Sussex
- Local Club: B.M.C. + Chiminiclub
Posted 25 May 2010 - 02:59 PM
fuel system is nearly in.... ( quick question .... is the fuel pressure regulator plumbed in right? also what do i connect the small pipe to ontop of the regulator? )
Chris
The pipe goes from the top of the FPR to the intake manifold, there should be a solid pipe on there somehwere to connect it to, 6mm vacuum pipe if my memory serves me right.
Good to see your making some progress, I got a perspex sheet for my parcel shelf although after experiencing the heat in there after a short run I am not too sure how it will hold up - as in not melt all over the cam cover, not wanting to scare monger, I think I'll save the perspex for show days and use my ali one for the other times.
Raised tunnel is the only way, it just makes the inside feel much better, a more grown up place.....
keep it up
Andy
Edited by cptkirk, 25 May 2010 - 03:06 PM.
#51
v-tec van
-
- Noobies
-
- 97 posts
Stage One Kit Fitted
Posted 25 May 2010 - 03:18 PM
Thanks for that andy ill go and see if i can find it.
my plan is to use the perspex vertically above the alli to leave everything on show when the rear doors are open .
chris
my plan is to use the perspex vertically above the alli to leave everything on show when the rear doors are open .
chris
#52
cptkirk
-
- Members
-
- 1,799 posts
Camshaft & Stage Two Head
- Location: West Sussex
- Local Club: B.M.C. + Chiminiclub
Posted 25 May 2010 - 03:20 PM
Ah ha - Like your thinking.
#53
vtecmini2
-

- Traders
-
- 128 posts
Mini Mad
Posted 25 May 2010 - 05:45 PM
HI Chris,
just had a look at your build looking good, just a quick question what have you use to hold ur bulk head to the cage?
thanks
john
just had a look at your build looking good, just a quick question what have you use to hold ur bulk head to the cage?
thanks
john
#54
v-tec van
-
- Noobies
-
- 97 posts
Stage One Kit Fitted
Posted 25 May 2010 - 06:31 PM
HI Chris,
just had a look at your build looking good, just a quick question what have you use to hold ur bulk head to the cage?
thanks
john
Cheers ive just used m6 rivnuts ... they seem to do the job and hold everything secure. There only a couple of quid for a pack of 50 off ebay
chris
#55
dougie1142
-
- Members
-
- 500 posts
Super Mini Mad
- Location: Inverness/Elgin
- Local Club: I.M.O.G
Posted 26 May 2010 - 12:23 AM
Looking cracking, great work and will be lovely!
Inspiring me just to rebuild my mini, not anything as good as this though!
Inspiring me just to rebuild my mini, not anything as good as this though!
#56
v-tec van
-
- Noobies
-
- 97 posts
Stage One Kit Fitted
Posted 29 May 2010 - 05:41 PM
The dash arrived yesterday afternoon at last. Got it roughly in place today just waiting on the seats to come now so i can work out where the steering wheel will sit in its final position, then i can cut out for the digidash ( paper template at the moment ) and cut the steering cowl up to make that fit. so fingers crossed the seats will arrive soon.
DSC04460.JPG 903.88K
332 downloads
cheers
chris
DSC04460.JPG 903.88K
332 downloadscheers
chris
#57
v-tec van
-
- Noobies
-
- 97 posts
Stage One Kit Fitted
Posted 02 August 2010 - 01:24 PM
Time for another update.
The seats arrived the day before i went on holiday, i found another company that was selling them as the first people messed me about they took less than a week to arrive whereas id been waiting for about 7 weeks off the first company.
kirkey 58 series
23062010217.JPG 714.83K
254 downloads
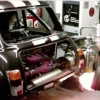
the subframes are all welded in now, just need to make a bracket fot the backrest to stiffen that up.
the wiring also arrived. i`ve mounted the power up kit and ecu on a panel on the rear bulkhead with 4 small bobbins to help with vibrations.
22062010216.JPG 801.81K
204 downloads
the engine looms all in along with the zcars loom and fuseboard. The digidash is wired in. the front headlights need connecting up when ive bought some headlights and HIDs
the wiper motor is now located under the dash to keep under the bonnet from looking cluttered ( simple but effective 20 min job )
the next job is to try and get the engine to run properly then i can think about brake and clutch lines.
chris
The seats arrived the day before i went on holiday, i found another company that was selling them as the first people messed me about they took less than a week to arrive whereas id been waiting for about 7 weeks off the first company.
kirkey 58 series
23062010217.JPG 714.83K
254 downloadsthe subframes are all welded in now, just need to make a bracket fot the backrest to stiffen that up.
the wiring also arrived. i`ve mounted the power up kit and ecu on a panel on the rear bulkhead with 4 small bobbins to help with vibrations.
22062010216.JPG 801.81K
204 downloadsthe engine looms all in along with the zcars loom and fuseboard. The digidash is wired in. the front headlights need connecting up when ive bought some headlights and HIDs
the wiper motor is now located under the dash to keep under the bonnet from looking cluttered ( simple but effective 20 min job )
the next job is to try and get the engine to run properly then i can think about brake and clutch lines.
chris
#58
rustandoil
-

- Members
-
- 317 posts
Speeding Along Now
- Location: Cotswolds
Posted 07 August 2010 - 06:34 AM
Looking good  and inspiration to get on with mine, thanks
and inspiration to get on with mine, thanks
#59
WRX DEMON Type R
-

- Noobies
-
- 3 posts
Starting My Mini Up
Posted 08 August 2010 - 04:18 PM
Awesome project.
#60
v-tec van
-
- Noobies
-
- 97 posts
Stage One Kit Fitted
Posted 13 August 2010 - 08:05 PM
At 3.27pm this afternoon after a trip to Honda for a new cam sensor the engine burst into life.
its still massively over fueling but i guess thats down to the base map, even so, at last it runs
The clutch line is in now so the next job is to get the brake lines in and sorted.
a shopping trip to demon tweeks last weekend to cheer me up saw me spend a small fortune but come away with:
steering wheel
steering wheel spacer
proportioning valve
line lock valve
2x master cylinder reservoirs
tank breather
it should keep me going for the next week or so.
i can go to bed happy now it runs ......... i feel as though a milestone has been reached.


2 user(s) are reading this topic
0 members, 2 guests, 0 anonymous users


