Jump to content


Photo
- - - - -

Newcomer to the Mini Scene and my project


  • Please log in to reply
141 replies to this topic

#1 stormduck

stormduck

    Speeding Along Now

  • Members
  • PipPipPipPipPip
  • 383 posts

Posted 22 September 2005 - 08:27 AM

Hi people, after wanting a mini since 14 years old and having other things getting in the way of getting one, i've finally got the time, space, knowledge, tools and a good mate with welding knowledge :) So i've gone and got myself a 998 mayfair with 87k on the clock and plenty of rust to keep my welding mate happy!

Here she is after towing her home, running on 2 cylinders so i didn't want to drive her (nancy according to her previous owner, and i've GOT to keep the name or she'll string me up!). She's an MOT failure that needs £1k of garage work to get her through, but by doing the work myself £1k should have a very nice mini with loads of extras (respray money not included!)

Posted Image

Rotten front panel, untidy wings, rotten a-panels, rotten drivers door plus mroe more to come:

Posted Image
Posted Image

The boots been taking in water, i think from the rubber seal, so there's some rust and a small hole:

Posted Image

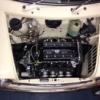
With just 87k the engine should be in good nick with just the need for tidying and slight refurb but i'll decide fully when i get to doing it:

Posted Image

Not an excessively great interior, although hoovers up well it's not my cup of tea, plus the seats have had it and it's a bit dirty after 15 years

Posted Image

#2 stormduck

stormduck

    Speeding Along Now

  • Members
  • PipPipPipPipPip
  • 383 posts

Posted 22 September 2005 - 08:34 AM

First full days work on her: aim was to strip the interior and find out exactly what the floor is like. With all the seats and majority of the carpet out, i had to disconnect the bottom hose of the rad to drain the water so that i could get the heater out of the inside of the car so that all the carpet and insulation around hte bulkhead could be removed. The rad is also knackered so needs coming out, but a 15 year old jubilee clip is very stubborn so it took me plenty of time removing the cowling and fan with the rad still in so i could enough space to get a dremmel down there and cut the clip in half - little git!!!

The front grille, bonnet etc also came off:

Posted Image
Posted Image
Posted Image

With the carpets up all was very good, apart from a small patch on the drivers side arch and a slightly bent floor probably from some twonk jacking it up in the place, grrr!

Posted Image

I also found some spaghetti:

Posted Image

#3 stormduck

stormduck

    Speeding Along Now

  • Members
  • PipPipPipPipPip
  • 383 posts

Posted 22 September 2005 - 08:46 AM

Next stage: get rotton panels off. With the advice of my welding friend Kenny i set to work with an angle grinder:

Posted Image

Both wings off and a mess made of the front panel as i don't know which panel the brackets belongs to that attaches it to the inner wings

Posted Image

A panel off:

Posted Image

Other one:

Posted Image

After grinding back the wing i could see the scuttle is pretty knackered so i'll be replacing that aswell, along with the inner corner pieces:

Posted Image

With all the arches off, side windows out and bits removed at the back is where i'm at now:

Posted Image

I may start removing some engine related parts today, worn hoses and clips etc, nothing too heavy as i've got a cold :) The rear subframes got to come off soon aswell which i'm not looking forward to, and i've got to take the screens out to get to the scuttle and some rust on the rear.....and this is just a small list, there's plenty left!!!

But i have only had the car 1 week and 1 day so it's moving pretty quickly really! I'm aiming to have her back fully finished by february next year to replace my Fiesta.

Let me know your thoughts!

#4 Jammy

Jammy

    Moved Into The Garage

  • Members
  • PipPipPipPipPipPipPipPipPipPipPip
  • 25,397 posts

Posted 22 September 2005 - 09:03 AM

Looks like a great project!! What are your plans for the finished article?

Also, is your engine yellow or gold. A gold engine means its one that has been refurbed. Although just the fact that you can see the engine colour after (just! lol) 87k is quite an acheivement!

#5 Pickup76

Pickup76

    Ring Runner 2005

  • Traders
  • PipPipPipPipPipPipPip
  • 1,191 posts
  • Location: Peterborough

Posted 22 September 2005 - 09:04 AM

crikey you're really cracking into this! To be honest it doesnt look bad at all from the pictures just a little scruffy. Good project car though! What mods have you got planned?

#6 Purple Tom

Purple Tom

    Up Into Fourth

  • TMF+ Member
  • PipPipPipPipPipPipPipPipPip
  • 4,921 posts
  • Location: Derbyshire
  • Local Club: TMF

Posted 22 September 2005 - 09:16 AM

looks like a good project! and you're doing it all yourself, which is always good :)

As Pickup76 says, it doesn't actually look that bad! For a 15 year old Mini its in pretty good nick, and looks like its been looked after too. Hopefully you'll cure all the little horrors underneath, and it'll be a nice little motor.

Good luck with it, and keep us informed!

#7 stormduck

stormduck

    Speeding Along Now

  • Members
  • PipPipPipPipPip
  • 383 posts

Posted 22 September 2005 - 01:01 PM

cheers peeps

jammy - it looks more gold than yellow but i'll have to check. what do you mean by refurb? a factory mass refurb thingy? I assume that 87k isn't much just because i've got a 98 fiesta with 88k on it!

pickup - it helps being currently out of work!

minis - you're right, apart from the front and couple of bits at the back it's all pretty sound which is just what you want from a shell! But it's still got to get worse before it can get better, more stripping is on the cards. I wouldn't have it any other way than doing it myself, so much better! Apart from the welding as i don't have a clue, but he's going to teach me anyway so that'll be top notch.

To be honest, i've never driven a mini before, and i want to see what standard 998 power is before i go improving it. So my first intention is to remove the head and have a look inside and check the bores, it looks VERY clean in the rocker cover so hopefully it won't need rebuilding yet, then just replace the generals, plugs etc. and check everything else. But i've got twin 1-1/4 SU carbs lined up, and i want a better head, either a 1300 mg or a 12G 295. Get an LCB manifold and stainless zorst and see where that takes me.

I've got half leather black + red cooper front and back seats to pick up at the weekend, then i'll probably make my own door cards i'll see how it goes. Cooper dash hopefully, i'll see what the money's like when i get to this stage as it'll be in for a respray probably in standard rover flame red as it is now, but with a white roof after i've peeled off that union jack.

But chances are things won't go to plan as they never do so i'll keep this topic updated so you's can follow my antics!!

cheers people
dave.

#8 Jammy

Jammy

    Moved Into The Garage

  • Members
  • PipPipPipPipPipPipPipPipPipPipPip
  • 25,397 posts

Posted 22 September 2005 - 01:15 PM

Well goldseal engines were engines that were refurb by Rover (might be wrong on that), anyway I know they were factory refurb engines. I believe there were two kinds, goldseal and silver seal. I think goldseal was a total engine rebuild, where as silver seal was engine rebuilt less the gearbox? Hang on, my memory is a little hazy, I'll go and check it out for sure!

#9 Jammy

Jammy

    Moved Into The Garage

  • Members
  • PipPipPipPipPipPipPipPipPipPipPip
  • 25,397 posts

Posted 22 September 2005 - 01:24 PM

Here we go, taken from this MG site, the same applies for minis though.

Gold Seal Replacement Engines were primarily offered during the production of the MGTC but there were some offered during the early days of the TD and many of these may have made there way to MGTD's in later years. During the early days of imports there were shortages of trained workers and parts to perform major repairs or rebuilds to the XPAG engines that MG used. Because of this the factory created a set of spare engines that could be swapped out for the original, instead of repairing it. The factory would exchange your worn out engine with these replacement engines. These engines were painted gold in color instead of dark red and came with a special ID tag designating them as such. The tags were made of brass and were affixed to the block stating that it was an original factory replacement engine. Sometimes these tags were affixed to the same location as the engine ID tag. In later years of TD production the same sort of process was carried out by dealers and engine rebuilding facilities who would have a set of spare engines on hand. In this manner they could swap your tired engine for a rebuilt one and in a matter of hours, or a few days, get you back on the road. Your engine would then be rebuilt at their leisure and wind up on some other MGTD later on. In fact if anybody has my engine, ID 19988, I would appreciate an email.

From the MGCC: A large number of cars with XPAG engines have had BMC replacement engines (Gold Seal) fitted. These usually had no XPAG on the octagonal plate, but instead a letter prefix (A to E have been seen) probably denoting the over-bore sizes, followed by a larger than usual number (E99794 has been seen). With replacement engines, the original number of that engine can sometimes be deciphered just above the octagonal plate, stamped on the block. Be prepared to find, however, that your engine might have started life on a Y-type!


To find out if you have a gold seal post up the engine number and there will be someone who can check it for ya!

#10 stormduck

stormduck

    Speeding Along Now

  • Members
  • PipPipPipPipPip
  • 383 posts

Posted 22 September 2005 - 04:05 PM

cheers for that fella, i thought i remember reading something about that. On closer inspection i'm pretty sure the engine's painted yellow rather than gold. These pics may help:

First stage of engine stripping with the intention of removing the head and generally checking components:

Posted Image

and some pretty clean rockers from my opinion, but then i'm no expert:

Posted Image

#11 Bungle

Bungle

    Original Spamster

  • Members
  • PipPipPipPipPipPipPipPipPipPipPip
  • 28,971 posts
  • Location: Cornwall
  • Local Club: cornish mini club

Posted 22 September 2005 - 04:29 PM

keep up the good work :grin:

#12 Dom

Dom

    Moved Into The Mazda

  • TMF+ Member
  • PipPipPipPipPipPipPipPipPipPipPip
  • 10,685 posts
  • Location: Nürburgring

Posted 23 September 2005 - 08:08 AM

Double post removed :wink:

Looks like a great project and your getting stuck in! Great! :grin: Have fun and enjoy yourself. :)

#13 stormduck

stormduck

    Speeding Along Now

  • Members
  • PipPipPipPipPip
  • 383 posts

Posted 26 September 2005 - 06:21 PM

Cheers peeps. Latest update of the work completed over the weekend and today.

The cylinder head is now off, and considering i've never done this before i'm well chuffed :grin: The rockers look nice and clean with no carbon-like muck, but the head needs a good clean:

Posted Image

I'm not sure how worn the rockers are, maybe someone can give me some idea of this?

Posted Image
Posted Image

Here's where the head gasket's gone, which is perculiar because the spark plugs for these two cylinders were of a tanned colour whereas the other two were jet black???

Posted Image

The underside of the head looking a bit rough with nasties in the coolant channels from a knackered radiator.

Posted Image

The Block, maybe someone could also shed some light on the condition of the pistons/bores? The bores appear very smooth, the middle two piston surfaces are covered in black C**p. I'm not too sure how to clean this?

Posted Image
Posted Image

The engine bay after removing the dizzy, alternator, master cylinder. Also drained the oil and filter. Need to get a long 1/2 inch and 9/16 sockets and spanners as i don't have them and the mini seems to rely on them, then i'll remove the starter and brake servo. Once that's done i'm seriously considering taking out the engine to sort it oot. The back of the block is an inch thick in sludge! And it's leaking oil from the fan belt end, crankshaft oil seal perhaps. That way i can get in the bay, replace the nasty bulkhead sound deadening and de-rust and re-paint. Also strip the front sub-frame and re-paint that too. Fun Fun!

Posted Image

#14 CAU998

CAU998

    One Carb Or Two?

  • Members
  • PipPipPipPipPipPipPip
  • 1,202 posts
  • Local Club: TMF South Central...

Posted 26 September 2005 - 09:25 PM

Nice project wish mine would get done as fast as that!

#15 TJenkos

TJenkos

    Up Into Fourth

  • Members
  • PipPipPipPipPipPipPipPipPip
  • 4,815 posts

Posted 26 September 2005 - 09:29 PM

Mine too..

2 Months later and i just havent got anywhere!


0 user(s) are reading this topic

0 members, 0 guests, 0 anonymous users