Interesting to see the inner wing and a post repairs coming along - I think I'll start my Mk1 work there.
How does the edge of the inner wing line up against the a post though? What part of the A post is it supposed to be welded to? Can't tell from looking at mine as it's in such a state with loads of old 'repairs' in the way.


My Mk1 Mini Rebuild
Started by
minimikej
, Sep 26 2010 06:48 PM
202 replies to this topic
#91

gs.davies
-

- Noobies
-

- 60 posts
Stage One Kit Fitted
- Location: Essex
- Local Club: Essex Mini Club
Posted 04 January 2013 - 01:12 PM
#92
minimikej
-
- Members
-
- 355 posts
Speeding Along Now
- Location: Derbyshire
Posted 23 January 2013 - 09:47 AM
Good question :) Mine's the same. But, it looks to me like the trailing edge of the inner wing / flitch is spot welded to the 'step' in the A post - I will try get some more pictures to explain. I have seen somewhere that there is a gap between A panels and pillar which would have been filled with some foam??! Argh.How does the edge of the inner wing line up against the a post though? What part of the A post is it supposed to be welded to? Can't tell from looking at mine as it's in such a state with loads of old 'repairs' in the way.
#93
minimikej
-
- Members
-
- 355 posts
Speeding Along Now
- Location: Derbyshire
Posted 23 January 2013 - 09:49 AM
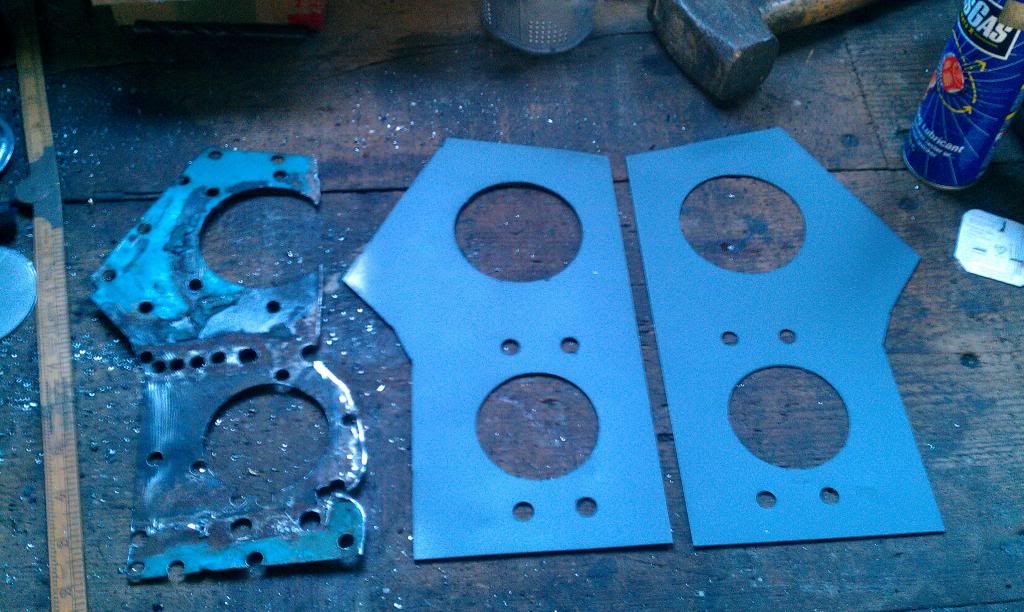
Managed to clear enough snow out from in front of the garage doors to get in yesterday. Didn't feel well enough to tackle any major work, but I did make up a pair of those inner wing / shock mount reinforcement panels I asked about earlier. Pretty happy with the result, though with hindsight by the time I'd bought a couple of hole saws I'm pretty sure I could have bought a pair ready made 
#94
minimikej
-
- Members
-
- 355 posts
Speeding Along Now
- Location: Derbyshire
Posted 01 February 2013 - 08:23 PM
Wow, a couple of hours to spare. I welded the strengthener panels above ^ to the crossmember rather than the other way round, then clamped up the new inner wing. I started drilling holes left right and centre for plug welding.
I drew along the join lines from the interior where possible and got things clamped up. The cleco pins are invaluable for clamping the parcel shelf to the inner wing. First time I've used these.
I clamped some angle iron along the shock mounts to clamp things up nicely.
Put a couple of plug welds in:

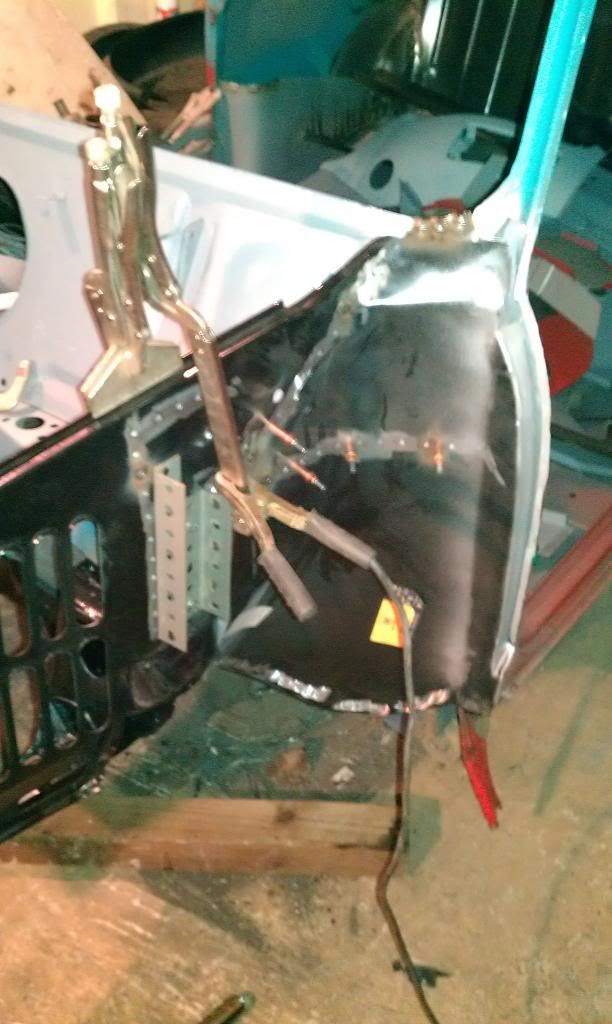
Lastly, this is the 'natural' join between the inner wing and door pillar. Are these supposed to meet and be welded together? I've given up deliberating. I know the inner wing is in the right place so it's probably the A post which is out...?
Should I attempt to pull these together up the line of the A post? Or rely on spotting the outer and Inner A panels together to provide support?
I reckon I could put self tappers through to clamp together, just not sure if this is right? Any suggestions?
Cheers
Mike
I drew along the join lines from the interior where possible and got things clamped up. The cleco pins are invaluable for clamping the parcel shelf to the inner wing. First time I've used these.
I clamped some angle iron along the shock mounts to clamp things up nicely.
Put a couple of plug welds in:
Lastly, this is the 'natural' join between the inner wing and door pillar. Are these supposed to meet and be welded together? I've given up deliberating. I know the inner wing is in the right place so it's probably the A post which is out...?
Should I attempt to pull these together up the line of the A post? Or rely on spotting the outer and Inner A panels together to provide support?
I reckon I could put self tappers through to clamp together, just not sure if this is right? Any suggestions?
Cheers
Mike
#95
okc78
-

- Noobies
-
- 169 posts
Mini Mad
- Location: Gloucestershire
- Local Club: none so far
Posted 04 February 2013 - 10:35 PM
Hi Mike, I have a couple of pictures of my mkII A post (built 1967) as I was picking it apart that might be of use to you. I'm pretty sure it had never been apart before so original and rusty and I presume the same as your mk I. The return section of inner wing tucks in tight behind the A post and was spot welded together.
 P1050239.JPG 34.48K
48 downloads
P1050248.JPG 29.13K
41 downloads
P1050242.JPG 32.01K
36 downloads
P1050239.JPG 34.48K
48 downloads
P1050248.JPG 29.13K
41 downloads
P1050242.JPG 32.01K
36 downloads
Its difficult to explain but the upper section of the inner wing/flitch was spot welded to the inner step of the A post, then lower down where the A post turns into the door step theres a raised step in the inner wing, that was spot welded to the lower part of the outer A panel/ door step. Hope that makes sense and reads with the pics.
Keep up the good work
Ollie
P1050239.JPG 34.48K
48 downloads
P1050248.JPG 29.13K
41 downloads
P1050242.JPG 32.01K
36 downloadsIts difficult to explain but the upper section of the inner wing/flitch was spot welded to the inner step of the A post, then lower down where the A post turns into the door step theres a raised step in the inner wing, that was spot welded to the lower part of the outer A panel/ door step. Hope that makes sense and reads with the pics.
Keep up the good work
Ollie
#96
Anomaly
-

- Noobies
-
- 17 posts
Learner Driver
- Location: Tewkesbury
Posted 05 February 2013 - 07:29 AM
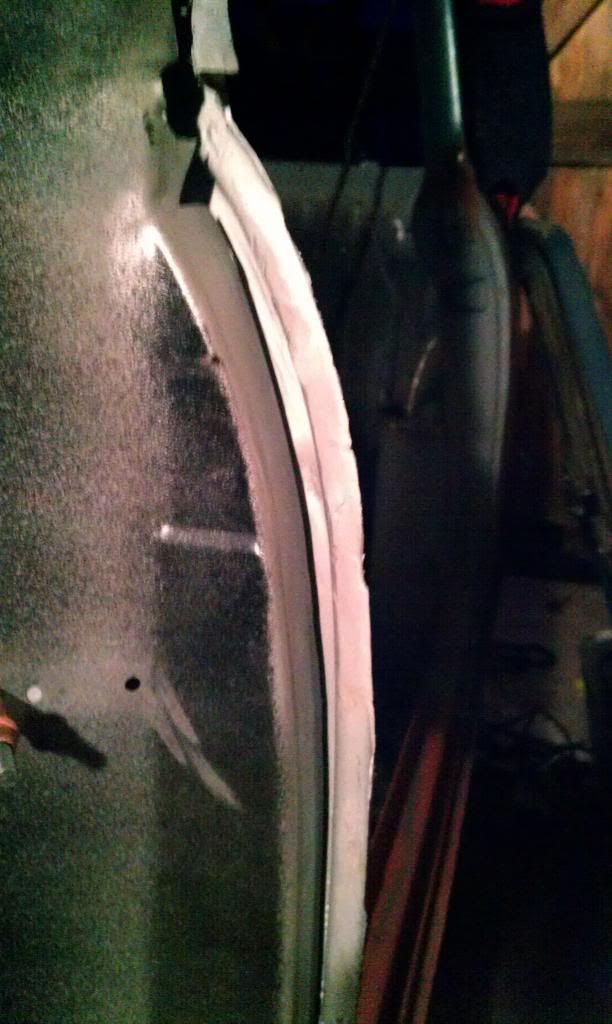
I'm not sure this image is any better than Ollies, but I think the inner wing should tuck inside the a-post based on where the inner a needs to be positioned for the door then welded up. It looks like you may need to remove some material from the inside of the a post?

photo hosting sites
photo hosting sites
#97
minimikej
-
- Members
-
- 355 posts
Speeding Along Now
- Location: Derbyshire
Posted 05 February 2013 - 08:49 AM
Thanks for the pics Ollie and @anomaly - I think this sums things up pretty well! I would expect things to look like @anomaly's pic but it's more like the first of Ollie's pics and description. There was no way I could pull the panel to meet at the top so I've clamped and stitched it where it can be persuaded to touch the A post.
Oh well, it's progress I suppose...
Cheers
Mike
Oh well, it's progress I suppose...
Cheers
Mike
#98
okc78
-
- Noobies
-
- 169 posts
Mini Mad
- Location: Gloucestershire
- Local Club: none so far
Posted 05 February 2013 - 05:28 PM
The pics I posted were not that great, especially the last one which is a complete mess but it was the only pic I had of the lower detail. My A post to inner wing is the same as it is in Anomaly's pic. I see it looks a little different but I think that because I still had some of the outer A panel left in my pic, I just sliced it down the outside to avoid wrecking the lip I needed to save.
#99
rally515
-

- Members
-
- 3,848 posts
Up Into Fourth
- Location: Lancashire
Posted 05 February 2013 - 05:39 PM
Hi Mike, I have a couple of pictures of my mkII A post (built 1967) as I was picking it apart that might be of use to you. I'm pretty sure it had never been apart before so original and rusty and I presume the same as your mk I. The return section of inner wing tucks in tight behind the A post and was spot welded together.
Its difficult to explain but the upper section of the inner wing/flitch was spot welded to the inner step of the A post, then lower down where the A post turns into the door step theres a raised step in the inner wing, that was spot welded to the lower part of the outer A panel/ door step. Hope that makes sense and reads with the pics.
Keep up the good work
Ollie
May i ask were you got the doorstep panel in the middle photo you posted ?,as i need that exact one which goes up alot further than the usual doorstep panels.
Regards
Clifford
#100
bigcaddy
-

- Members
-
- 184 posts
Mini Mad
Posted 05 February 2013 - 05:41 PM
Progress looks great.
keep at it.
keep at it.
#101
minimikej
-
- Members
-
- 355 posts
Speeding Along Now
- Location: Derbyshire
Posted 05 February 2013 - 05:48 PM
Ah, got you,
Well I guess the car is a bit of an odd shape - if you ever saw the state of it to start with it was patchwork hell. With the doors and A panel in place along the current A post line everything fits and looks right, although the door-to-A post gap is too large but not beyond being adjusted. Weird.
Oh well, the car is an enigma and hardly an unadulterated original. It is what it is and I shall do a better job than the previous restorer. All good practice for the next 2 :)
Thanks again - Ollie your mk2 build is amazing.
#102
minimikej
-
- Members
-
- 355 posts
Speeding Along Now
- Location: Derbyshire
Posted 05 February 2013 - 05:49 PM
Clifford - that looks like the m-machine one, same as I have. Doesn't look like it does in the parts catalogue, there is loads of well pressed material on either side vertical. A good part imho.
Hi Mike, I have a couple of pictures of my mkII A post (built 1967) as I was picking it apart that might be of use to you. I'm pretty sure it had never been apart before so original and rusty and I presume the same as your mk I. The return section of inner wing tucks in tight behind the A post and was spot welded together.
Its difficult to explain but the upper section of the inner wing/flitch was spot welded to the inner step of the A post, then lower down where the A post turns into the door step theres a raised step in the inner wing, that was spot welded to the lower part of the outer A panel/ door step. Hope that makes sense and reads with the pics.
Keep up the good work
Ollie
May i ask were you got the doorstep panel in the middle photo you posted ?,as i need that exact one which goes up alot further than the usual doorstep panels.
Regards
Clifford
Cheers - Mike
#103
rally515
-
- Members
-
- 3,848 posts
Up Into Fourth
- Location: Lancashire
Posted 05 February 2013 - 05:52 PM
Clifford - that looks like the m-machine one, same as I have. Doesn't look like it does in the parts catalogue, there is loads of well pressed material on either side vertical. A good part imho.
Hi Mike, I have a couple of pictures of my mkII A post (built 1967) as I was picking it apart that might be of use to you. I'm pretty sure it had never been apart before so original and rusty and I presume the same as your mk I. The return section of inner wing tucks in tight behind the A post and was spot welded together.
Its difficult to explain but the upper section of the inner wing/flitch was spot welded to the inner step of the A post, then lower down where the A post turns into the door step theres a raised step in the inner wing, that was spot welded to the lower part of the outer A panel/ door step. Hope that makes sense and reads with the pics.
Keep up the good work
Ollie
May i ask were you got the doorstep panel in the middle photo you posted ?,as i need that exact one which goes up alot further than the usual doorstep panels.
Regards Clifford
Cheers - Mike
Thank you shall be back on the phone to m-machine in a flash ;)
Thank you.
#104
okc78
-
- Noobies
-
- 169 posts
Mini Mad
- Location: Gloucestershire
- Local Club: none so far
Posted 05 February 2013 - 08:07 PM
Thanks Mike, theres a long way to go yet but I'm really enjoying it. I'm still finding jobs to do before welding in the floor and finding time isn't easy with kids and things but theres no rush I suppose.
I've a 71 clubman with an MED 1380 waiting under a sheet for after myself, not in bad condition though considering the body is mostly original.
Clifford, Mike is right, the door steps are M-Machine, I found it to be a pretty good panel as well. I would imagine its a fairly difficult panel to make properly as it has a slight taper front to back on the door step itself and a slight curve that follows the sill line looking down the body.
The M-Machine door step repair panel looks like this, its the lower one on the parcel shelf, the one above is a section I was making but gave up on as I really needed curved section at either end as well so bought the M-Machine one.
P1050096.JPG 49.93K
22 downloads
Hope you don't mind my posting a picture on your build thread Mike.
Cheers
Ollie
I've a 71 clubman with an MED 1380 waiting under a sheet for after myself, not in bad condition though considering the body is mostly original.
Clifford, Mike is right, the door steps are M-Machine, I found it to be a pretty good panel as well. I would imagine its a fairly difficult panel to make properly as it has a slight taper front to back on the door step itself and a slight curve that follows the sill line looking down the body.
The M-Machine door step repair panel looks like this, its the lower one on the parcel shelf, the one above is a section I was making but gave up on as I really needed curved section at either end as well so bought the M-Machine one.
P1050096.JPG 49.93K
22 downloadsHope you don't mind my posting a picture on your build thread Mike.
Cheers
Ollie
#105
rally515
-
- Members
-
- 3,848 posts
Up Into Fourth
- Location: Lancashire
Posted 05 February 2013 - 08:27 PM
Cheers that looks great,thanks ollie.
Cliff
Cliff


0 user(s) are reading this topic
0 members, 0 guests, 0 anonymous users


