Looks Amazing!


My Fixerupper
Started by
skoughi
, Dec 18 2010 09:41 PM
200 replies to this topic
#151

Daviewonder
-
- Members
-

- 1,015 posts
Needs an extra inch!!
- Location: England
Posted 18 December 2014 - 12:16 AM
#152
Ben_O
-

- Paint Doctor
-
- 9,781 posts
Mill Road Garage
- Location: Isle of Wight
Posted 18 December 2014 - 12:22 AM
Getting there now!
#153
skoughi
-
- Members
-
- 1,199 posts
One Carb Or Two?
- Location: Lerwick
- Local Club: Shetland classic car club
Posted 18 December 2014 - 06:04 PM
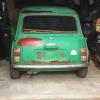
Cheers guys! She's not perfect that's for sure but she's painted. Speaking with the guys at the bodyshop and they agreed with how I feel about it in that sometimes you have to say enough is enough and throw some paint on! I could've and maybe should've spent more time on her but I had a two day window to get gloss on so just had to go for it and worry about a few little marks here and there. The chap that painted her put on three good coats so there's scope for flatting her back and buffing if I feel like it. Bonnet was done this morning so hopefully if the weather is no too bad tomorrow morning then I should get her home. I'll post up some better pics once she's back.
#154
Ben_O
-
- Paint Doctor
-
- 9,781 posts
Mill Road Garage
- Location: Isle of Wight
Posted 18 December 2014 - 06:22 PM
Looking forward to the other pics!
#155
skoughi
-
- Members
-
- 1,199 posts
One Carb Or Two?
- Location: Lerwick
- Local Club: Shetland classic car club
Posted 19 December 2014 - 01:45 PM
Well I don't think I'll manage to get her home today but the guys at the shop say they'll try their best to get her to me as soon as possible. Anyway I skived off this morning and nipped over with the works van and picked up the doors and bonnet so I managed to get them home, couldn't resist a few pics while I was there! Really happy to see her in gloss!!
 IMG_20141219_133842.jpg 141.8K
25 downloads
IMG_20141219_133817.jpg 144.39K
28 downloads
IMG_20141219_133758.jpg 133.32K
26 downloads
IMG_20141219_133842.jpg 141.8K
25 downloads
IMG_20141219_133817.jpg 144.39K
28 downloads
IMG_20141219_133758.jpg 133.32K
26 downloads
IMG_20141219_133842.jpg 141.8K
25 downloads
IMG_20141219_133817.jpg 144.39K
28 downloads
IMG_20141219_133758.jpg 133.32K
26 downloads
#156
sonikk4
-

- Admin
-
- 15,909 posts
Twisted Paint Polisher!!!
- Name: Neil
- Location: Oxfordshire
Posted 19 December 2014 - 01:51 PM
She does look good, it gives you a sense of satisfaction seeing new paint on your car, then there is the trepidation of not scratching it when trying to put it altogether. Lots of tape helps here
#157
skoughi
-
- Members
-
- 1,199 posts
One Carb Or Two?
- Location: Lerwick
- Local Club: Shetland classic car club
Posted 19 December 2014 - 02:45 PM
Thanks Neil, I'm going to let her sit over the festive then I'll be investing in a roll of bubblewrap and covering her up! If there's a chance of scratching paint then I will do it!
#158
Ben_O
-
- Paint Doctor
-
- 9,781 posts
Mill Road Garage
- Location: Isle of Wight
Posted 19 December 2014 - 03:55 PM
Make sure the paint has full cured before putting bubble wrap on it, especially if it is being stored somewhere that might be damp.
I made the mistake when i refurbished my started motor. Had a beautiful flawless finish on it, left it 2 weeks to cure before wrapping it in bubble wrap.
Took the bubble wrap off a few weeks later to pop the nuts on the live pole and it was covered in bubble shaped marks all over.
Just thought it was worth a mention, wouldn't want to see you have any problems..
#159
skoughi
-
- Members
-
- 1,199 posts
One Carb Or Two?
- Location: Lerwick
- Local Club: Shetland classic car club
Posted 20 December 2014 - 09:26 AM
Aye thanks for that Ben, someone else has mentioned the same thing to me the other day. I might lay on a plastic dust sheet first before I tape on the bubble wrap to try and stop that happening. I'll be leaving her well alone for a couple of weeks as well to let things harden up.
#160
skoughi
-
- Members
-
- 1,199 posts
One Carb Or Two?
- Location: Lerwick
- Local Club: Shetland classic car club
Posted 18 February 2015 - 09:48 PM
Starting to get back into things that again now that Up Helly Aa is out the way, I've been going through the wiring harnesses lately. These are second hand ones that I bought a while ago, the rear one is from a later model as I found out it has a feed for a rear mounted washer bottle, and the front is from a three clock model with the dip resistor that's on the bulkhead. I spent a good while going through everything and comparing to the nearest wiring diagram that I could find in the manual. Lots of chasing wires with a continuity meter followed. Things were a bit confusing at first but ended up being straightforward and I now have a lot better understanding of the minis wiring. There was a few things that I changed, these were to strip out the ballast resistor wire and replace with a plain white one, replaced the glass fuse box with a six blade box and incorporated the two inline fuses that are next two it. Also I put in two feed wires for the relay that'll work the radiator fan, along with various repairs to the ends of wires. Now all that's left is to wrap up the harness and install then join into the rear harness.
IMG_20150218_213023.jpg 143.75K
2 downloads
IMG_20150218_213004.jpg 172.26K
4 downloads
IMG_20150218_213023.jpg 143.75K
2 downloads
IMG_20150218_213004.jpg 172.26K
4 downloads
#161
skoughi
-
- Members
-
- 1,199 posts
One Carb Or Two?
- Location: Lerwick
- Local Club: Shetland classic car club
Posted 12 March 2015 - 10:54 PM
Managed to get a few more things done on the clubman lately however I've not been dedicating as much time as I'd like to as there seems too much else on of late along with a stinking head cold which thankfully seems to have eased! I got the loom finished and installed. There's still a bit of wiring to do but will get this done once the engine is installed. Reasonably happy with how it's sitting at the mo but this will need final adjustments and some form of attachments to keep it in place., I've spotted something in a local supplier which will be purchased shortly! So I've moved on to fitting sill trim and arches. I got my grp 2s from minispeed along with a length of u shaped rubber trim to go between arches an body, however I ended up gluing this on to the outside lip to protect the edge and instead got some rubber gasket from mini spares which was much better, this was all stuck on with pro stick adhesive.
IMG_20150312_223142.jpg 137.73K
3 downloads
IMG_20150312_223118.jpg 147.61K
4 downloads
IMG_20150312_223101.jpg 134.3K
1 downloads
On the car itself I bought some u shaped channel, the type that is usually used to black silk trim, from a local supplier and went the whole way around the car. Starting at the front of a wheel arch, along the sill around the rear arch and across the rear valance then down the other side, and finally going across the bottom lip of the front panel. This was again stuck on here and there with some pro stick just for good measure, other bits got plenty of grease to hopefully keep away the rust for a while. Maybe a bit of overkill but I want to protect any edges as much as possible from the ever present salty air we have up here! I even temporarily stuck on a number plate tonight just for some inspiration! Rather happy with how she's starting to look!
IMG_20150312_223042.jpg 106.04K
1 downloads
IMG_20150312_223020.jpg 151.82K
14 downloads
IMG_20150312_223142.jpg 137.73K
3 downloads
IMG_20150312_223118.jpg 147.61K
4 downloads
IMG_20150312_223101.jpg 134.3K
1 downloadsOn the car itself I bought some u shaped channel, the type that is usually used to black silk trim, from a local supplier and went the whole way around the car. Starting at the front of a wheel arch, along the sill around the rear arch and across the rear valance then down the other side, and finally going across the bottom lip of the front panel. This was again stuck on here and there with some pro stick just for good measure, other bits got plenty of grease to hopefully keep away the rust for a while. Maybe a bit of overkill but I want to protect any edges as much as possible from the ever present salty air we have up here! I even temporarily stuck on a number plate tonight just for some inspiration! Rather happy with how she's starting to look!
IMG_20150312_223042.jpg 106.04K
1 downloads
IMG_20150312_223020.jpg 151.82K
14 downloads
#162
skoughi
-
- Members
-
- 1,199 posts
One Carb Or Two?
- Location: Lerwick
- Local Club: Shetland classic car club
Posted 13 March 2015 - 07:26 PM
Picked up my side stripes and replacement boot badge sticker today, very happy chap! I had these done at a local sign makers and probably paid a little too much for them but always try and use local first. I think they're awesome anyway!!
IMG_20150313_192146.jpg 129.59K
4 downloads
IMG_20150313_192146.jpg 129.59K
4 downloads
#163
skoughi
-
- Members
-
- 1,199 posts
One Carb Or Two?
- Location: Lerwick
- Local Club: Shetland classic car club
Posted 26 March 2015 - 10:41 PM
Managed to get my boot lined out this last wee while. I was only going to make a base board and a board to cover the back of the rear seat but thought to hell and made two side bits as well. I still need to make two brackets to support the base at the rear and re jig a couple of other bits but I think it should be ok. I obviously need some short pile black carpet but can't get any from local carpet fitters so seeing as we're heading south for a family holiday tomorrow then I'll be trawling carpet shops for some offcuts! I did however manage to scran some rubber type underlay this week for the interior . Which was good! I love scranning stuff!!
IMG_20150326_222554.jpg 99.04K
10 downloads
IMG_20150326_222536.jpg 66.05K
13 downloads
IMG_20150326_222519.jpg 85.5K
7 downloads
IMG_20150326_222554.jpg 99.04K
10 downloads
IMG_20150326_222536.jpg 66.05K
13 downloads
IMG_20150326_222519.jpg 85.5K
7 downloads
#164
skoughi
-
- Members
-
- 1,199 posts
One Carb Or Two?
- Location: Lerwick
- Local Club: Shetland classic car club
Posted 10 April 2015 - 06:11 PM
So we returned from our wee jaunt south yesterday, always fun spending a night on the Aberdeen to Shetland ferry stuffed into a small cabin! Was a great holiday though, bought a newish fiesta to replace the old 1.4 one. This time I bought a 1L 125ps ecoboost. Cracking wee car, best 1 litre that runs on three cylinders that I've ever driven that's for sure! We also made it to Brands Hatch to watch my first ever touring car meeting, brill experience even though the weather on the sat was total crap! Anyway whilst we were in Edinburgh for a few days I made my usual shopping trip to see the very nice chaps a The Mini Works. Very helpful chaps, Simon gave me some great advice and sold me a few items I'm looking for just now.
DSC_0118.JPG 95.55K
6 downloads
Now that I'm back home and still have a few days off until I return to work next week then I've been trying to get some progress done. First up was to finish the boot lining. I went to a carpet fitters in Aberdeen before we caught the ferry and picked up some short pile carpet. This has simply been glued to the hardboard and plywood that I'd already cut. I still had to do a fair bit of adjusting and tweaking but I'm now fairly happy with it and it's neatened things up quite nicely.
DSC_0124.JPG 115.26K
3 downloads
DSC_0126.JPG 113.36K
10 downloads
Also I tackled the grimy headliner thats been gathering dust etc in my garage roof for the last four years. Helluve a state but after a wash, wipe down with celly thinners, soak in bleach, soapy wash then one coat of some satin gloss (cream) it looks quite good! A little repair to a couple of tears and a wee rig up to make some make do ends for three ends on roof bars and it'll be good to go.
DSC_0121.JPG 37.14K
1 downloads
DSC_0122.JPG 73.2K
3 downloads
DSC_0130.JPG 28.05K
6 downloads
#165
skoughi
-
- Members
-
- 1,199 posts
One Carb Or Two?
- Location: Lerwick
- Local Club: Shetland classic car club
Posted 17 April 2015 - 10:15 PM
Started fitting the headlining tonight, once I had it centered then it seemed reasonably easy to get in place . I used spring loaded bulldog clips bought from tesco, can't remember how many I bought but they were cheap and did the job perfectly. I used a hot air gun, very carefully, to warm and stretch the headliner then clipped it place. Started along the windscreen edge first then the rear window working out from the center then each side. Once I'd gone the whole way around I started sticking on double sided tape and re clamping. Not quite finished it tonight but nearly there, once it's done then I think I'll put in the front and rear screens to keep it in place.
IMG_20150417_230130.jpg 86.57K
7 downloads
IMG_20150417_230111.jpg 64.95K
10 downloads
IMG_20150417_230130.jpg 86.57K
7 downloads
IMG_20150417_230111.jpg 64.95K
10 downloads


0 user(s) are reading this topic
0 members, 0 guests, 0 anonymous users


