Jump to content


Photo
- - - - -

The Noobs Budget Vtec.


  • Please log in to reply
508 replies to this topic

#1 Jamie_hail

Jamie_hail

    Super Mini Mad

  • Members
  • PipPipPipPipPipPip
  • 555 posts
  • Location: Fort William

Posted 21 August 2011 - 11:23 PM

Well well, this topic is going up a lot sooner than I had ever expected, after finding an engine fairly locally! Shall be going to pick it up this weekend. B16a that put out 175bhp on it's last dyno run.

Project is on a very, very tight budget as I've got a trip to South Africa planned for three months, departing next august! This is looking to be done by March though!


Been looking for a project mini for years, and after popping along to a local mini meet, it suddenly became time to resurrect my account on here and find a mini. Straight away I found a green cooper MPI for sale on here! (Thanks MYKWEB) And went to collect a week later. Over the money was handed ( only £800) and we began the journey home. Of course, nothing is ever simple and we had to stop multiple times and adjust the way the car was tied down due to it shifting slightly. Maybe it would be easier to take a few more straps next time! As the mini was listed for spares or repairs, I was expecting there to be a lot of work to do!

Posted Image

First thing I could afford to set about was the first bit of rust I found - the battery box. Out came the battery, and with a can of Kurust, I set about removing any rust that was in there, stripping all around it to bare metal but ended up grinding it out! Walked inside to go to bed, as I'd been out here since we got her home! And there, in my room, was my computer desk - perfect. Outside it went and I began to cut the bottom shelf up - the metal was perfect to replace the 'floor' of the battery box. It was a little bit bent, but it was much better than what was in there! cut it so it would sit over the battery box, then bent the edges up all the way round to get a better weld - the box is now slightly shallower, but a lot stronger than it was, and rust free! Ventilated too, just incase the battery takes a leak! Isn't that why there are two holes in the box anyway?

Posted Image

Posted Image

Welded underneath, with a welder that likes to cut out all the time. Needs replaced! As does the whole battery box, but I was too eager to begin working on the car! I'll replace the whole box when I get a new welder, and get round to fitting twin tanks. Anyway, I coated it in nearly half a can of zinc primer, and sealed the underside with some generic under-body sealant. Fitted new terminals on the battery wiring, and got on with it :)

Will update this with separate posts just to keep it a little more organised.

Edited by Jamie_hail, 22 August 2011 - 12:13 AM.


#2 Mini Mad Drakeley

Mini Mad Drakeley

    One Carb Or Two?

  • Members
  • PipPipPipPipPipPipPip
  • 1,172 posts
  • Location: bangor
  • Local Club: south down mini owners club

Posted 21 August 2011 - 11:36 PM

thats quite an impressive improvisation :lol: never seen that before and i thought the battery boxes had 3 holes, mine does? :huh:

#3 jcollingwood

jcollingwood

    Stage One Kit Fitted

  • Noobies
  • PipPipPip
  • 53 posts

Posted 21 August 2011 - 11:44 PM

aha good improvisation there. going to be following this one so keep the good work up and keep us informed! :P

#4 Jamie_hail

Jamie_hail

    Super Mini Mad

  • Members
  • PipPipPipPipPipPip
  • 555 posts
  • Location: Fort William

Posted 22 August 2011 - 12:07 AM

Inside - hmm, the place I shall probably be spending many, many hours! Wasn't too keen on the black, peeling vinyl dash that was in the car so out it came!
Posted Image

I used the older dashboard as a template, drew round it onto a sheet of 12mm MDF and set about cutting it out... Got the shape right! Into the vice it went, so I could smooth all the edges, and thin the material on the back, where it will sit against the dash rails so I can fit a bead of sealant to stop vibrations...

Posted Image

Dusty bloody horrible stuff to work with in an enclosed space, especially with a belt sander and planer to get the shape perfect, too!

Fitted the dashboard up to the car, held it in place with duct tape and took a permanent marker to it, sat down in the drivers seat and marked on where I could see the guages, digital dash, indicator/main beam lights and vents best.
Posted Image

Once this was done, I used a 55mm hole saw to drill where the guages would go - a 10mm drill bit for the digi dash mount. Cut a square out for the digi connectors, along with the vents with a jigsaw. Notched the back of the vent holes with the edge of a drill bit at 90* positions for the little bits that hold them in place. Again with a 10mm drill bit, I drilled holes for the immobiliser/alarm light and turn signal lights.
Once done, I sent the dashboard off to my local sign writers to be carbon wrapped.

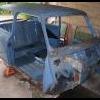
Whilst the dashboard was off being wrapped, I decided to make a start on the interior - out came the seats, out came the carpet, out came the rear seats. It looked a bit crappy before. http://www.brydenenterprises.co.uk/
Posted Image

I gave the carpet to a friend who does carpet and rug restorations, he restored the carpet to new condition for nothing! Remember the thread title, this is on a budget!
Again, whilst the carpet was away, I set about something else - stripping the floorpan right back to check for rust - which I'm pleased to report - there was none, none what so ever! Stripping back the bitumen sound deadening was a right PITA! Plenty of wd40, a big hammer and chisel sorted that though - why do rover think it's a good idea to only put small peices of the stuff around the car? How is that meant to make it any quieter?
Posted Image
I primed the floor with zinc primer, after stripping back to bare metal to check for rust. 3 coats should be enough!
Then the interesting part, I blew £70 of my budget on sound deadening. If a jobs worth doing though, it's worth doing right. Rover - take note, this is how sound deadening should of been done!

Posted Image

Posted Image

As you can see, there's a centre console - Came from custom consoles, and wow I'm impressed! Its a tight fit with all the sound deading down, but I'm sure it would of fitted perfect otherwise! I only had it in those pictures to hold a new pioneer head unit to keep me amused when working on the interior. Again, too eager to shove bits in! Lets just call it a test fitting or something!
Eagle eyed viewers will also notice a mdf parcel shelf - I remade that with the spare mdf I had from doing the dashboard.

Posted Image

Ooh, whats that? A load of goodies you say? For me? Oh, for Kermit... The mini. Yay! MG seats, Sabelt harnesses, an amp, pioneer head unit and 4, 210 watt three way speakers. Oh, and a copy of miniworld. Okay - the budget wasn't blown. The mg seats and harnesses came with the 'project' and the rest were ebay deals - set me back less than £150 for a system loud enough to drown the every day rattles out.

Before I knew it, I had the carpet and dashboard back! Carpet, seats, centre console, new kickboard, and speakers all went in whilst I made the dashboard up with the guages, mounted them in place, and sorted out some of the wiring behind the dash. All back together inside now - yipee!
Posted Image

Posted Image

Posted Image

Posted Image

Posted Image

Posted Image

Posted Image

That 800w amp only cost £25, and was brand new in the box - bargain!

Not bad! Centre console was the most expensive thing in the car, but so worth it! £83 shipped. The dashboard cost £20 to be wrapped, as I put a lot of business that way for the guys there! Had the MDF left over from a woodworking project. The heater panel graphic was from Roofless on here, as you can see from the 'sticky fingers' decal on the console! I ordered a switch panel graphic too, but ordered the wrong one, so it's sat in the garage somewhere!

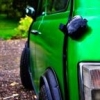
I found these in a box in my room, ordered them years ago as a mate wanted them for his scooter, falling out with him resulted in him not getting them for christmas - I thought, well, they're green, so why not?
Posted Image

Digi Dash that was with the car looks awesome at night, so neat and tidy too!
Posted Image

Thats all for now folks - Going to pick up the engine this weekend coming, so expect a few more updates through the week about my excitement, and maybe some prep work - will be using an allspeed subframe, which my budget says I wont be able to afford till December, so I'll post plenty of updates on the flip front, sorting the engine, gutting the wiring and any other things that can be done before then - will try and keep this active!

#5 Jamie_hail

Jamie_hail

    Super Mini Mad

  • Members
  • PipPipPipPipPipPip
  • 555 posts
  • Location: Fort William

Posted 22 August 2011 - 12:10 AM

thats quite an impressive improvisation :lol: never seen that before and i thought the battery boxes had 3 holes, mine does? :huh:

aha good improvisation there. going to be following this one so keep the good work up and keep us informed! :P


The battery box does have three holes, they're just out of site in the rust picture - and has become a million and one! Anyway, it was enough to hold the battery in place for the meantime, the box will be coming out completely, and an oddysey battery mounted under the rear seats, possibly with a flat tank across the width of the boot. Major improvisation, but like I said, it'll work until then!

Total spent so far? £800 on the car and less than £175 on everything else. I'm taking the budget seriously! :P

#6 evansisgreat

evansisgreat

    One Carb Or Two?

  • Members
  • PipPipPipPipPipPipPip
  • 1,095 posts
  • Local Club: Not yet

Posted 22 August 2011 - 12:40 AM

Nice project mate, love the dash layout. Where abouts in Scotland are you?

#7 Jamie_hail

Jamie_hail

    Super Mini Mad

  • Members
  • PipPipPipPipPipPip
  • 555 posts
  • Location: Fort William

Posted 22 August 2011 - 12:59 AM

I'm up North, Glenfinnan, about 18 miles from Fort William. Driving roads galore to the west/southwest - and lots and lots of straights to the east! Lets just say, mother hit the limiter in a 3.2 litre Audi TT on the way to work the other morning! What a commute!
Travel all over the place though, down in Bellshill normally once a week with a mate in the Lorry, and seeing a girl in Motherwell, so might see you about one day!

#8 Jamie_hail

Jamie_hail

    Super Mini Mad

  • Members
  • PipPipPipPipPipPip
  • 555 posts
  • Location: Fort William

Posted 25 August 2011 - 09:12 PM

Posted Image

Posted Image

Possibly the last two pictures of Kermit, before the conversion begins and the front end is cut... :mmkay:

#9 Midas Mk1

Midas Mk1

    Crazy About Mini's

  • TMF+ Member
  • PipPipPipPipPipPipPipPipPipPip
  • 5,626 posts
  • Location: Manchester
  • Local Club: S.U.N.M.C

Posted 25 August 2011 - 09:39 PM

Looking Good, im subscribed! :thumbsup:

#10 Kam

Kam

    Straight to the Point

  • TMF+ Member
  • PipPipPipPipPipPipPipPipPip
  • 4,140 posts
  • Location: Hampshire
  • Local Club: 16vMini club

Posted 26 August 2011 - 08:55 AM

Good going with the budget side of things, I hope you do stick with it, it can be done, so I hope your buying a secondhand frame and an engine that needs a bit of tidying up as buying a new allspeed frame and working engine isn't really budget orientated

Even cheaper would be make your own frame, like I said, the budget side can be done depending on what you can do

Keep at it

#11 MiniLandy

MiniLandy

    One Carb Or Two?

  • Members
  • PipPipPipPipPipPipPip
  • 796 posts
  • Location: Ramsey, Cambs.
  • Local Club: HAMOC

Posted 26 August 2011 - 09:17 AM

Looking good, I tried to get my brother to buy that same car, actually, looked like a good deal.

Where'd you get that soundproofing from??

#12 Jamie_hail

Jamie_hail

    Super Mini Mad

  • Members
  • PipPipPipPipPipPip
  • 555 posts
  • Location: Fort William

Posted 26 August 2011 - 09:20 PM

Looking Good, im subscribed! :thumbsup:

Thanks! Think I'll be needing a bit of support on this one!

Good going with the budget side of things, I hope you do stick with it, it can be done, so I hope your buying a secondhand frame and an engine that needs a bit of tidying up as buying a new allspeed frame and working engine isn't really budget orientated

Even cheaper would be make your own frame, like I said, the budget side can be done depending on what you can do

Keep at it


Again, thanks! I have no choice but to stick with it, every single penny I earn is going into the car, and that isnt much! going to try and keep under a 4k budget! So far, the car cost me £800, and to get the whole rear end/interior in good condition cost about £200... Picking up a Honda b16a engine this weekend, it's got a 100k on it, so it'll be stripped, I'll check the bores, new rings, new valve seals, guides and valves, new timing gear, new pulleys, new clutch... As and when budget allows! It's an engine, gearbox, radiator, fan, ecu, interior and engine wiring looms, honda driveshafts, engine mounts, bushes, the lot! Everything in the front end of the honda, Im picking up this weekend for £500!

Selling the existing MPI block/gearbox, subframe, looms ect should earn me back some of the budget! The gearbox was only rebuilt 7k ago, with all receipts here too!
I cant seem to find any Allspeed frames second hand, but selling the old subframe and engine should knock a fair bit off how much it will cost! £1300 for the whole allspeed kit (shafts, mounts, everything) - if one comes up second hand though, I'll have it!
I'm not great at fabricating, so making one is out of the question for now!

Looking good, I tried to get my brother to buy that same car, actually, looked like a good deal.

Where'd you get that soundproofing from??

It was a bargain - maybe not so if you were hoping to get the rover engine running, but for a conversion, it's excellent - not a spot of rust visible apart from the battery box!
The soundproofing is 'Silent Coat' - I bought it as a bulk pack from CarAudioDirect - £70 for 4sq.m! Threw the budget out the window a bit, but well well worth it! I'm an audiophile! Sold one of my DSLR's to pay for it though! And I guess I saved a large amount on making my own dashboard and having the carpet cleaned!
https://www.caraudio...-bulk-pack.html - Their site is playing up a bit, so if you have problems, then theres loads on Amazon - http://www.amazon.co...nt coat&x=0&y=0
Like I said, it was the bulk pack I used, but it's all the same stuff!

Edited by Jamie_hail, 26 August 2011 - 09:25 PM.


#13 Kam

Kam

    Straight to the Point

  • TMF+ Member
  • PipPipPipPipPipPipPipPipPip
  • 4,140 posts
  • Location: Hampshire
  • Local Club: 16vMini club

Posted 26 August 2011 - 10:07 PM

I like your frame of mind dude, I reckon you'll be able to hit your 4k, why? because I put a 1.6 on the road with 5k, and thats with me knowing squat and buying everything new that was plug n play for the build, the engine I think was the only secondhand thing, stuff like a welder and all the other little bits that people forget all adds up

I know its all dependent on how you want the car to look but I hope you hit your goal, it can be done

I'm subscribed, keep at it, top work

#14 Jamie_hail

Jamie_hail

    Super Mini Mad

  • Members
  • PipPipPipPipPipPip
  • 555 posts
  • Location: Fort William

Posted 26 August 2011 - 10:26 PM

I like your frame of mind dude, I reckon you'll be able to hit your 4k, why? because I put a 1.6 on the road with 5k, and thats with me knowing squat and
buying everything new that was plug n play for the build, the engine I think was the only secondhand thing, stuff like a welder and all the other little bits that people forget all adds up

I know its all dependent on how you want the car to look but I hope you hit your goal, it can be done

I'm subscribed, keep at it, top work


I'm going to try and keep everything as plug and play as possible, but all second hand - Like said above, I've found a whole honda front end for £500, so that should keep the costs down!

Shall keep me busy through the winter - Going to set a deadline of the 1st of February too, but not going to cut corners just to get it done! Thanks for the support!

#15 M J W J

M J W J

    One Carb Or Two?

  • Members
  • PipPipPipPipPipPipPip
  • 976 posts
  • Location: Midlands
  • Local Club: not yet

Posted 26 August 2011 - 10:31 PM

Looking good.

Although I am now starting to realise what a headache it is you can build your own frame (mines for a Vauxhall engine) for under £200. Just takes time, a lot of fiddling around and patience. Not really knowledgeable on the Honda stuff but can't you modify a metro frame? Surely that would be cheaper than buying an Allspeed. Just an idea.


0 user(s) are reading this topic

0 members, 0 guests, 0 anonymous users