Was this one but u think its for the air guns... Hmmm
http://www.halfords....yId_165469#dtab


998 Fast Road Build.
Started by
Brookesy
, Nov 18 2011 02:19 PM
137 replies to this topic
#32

firefox
-

- Members
-

- 1,102 posts
One Carb Or Two?
- Location: Stockton-on-Tees
- Local Club: will find one when on the road
Posted 18 November 2011 - 10:07 PM
Yeah thats the same one bud it's 1/2 drive so should be ok the socket at machine mart is 3/4 driveWas this one but u think its for the air guns... Hmmm
http://www.halfords....yId_165469#dtab
Edited by firefox, 18 November 2011 - 10:10 PM.
#33
Brookesy
-
- Members
-
- 507 posts
Super Mini Mad
Posted 18 November 2011 - 10:52 PM
Lovely job i will have a look in the morning then and can have a crack at it sunday night as i found a rather handy metal bar in the garage that i can use to lock the primary gear with.
Also Andy i cant see where you are on about? I had another look in person aswell. Do you mean the housing that the wrecked bearing is in or the one below that has chips around the edge(can just see in the photo) Wrecked bearing seems very snug, couldnt even get it out earlier so have given up till later
Yep...wont be easy to get that bolt off now! also the inside face of the transfer housing where the bearing has commited suicide looks worn. you may need to get it machined flat again and a new set of oversized washers to take up the idler gear end float...check the gearbox case behind the idler gear..If it looks like this...it will need a bit of work...this one did!!
Also Andy i cant see where you are on about? I had another look in person aswell. Do you mean the housing that the wrecked bearing is in or the one below that has chips around the edge(can just see in the photo) Wrecked bearing seems very snug, couldnt even get it out earlier so have given up till later
#34
firefox
-
- Members
-
- 1,102 posts
One Carb Or Two?
- Location: Stockton-on-Tees
- Local Club: will find one when on the road
Posted 18 November 2011 - 11:21 PM
You have to put the casing in the oven , wait until the wife is out ha ha ha at 200 for 10/15 min then slam it down on a flat wood surface and it should fall out you will not get the outer case of the bearing out unless you do this and refitting the new one is the same you are a cheff bake itLovely job i will have a look in the morning then and can have a crack at it sunday night as i found a rather handy metal bar in the garage that i can use to lock the primary gear with.
Yep...wont be easy to get that bolt off now! also the inside face of the transfer housing where the bearing has commited suicide looks worn. you may need to get it machined flat again and a new set of oversized washers to take up the idler gear end float...check the gearbox case behind the idler gear..If it looks like this...it will need a bit of work...this one did!!
Also Andy i cant see where you are on about? I had another look in person aswell. Do you mean the housing that the wrecked bearing is in or the one below that has chips around the edge(can just see in the photo) Wrecked bearing seems very snug, couldnt even get it out earlier so have given up till later

#35
Brookesy
-
- Members
-
- 507 posts
Super Mini Mad
Posted 18 November 2011 - 11:29 PM
Haha are you serious? i take it it expands so you can get the bearing casing in?
Cheers for the tips
Cheers for the tips
#36
twrminisport
-

- TMF+ Member
-
- 913 posts
Jesus
Posted 19 November 2011 - 03:49 AM
Ill be keeping an eye on this 
If you need any help let me know, ive written a guide on small bore tuning if your interested aswell
Jesus
If you need any help let me know, ive written a guide on small bore tuning if your interested aswell
Jesus
#37
Brookesy
-
- Members
-
- 507 posts
Super Mini Mad
Posted 19 November 2011 - 08:24 AM
Cheers Jesus. That would be amazing if I could have a gander
#38
firefox
-
- Members
-
- 1,102 posts
One Carb Or Two?
- Location: Stockton-on-Tees
- Local Club: will find one when on the road
Posted 19 November 2011 - 09:24 AM
Yes gospel it is the only wayHaha are you serious? i take it it expands so you can get the bearing casing in?
Cheers for the tips
#39
liirge
-

- Members
-
- 4,097 posts
Up Into Fourth
- Local Club: EDMC AND MMC
Posted 19 November 2011 - 12:51 PM
Or what you can do is weld a nut on top of the bearing, and then turn bolt through with a couple of washers and this will pull the bearing out of the case!
#40
firefox
-
- Members
-
- 1,102 posts
One Carb Or Two?
- Location: Stockton-on-Tees
- Local Club: will find one when on the road
Posted 19 November 2011 - 01:51 PM
Hi Bud isn't there a fear of the outer race pulling off centre and the bolt pucturing the casing and also weld splatterOr what you can do is weld a nut on top of the bearing, and then turn bolt through with a couple of washers and this will pull the bearing out of the case!
#41
liirge
-
- Members
-
- 4,097 posts
Up Into Fourth
- Local Club: EDMC AND MMC
Posted 19 November 2011 - 02:21 PM
well, if you are careful and make sure that you put spreaders on the aluminium casing there wont be a problem.
Done it loads of times never had a problem, Even a really **** weld and **** alignment usually pulls them out.
Can't see an issue with splatter, and if you do manage it just remove the splatter.

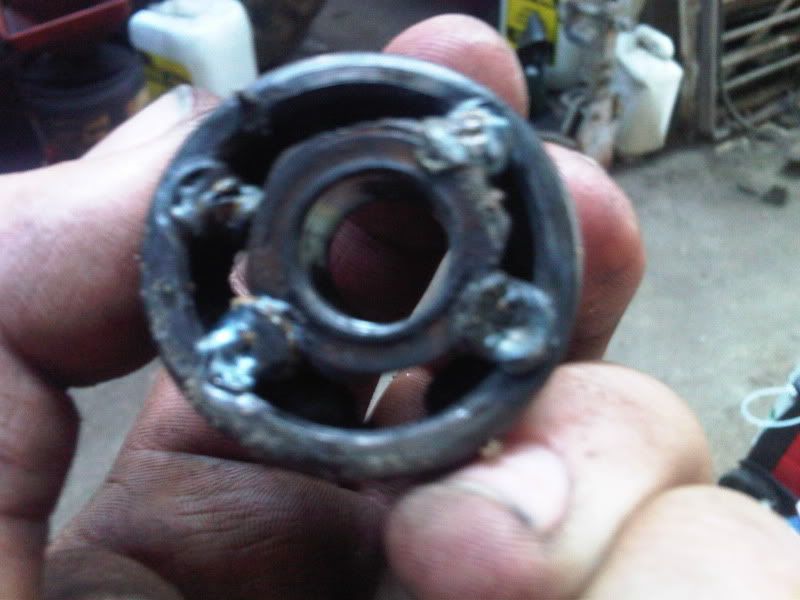
See what I mean....really not straight in anyway, I think i used lots of little nuts as spreaders kept putting more down and then tightening a couple of turns then more nuts then another couple of turns. Don't really know why I did it in such a bad way that time, just did! haha
Done it loads of times never had a problem, Even a really **** weld and **** alignment usually pulls them out.
Can't see an issue with splatter, and if you do manage it just remove the splatter.
See what I mean....really not straight in anyway, I think i used lots of little nuts as spreaders kept putting more down and then tightening a couple of turns then more nuts then another couple of turns. Don't really know why I did it in such a bad way that time, just did! haha
#42
firefox
-
- Members
-
- 1,102 posts
One Carb Or Two?
- Location: Stockton-on-Tees
- Local Club: will find one when on the road
Posted 19 November 2011 - 02:45 PM
Only one problem i cant weld well i can spot weld but i see your point , i got the slam dunk method of a gearbox site and said it was easywell, if you are careful and make sure that you put spreaders on the aluminium casing there wont be a problem.
Done it loads of times never had a problem, Even a really **** weld and **** alignment usually pulls them out.
Can't see an issue with splatter, and if you do manage it just remove the splatter.
See what I mean....really not straight in anyway, I think i used lots of little nuts as spreaders kept putting more down and then tightening a couple of turns then more nuts then another couple of turns. Don't really know why I did it in such a bad way that time, just did! haha
i get your point though

Edited by firefox, 19 November 2011 - 02:47 PM.
#43
CARTER_GT
-

- Noobies
-
- 18 posts
Learner Driver
- Location: Melbourne
- Local Club: Victorian Mini Club inc.
Posted 19 November 2011 - 03:00 PM
Gday mate,
Cant be bothered reading the whole thread as i am to tired it almost 2 am over here. The photo is of the crankcase ventilation. Not sure if anybody as mentioned it already.
Anyways have a read through this. It was written by one of australias premier mini specialists and has alot of good info on how to make a small bore quick. He mainly covers the 1098 but they are basically the same as a 998 apart from crank.
http://www.minimania...81/ArticleV.cfm
Enjoy!
Cheers,
Steve
#44
briain
-

- Noobies
-
- 40 posts
On The Road
Posted 19 November 2011 - 03:17 PM
Yeah thats how I did the water pump bearing on my motorbike, I also had the new bearings in the frezzer to make them easier to put inHaha are you serious? i take it it expands so you can get the bearing casing in?
Cheers for the tips
#45
firefox
-
- Members
-
- 1,102 posts
One Carb Or Two?
- Location: Stockton-on-Tees
- Local Club: will find one when on the road
Posted 19 November 2011 - 03:43 PM
Nice one bud forgot to mention the freezer bitYeah thats how I did the water pump bearing on my motorbike, I also had the new bearings in the frezzer to make them easier to put in
Haha are you serious? i take it it expands so you can get the bearing casing in?
Cheers for the tips


0 user(s) are reading this topic
0 members, 0 guests, 0 anonymous users


