Jump to content


Photo
- - - - -

Come On Nelly! (Sheddy Studio 2)


  • Please log in to reply
233 replies to this topic

#226 666junky

666junky

    One Carb Or Two?

  • Members
  • PipPipPipPipPipPipPip
  • 1,225 posts

Posted 16 May 2014 - 07:21 AM

Dent in the flitch panel on the passengers side, driver side floor pan scraped and dented quite badly and a few dinks on the exhaust hangers. Scary stuff but shes back on the road! Getting my new front tires fitted today and tracking re-done. One tire has a huge hole and chunks missing and the other has a big flat spot and uneven wear... plus a chunk out of the rim haha!


After Jack changed all the bushes she feels so much more stable, no more knocking or banging around shes now a really nice mini to drive!

Bring on L2B!!


#227 jackmason

jackmason

    Super Mini Mad

  • Members
  • PipPipPipPipPipPip
  • 522 posts
  • Location: Essex

Posted 16 May 2014 - 10:19 AM

It was pretty scary to watch this unfold in my rear view mirror.


First thought was that she has pulled over quickly on purpose, maybe due to a wheel bearing, fire or lack of oil pressure. Then i realised just how violently she mounted the curb, realised that she was still moving quite quickly and that the car was bouncing up and down and shaking with loads of tyre smoke pouring out the side.


I was scared!


I stopped as quickly and safely as i could and run back to a very upset, scared and shaken niki :(


After helping calm her down, we had a laugh about it and inspected the damage.


She'd done a proper job of it!


Relatively easy job to fix it all, hardest part was trying to straighten the track rod (only bent slightly)


This was what it looked like once i took the wheel off.


IMG_20140511_220620_zps40c4668f.jpg


#228 1984mini25

1984mini25

    Crazy About Mini's

  • Members
  • PipPipPipPipPipPipPipPipPipPip
  • 8,785 posts
  • Location: -

Posted 17 May 2014 - 11:00 PM


So please please please!!! be careful out on the road and make sure you use nylocs on anything that may vibrate free / is part of the structure of the car!


It's not just a case of using nyloc nuts (although not on anything that gets hot as the heat will melt the nylon part and once used should always be replaced) and plain nuts with spring washers, its also using the correct size and grade fastening. I ended up refusing to work on someone's mini recently because they were insisting on replacing perfectly usable fixings with random ones that in some cases weren't the correct size, grade and forcing metric and imperial sizes together. All because the old ones were rusty (just needed a wire brush) and the new fixings were cheap and shiny and I could see this very thing happening once It was ever roadworthy.


I myself have also had a front tie bar nut work lose, although no idea how as it hadn't been touched in years. that the first I noticed was braking from 70 for a stationary queue of traffic for the roundabout ahead, witch sent the mini veering sideways. luckily the nut didn't fully unwind itself, so I was able to pull over and tighten it back up as best I could and carefully drive the last 3 miles home for a change of underwear.  


#229 666junky

666junky

    One Carb Or Two?

  • Members
  • PipPipPipPipPipPipPip
  • 1,225 posts

Posted 03 November 2014 - 07:43 PM

So fast forward a massive gap in the running of Nelly, issues and running problems I have taken the dive and bought another micra.. This one is to strip down though!


1385793_10152409999977233_13630251706710


6 hrs progress so far, stripped out alot of the interior loom and worked out what parts need to stay for the NATS system to still work properly.

For anyone stripping a micra, its much easier to get the dash out after you remove the wiper / indicator stalks! Once i have it all removed im gonna try and do a full rundown of which wires are needed for this conversion.

One thing to note is the wires are not identical throughout their routing.. For example on the horn wiring - at the switch there are a set of two cables and a single cable on a different connector (none marked typically with a black earth anywhere at all although one must be!) this then changes to a set of 4/5 further down the loom of different colours and then seemingly dissapears - Il need to trace it further to work it out!

So, yup, tomorrow il be removing more of the dash and starting on the engine bay side of things.. All out in the open without a garage.. should be a laugh!


Edited by 666junky, 03 November 2014 - 07:45 PM.


#230 666junky

666junky

    One Carb Or Two?

  • Members
  • PipPipPipPipPipPipPip
  • 1,225 posts

Posted 11 March 2015 - 11:17 AM

Ok, so this topic hasnt been posted on in ages so i thought i would update the progress on it.. 

Im not going to do a step by step account of this whole build but i thought this was quite important for anyone using the allspeed frame and putting it into a car with the front end in place.

First of all... Its not easy. 


I started by cutting the inner wings away to what i thought would be enough - turns out it wasnt.


11046336_10152666124767233_2926265981025

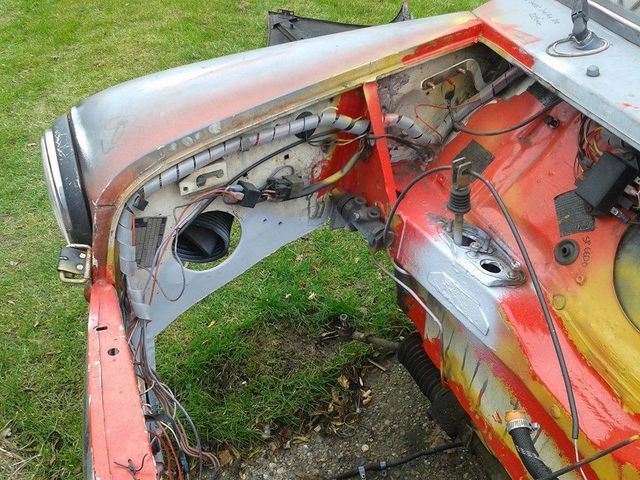
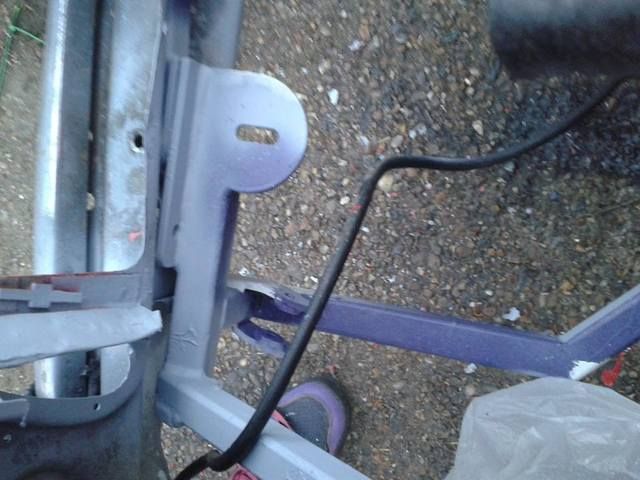
Look at the very front of the car - i tried to retain the inner wing to front panel support but this must be cut away or it wont go in ( the vertical bit of inner wing attached to the front panel near the teardrop mount. 

Same for the other side : (material not removed yet)

11043101_10152666124857233_1337483780851


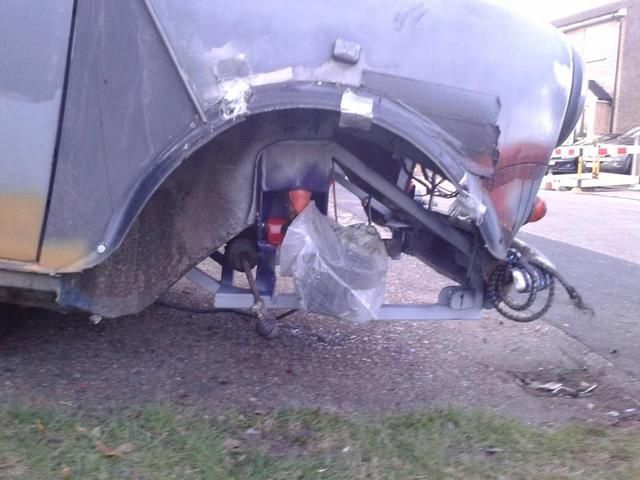
Also remove as much horizontal inner wing beneath the damper mount as possible - the towers on this frame are wider than standard and will foul the extra flap of metal beneath the bolts: In this picture i have hammered it outwards - it will eventually be removed entirely and smoothed out.


11046753_10152666124962233_3748972654284

You can just abouts see what i mean in this picture above. and this one below :


10422537_10152666125027233_2466127648341


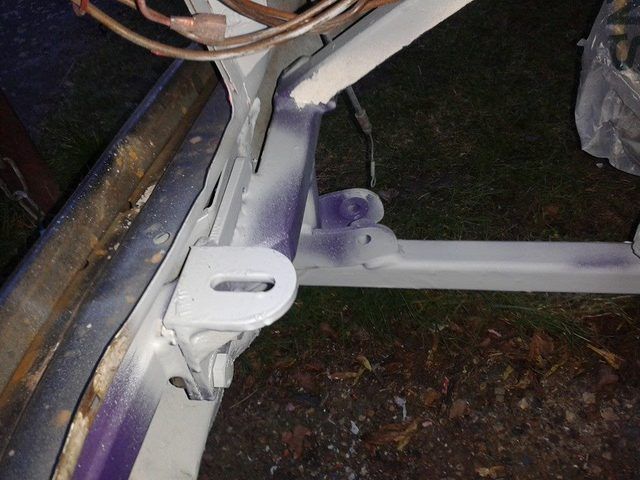
you will also see that now the frame is in I have removed / bent the extra material i left in place in the original pictures: the photos below may show it a little better. 

For anyone doing the conversion you must remove any protruding material around the teardrop mount area - for the best fit you will need to bend the bottom of the front panel outwards whilst you lift the frame in - it will catch and scrape the frame if you dont. 

I hope these pictures below explain what im mumbling about (Its not bolted at the front yet!) 

10647089_10152666125247233_1528547654537

11028965_10152666125327233_8159973443834


Amongst the swearing and shouting you also have to retain the front part of the frame in the front valance area (It will not lift in with it in place!!) I used a zip tie wrapped round the bumper/valance to hold it in place whilst lifting the frame. 

Now the tower bolts are a fuddle so i recommend using a jack under the rear engine mount to hold it all up in position - try to get both bolts to catch the thread and then work your way side to side - the frame will pull itself up into the holes but be careful you're not cross threading them! 


The rear subframe mounts in the car are a pig to line up and i found myself using a screwdriver to pull it up then sliding the mounts in place - i used a dremel to round out one of the holes. Please use spreader plates inside the car too as this is a solid mount frame and ive seen floors crack without them! 


The front mounts can be done last ( they are more to hold the front end in place than anything else) and you will have to drill a new hole in the valance - as you can see by the pictures they do not line up with the old teardrop holes - they are just a little to the side. 

You will need to re-use your own rear subby mounts, tower bolts and find some bolts/nuts for the front mounts. The fixings you get are for the engine mounts, tower bolt collars (MUST USE!) and a couple of other bits. 


I hope this helps at least one person! 


#231 Ben_O

Ben_O

    Mill Road Garage

  • Paint Doctor
  • PipPipPipPipPipPipPipPipPipPip
  • 9,794 posts
  • Location: Isle of Wight

Posted 11 March 2015 - 03:24 PM

Wow! This is different from the norm!


Love it!!


#232 alex-95

alex-95

    I am THE CLAMP MAKER

  • TMF+ Member
  • PipPipPipPipPipPipPipPipPipPip
  • 6,032 posts
  • Location: l

Posted 19 March 2016 - 05:16 PM

Any updates on nelly?


#233 blueovalcraig

blueovalcraig

    Mini Mad

  • Members
  • PipPipPipPip
  • 193 posts
  • Location: Rothesay, Isle of Bute

Posted 19 March 2016 - 11:26 PM

Have just read this from the start. Great work! Glad you weren't hurt when you had the accident

#234 Chris1992

Chris1992

    Up Into Fourth

  • Members
  • PipPipPipPipPipPipPipPipPip
  • 2,022 posts
  • Location: Essex

Posted 24 May 2016 - 06:14 PM

Not enough decent rat look mini's about. Love the character that Nelly has! Any updates?


1 user(s) are reading this topic

0 members, 1 guests, 0 anonymous users