Hang on you would need an extra joint in your shin to get your heels near the cross member with the front seat in place! Lol


Mini Failed Mot Due To Holes In The Sills
Started by
Jonny90
, May 16 2014 06:08 PM
46 replies to this topic
#31

CityEPete
-

- Members
-

- 3,920 posts
Up Into Fourth
- Location: On my soapbox....
Posted 17 May 2014 - 06:03 PM
#32
CityEPete
-
- Members
-
- 3,920 posts
Up Into Fourth
- Location: On my soapbox....
Posted 17 May 2014 - 06:05 PM
The word vertical is in every single post you have quoted me on! Lol
#33
Tamworthbay
-

- Members
-
- 7,025 posts
Crazy About Mini's
- Name: Clive
- Location: Tamworth
- Local Club: A5 minis
Posted 17 May 2014 - 06:12 PM
The word vertical is in every single post you have quoted me on! Lol
And the rear face of the crossmember is vertical hence the need for clarification. you don't need an extra joint unless you are an ostrich. Your feet go under the seat in front of you, not double back under you so your heels are nowhere near the heelboard so saying the vertical panel near your heels would suggest the crossmember rear face not the heelboard. Sit in the back and you will understand. Anyway the OP will know the correct location now.
#34
corrado vr6
-
- TMF+ Member
-
- 678 posts
Super Mini Mad
Posted 17 May 2014 - 06:40 PM
Well I'm confused!
If I were to sit in the back I would say my heels would be closer to the heel board my toes facing the central crossmember
If I were to sit in the back I would say my heels would be closer to the heel board my toes facing the central crossmember
#35
CityEPete
-
- Members
-
- 3,920 posts
Up Into Fourth
- Location: On my soapbox....
Posted 17 May 2014 - 07:30 PM
So are mine but lets not start that off again! Ha
#36
Tamworthbay
-
- Members
-
- 7,025 posts
Crazy About Mini's
- Name: Clive
- Location: Tamworth
- Local Club: A5 minis
Posted 17 May 2014 - 07:33 PM
Well I'm confused!
If I were to sit in the back I would say my heels would be closer to the heel board my toes facing the central crossmember
 image.jpg 72.85K
16 downloads
image.jpg 72.85K
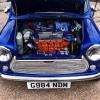
16 downloadsIf you look at the pic you will see that the rear passengers feet would be a long way forward of the heelboard. I know when I sit in the back of my mates mini my knees are pressed up against the seat and my feet go a way under the seat. The heels may be pointing to the heelboard but they aren't close to them as initially described. Which is why I clarified it for the OP.
On a different note, there are loads of really cool cross sectional pics of minis when I had a look for one to explain what I am on about. Some are really good for showing the panel arrangements.
#37
CityEPete
-
- Members
-
- 3,920 posts
Up Into Fourth
- Location: On my soapbox....
Posted 17 May 2014 - 07:43 PM
Thats actually about as water tight as mine! You must have very long feet.
#38
Tamworthbay
-
- Members
-
- 7,025 posts
Crazy About Mini's
- Name: Clive
- Location: Tamworth
- Local Club: A5 minis
Posted 17 May 2014 - 07:45 PM
you know what they say about people with long feetThats actually about as water tight as mine! You must have very long feet.

Shame mine are only size 8 :-(
#39
CityEPete
-
- Members
-
- 3,920 posts
Up Into Fourth
- Location: On my soapbox....
Posted 17 May 2014 - 07:47 PM
Same as big hands.....big gloves!
#40
Jonny90
-
- Just Joined
-
- 10 posts
Learner Driver
- Location: Aberdeenshire
Posted 18 May 2014 - 12:07 AM
What part is this, can't work out where this would go?
Will I need it?
Will I need it?
Attached Files
-
index.jpeg 10.79K
6 downloads
#41
corrado vr6
-
- TMF+ Member
-
- 678 posts
Super Mini Mad
Posted 18 May 2014 - 12:14 AM
It attaches to the rear bin and rear arch plus the quarter panel
#42
Jonny90
-
- Just Joined
-
- 10 posts
Learner Driver
- Location: Aberdeenshire
Posted 21 May 2014 - 09:22 PM
Alright guys, looking through the forum has raised a few more questions about the repair.
If im going to be replacing the heel board with the engine still installed, will I reed to brace the car or is it ok to replace the inner sill, then the heel board then finally the outer sills without bracing.
Also, I have found some rust inside the companion bin. Is this the inner sill? And if so and it is only this area affected, would you just use sheet metal to repair or would you replace the whole inner sill front to back? For this repair is the easiest option to remove the companion bin or should I cut out the bottom rear quarter skin to gain access?
Will I also need to replace the Floor to sill reinforcement for slinger bracket?
Last but no least, is it essential that I replace the jacking point as I don't plan to use it? Could I not just blank it off?
Cheers
Edited by Jonny90, 21 May 2014 - 09:31 PM.
#43
rally515
-

- Members
-
- 3,848 posts
Up Into Fourth
- Location: ask!
Posted 21 May 2014 - 10:05 PM
Hi Jonny,
Heres a little picture extract from one of my project threads on here, im currently at a stage of doing just this to one of my minis and thought some pictures of the innersill cut out completely might help towards you understanding whats what...
First few pictures are of the bracing I welded in BEFORE cutting any metal out what so ever, this is important because the most critical thing is to keep alignment, without accurate measuring and bracing you're likeing to be driving a crabbing mini down the road if you're not careful Hahha.


Mad these myself, but its probably best that you use some M-machine panels as shown by Cooperman as you can order tham complete with outer sill welded on, saves you time and welding materials too ;):

Inner sill template i shall be keeping for future sill replacements:


Now heres the part that you can do after bracing, cutting out back to good metal, ready to fit new :)
As you can see i've cut just past the rusty line, that rusty line is were the previous owner seam welded the oversill on and didnt even attempt to protect with paint, so back to bare metal and cut past that lot!


As you can see above, i cut Around the companion bin, this is so i could get access with a grinder to gind down the spot welds on the companion bin as its mounted to the inner sill/floor via spot welds on an internal lip (you'll be able to see the lip if you look in the companion bin with a tourch)
Heres the mess i was greeted by jsut from the rear section under the companion bin, expect the saem to fall out aha

All cut out and de-burred any sharp edges (i tend to cut myself alot!! 
 )
)

This the the rear section, within the companion bin, the rusted nots the see there are the captive nuts to hold the subframe to the heelboard, if you read on i'l post some photos of this section on my other mini when new pieces are in place and how it looks like when metal hasn't rotted away to nothing!

I cut the lower section of the rear quarter out for better access, you can buy a lower rear quarter repair piece so no worries there, the below picture is of the inner surface of the companion bin, can you see in inner lip i was talking about that spots the the floor/ inner sill ? :)


The picture below is looking down into the companion bin with inner sill removed (so that answers your question as to wheather its the inner sill you see in the bin ;) )


I'l be 2 minutes whilst i find pictures of the heelboard and certain other filler pieces at that intersection,
Cliff
#44
Jonny90
-
- Just Joined
-
- 10 posts
Learner Driver
- Location: Aberdeenshire
Posted 21 May 2014 - 10:20 PM
Thanks for that. R read on another thread that if I kept the doorstep in I wouldn't need to brace when replacing the sills but would it twist when I cut out the heel board?
#45
rally515
-
- Members
-
- 3,848 posts
Up Into Fourth
- Location: ask!
Posted 21 May 2014 - 10:24 PM
Ok so the closing panel, fillet piece and inner sill stiffener..........
This below is the innersill stiffener (pictured at the left), and the right piece i welded it to is called the closing panel (this sometimes as per your link to the panel comes already fitted with the fillet piece):

Welded together

Now the picture below shows were i have cut the lower section of the rear quarter out and also part of the heelboard as it was rotter also, remember the heelboard is the panel thats vertical and runs from either side of the car and the rear subframe bolts to (the rusty bolt point in my previous post was an inner view of the corner if the heelboard).
Closing panels again with (Seperate) fillet pieces:

And sill stiffeners:

The panel in the picture below that says "LH" on is the inner sill stiffener and its respective location, spot welded to the vertical section of the innersill within the companion bin (you'll eb able to see it in yours)

The middle panel you see here is a full heelboard:

Hope these help Jony, go through this post a few times to get the jist of panels and placement and possibly not tongiht but when you're less tired like I am , otherwise you might miss important details like the saying "Measure twice, Cut once!!"
Any other questions or if you don't understand please just ask before cutting about and making a bugger of your pride and joy :),
Cliff


1 user(s) are reading this topic
0 members, 1 guests, 0 anonymous users


