Its back! It arrived on a trailer about 7pm tonight? I will take some photos in the daylight tomorrow and post them. It's looking good.
Rod

One Carb Or Two?

Posted 09 February 2015 - 09:11 PM
Its back! It arrived on a trailer about 7pm tonight? I will take some photos in the daylight tomorrow and post them. It's looking good.
Rod
One Carb Or Two?
Posted 10 February 2015 - 08:46 AM
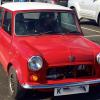
Here she is!
Come on, sing along "Isn't she lovely, isn't she wonderful...."
That's Chili Red if anyone is interested.
 IMG_0071.JPG 60.85K
36 downloads
IMG_0069.JPG 63.41K
24 downloads
IMG_0070.JPG 59.46K
20 downloads
IMG_0072.JPG 57.82K
14 downloads
IMG_0073.JPG 45.06K
9 downloads
IMG_0071.JPG 60.85K
36 downloads
IMG_0069.JPG 63.41K
24 downloads
IMG_0070.JPG 59.46K
20 downloads
IMG_0072.JPG 57.82K
14 downloads
IMG_0073.JPG 45.06K
9 downloads
Mill Road Garage

Posted 10 February 2015 - 11:59 AM
That looks lovely.
You must be very pleased with it!
well done
Ben
Formally known as dominicdee

Posted 10 February 2015 - 12:28 PM
that looks a treat!
One Carb Or Two?

Posted 10 February 2015 - 12:37 PM
Super Mini Mad

Posted 10 February 2015 - 01:45 PM
That's Chili Red if anyone is interested.
Looks great!
Is that Chili red from the BMW mini?
One Carb Or Two?
Posted 11 February 2015 - 07:56 PM
Yes its supposed to be BMW Chilii Red. I went that way on the basis that hopefully the red will be available for a long time - and I like the colour 
Rod
Super Mini Mad
Posted 12 February 2015 - 09:20 PM
It's a good colour, can see why you're pleased with it.....
One Carb Or Two?
Posted 22 February 2015 - 06:57 PM
Toady I labelled up the new front loom by comparing it to the old one. Then spent a tortuous 20 mins getting the grommet on to fit the bulkhead - that was fun! Then I threaded it in to the car and roughly positioned it around the engine bay.
The other day I bought new (old) glass all round from MiniJosh - top bloke - and a fuel tank.
I also took the cowling off the radiator and wire brushed and left it soaking in de-rusting gel (BlitHamber). Once that's cleaned off I'll give it a quick spray with etch through primer.
Slow going but moving forward.
Rod
One Carb Or Two?
Posted 23 February 2015 - 09:04 PM
I left the radiator cowling in the BlitHamber gel for about 18 hours and boy does it work. Its come up really well so I cleaned it off and give it a coating of paint to protect it.
Rod
Learner Driver

Posted 23 February 2015 - 10:58 PM
you're doing a great job,Looking forward to seeing the finished article,(as i suspect you are!)
i have painted a few of my minis myself in the past but you cant beat a professional job,keep up the good work !
One Carb Or Two?
Posted 28 February 2015 - 01:18 PM
Heater is all painted and new foam attached (and sprayed). Time to put it back together.
The only thing I haven't put back in is the switch and its wiring.
Rod
IMG_0097_2.JPG 52.54K
9 downloads
IMG_0098_2.JPG 58.68K
7 downloads
IMG_0099_2.JPG 55.19K
9 downloads
IMG_0100.JPG 84.4K
9 downloads
One Carb Or Two?
Posted 01 March 2015 - 05:03 PM
I am using new seat brackets but I'm not fitting standard seats. I will be fitting some from an Alfa 147 GTV. They have a wider base than the standard mini seats. So today, I cut and welded some right angle brackets from about 3 mm steel. These will have a couple of holes rilled in to the upright section so that I can bolt them on to the seat brackets. Then I will weld some square box section on to the plates and the seat frames will be attached to that.
When I've drilled the holes and attached them to the brackets I will stick some photos up.
I also cleaned up the rubber gaskets for the rear light clusters and the headlamps. I found that I need a few screws of the right size and 2 of the headlamp bowls. I'm going to put the plastic ones in rather than metal. Plastic doesn't rust so that should be better in the long run. I also need some new gaskets for the lenses so I'm building quite a list of parts I need from good old MiniSpares.
Rod
One Carb Or Two?
Posted 08 March 2015 - 06:43 PM
Hi,
I didn't have much time on the car this weekend but I've made some brackets to be bolted to them as you can see.
I then have a piece of square section which the seat sliding runners will be bolted to. I've asked a question in the forum about whether it will be strong enough to rivnut the box section to the plate or whether to weld the box section to the plate?
I realise that if I rivnut it then I lose the adjustable element of the brackets.
Rod
IMG_0119.JPG 52.58K
10 downloads
IMG_0120.JPG 60.21K
9 downloads
IMG_0121.JPG 69.03K
5 downloads
IMG_0152.JPG 54.68K
8 downloads
IMG_0153.JPG 54.8K
8 downloads
One Carb Or Two?
Posted 02 April 2015 - 10:41 PM
Hi
Right, the next stage of the seat frame saga.
After plan 1 was proved to be not fit for purpose I've added a section of box steel between the inner sill and the tunnel. I will drill that and the rear seat bracket holes will be fixed there.
Next I have made up some brackets (two per seat), The idea is that there's a piece of box section with the holes for the front seat bracket bolts. Then I've attached two sections of 2 to 3 mm steel to form a right angle. The idea is that they sit on the rear edge of the cross member. I've slanted the top piece of the box section down slightly so that it lines up with the angle of the seat bracket. The seat will have a slight upward tilt so that even though it is mounted behind the cross member, the seat will still slide. As you can see, in the rear pat of the box section, I've cut out a section to reduce the height of the bracket so the angle of the seat is minimal.
The bracket will be welded to the cross member for a good solid mount.
I think this should work ok, finally!
Pictures for those that are interested.
Cheers,
Rod
IMG_0392_2.jpg 80.01K
16 downloads
IMG_0394.jpg 34.45K
15 downloads
IMG_0395.jpg 33.4K
9 downloads


0 members, 1 guests, 0 anonymous users


