Jump to content


Photo
- - - - -

95 Sprite Rebuild & 16V Conversion


  • Please log in to reply
691 replies to this topic

#646 alchall

alchall

    Super Mini Mad

  • Just Joined
  • PipPipPipPipPipPip
  • 604 posts
  • Location: Chorley

Posted 04 October 2020 - 06:59 PM

It's been a while since my last update but I have been getting along, so here's a brief summary, not entirely in chronological order!


Rear subframe is in, handbrake cable fitted, shocks fitted etc...


mini-1151.jpeg


Rear shocks were tricker than I imagined, they are very close to the turrets at the bottom at full droop and I couldn't force the damper closed very far as there's not a lot of weight in the back at the moment and the springs are new so very firm, I was a little worried about this but actually once on it's wheels and camber and toe adjusted to somewhere near standard clearance is fine.


Similar story up front...


mini-1155.jpeg


Shocks far easier to fit at the front, getting the subframe in is a tricky job when you have to worry about paintwork though!


Callipers look good, came with green stuff pads which have mixed reviews but were a good deal as a set at the time so I'll see how I get on with them.


I had to improvise for the fresh air ducting on this side, it had been deleted by a previous owner, I was able to get the intake for the front but I could not get the correct size left hand vent for the bulkhead. So I purchased a new Revotec hose and a pair of heat shrink joiners, they only come in pairs, which turned out handy as the first one slipped down the tube some way when I got it to it's required size while shrinking, but with the two in place it's solid and has done the job nicely...


mini-1164.jpeg


mini-1153.jpeg


Lights are in...


mini-1154.jpeg


Got on well with the loom and most of the under bonnet fittings are now in place that need to be before the engine is dropped in and I also have the steering column and wheel fitted as are the pedals.


mini-1159.jpeg


mini-1157.jpeg


Taken a lot of fiddling to get the wiring all in place, but I have tested it and it is all working, the central locking was fiddly to fit also but it does work although I have still got to screw the mechanism to the lever arm.


The visible part of the locking levers wasn't in great condition, I tried giving it a lick of black enamel paint but it reacted with what was left of the coating that was already there. So I decided to use some of my spare vinyl from the interior trimming and fixed it in place behind the lever, I think this should look good when in place...


mini-1162.jpeg


mini-1163.jpeg


I also have found that I've not fitted the bottom bush far enough into the steering column so that is going to have to come out and be fixed, as it is I cannot fix the wheel in place with the nut.


I also popped my newly trimmed top dash rail to check for fitment of the tweaters and speaker wiring, it looks good and the tweeters fit in nicely, I do need to bond some brackets underneath though to ensure they don't pop out.


mini-1152.jpeg


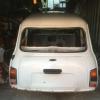
And another big milestone reached last week, it's now sat on it's wheels (I got to this stage a week ago, and tested the electrics after getting it on its wheels.


mini-1156.jpeg


mini-1158.jpeg


Those tail lights are difficult, the rubber gaskets just are too small and inflexible, got there in the end but such a pain and had sore fingers for days afterwards, seems like a common issue.


It's riding a little high, the front hilos are actually set to the lowest setting but it still sits on the droop stops, I suspect the addition of the engine will fix that to some extent, the rears aren't set to the lowest yet, but I'll do that then work it upwards from there to get it to standard height.


Anyway, that's about all for now, I'll leave you with a little view from under the OSF wheel arch, that ducting was hard work to fit, fixing the box to the inner wing was not an easy task.


mini-1160.jpeg


#647 72hump

72hump

    Mini Mad

  • Members
  • PipPipPipPip
  • 200 posts
  • Location: Nairn
  • Local Club: IMOG

Posted 04 October 2020 - 07:37 PM

Stunning mate, your car is probably way better than when it came out of the factory.

#648 Maccmike8

Maccmike8

    One Carb Or Two?

  • Members
  • PipPipPipPipPipPipPip
  • 1,089 posts
  • Location: uk

Posted 04 October 2020 - 08:09 PM

Bloody lovely.


#649 johnR

johnR

    Up Into Fourth

  • Members
  • PipPipPipPipPipPipPipPipPip
  • 2,244 posts
  • Location: Dorset

Posted 05 October 2020 - 09:34 AM

cracking on now! great work!


#650 REVVIT

REVVIT

    Speeding Along Now

  • Members
  • PipPipPipPipPip
  • 334 posts
  • Location: COVENTRY

Posted 05 October 2020 - 10:44 AM

Very Very nice ...


#651 colinf1

colinf1

    One Carb Or Two?

  • Members
  • PipPipPipPipPipPipPip
  • 902 posts
  • Location: Dundalk

Posted 05 October 2020 - 12:01 PM

I think this thread needs a NSFW tag now lol...


Very nice touch with the vinyl on the door locks


#652 alchall

alchall

    Super Mini Mad

  • Just Joined
  • PipPipPipPipPipPip
  • 604 posts
  • Location: Chorley

Posted 06 October 2020 - 01:51 PM

Stunning mate, your car is probably way better than when it came out of the factory.


Bloody lovely.


cracking on now! great work!


Very Very nice ...


I think this thread needs a NSFW tag now lol...


Very nice touch with the vinyl on the door locks


Thanks Guys, I just hope it actually works  :D


#653 Kaj

Kaj

    Mini Mad

  • Noobies
  • PipPipPipPip
  • 129 posts
  • Location: Kilmarnock

Posted 14 October 2020 - 01:19 PM

Lovely build mate. The black and red look fantastic with the Revolutions.
The power plant will be fantastic. Look forward to seeing more updates.

#654 alchall

alchall

    Super Mini Mad

  • Just Joined
  • PipPipPipPipPipPip
  • 604 posts
  • Location: Chorley

Posted 02 December 2020 - 12:34 PM

It's been a while since I updated this but I have been making steady progress....


Tank installed in the boot, I had to find a strip of rubber for the boot floor which was supposed to be self adhesive but it wasn't very sticky but it stuck down securely with some trim fix glue, I also had to source a plug for the pump wiring as my loom didn't have one, as it turns out the plug is the same as a denso alternator to cheap and simple.


mini-1165.jpeg


As you can see the spare is nicely powder coated and has a brand new tyre (cheapest I could find) and I've a Bosch battery, largest that would fit.


I've also fitted the boot lining kit, I'll need to pop this back out again as I still have to sort out the tank vent pipe but it's easy enough to do, lining is nice and neat though so pleased with this.


mini-1166.jpeg


Next up carpets, tidied up and secured the rear loom and subwoofer cable, I purchased the sound deadening kit with my carpet from Optimise Automotive, on reflection not really necessary as I have the Silent Coat pads which will likely do a better job than this stick on closed cell foam but it weighs nothing so I'm using it anyway.


And then on to the carpets, this is good quality and easy to fit, almost no trimming was required, just a tiny bit to trim off the top edges of the side trim at the door step where it is a little too tall (see third photo down) and a minor adjustment to the piece on the bulkhead where my ECU lives.


mini-1167.jpeg


mini-1168.jpeg


mini-1169.jpeg


I switched to MPI door seals, I don't have a good picture of this but the benefit is it creates a nice tidy finish to the carpet on the sills.


And talking of MPI parts I sourced these MPI style rear bins from Bolt On Bits (same place I got the door bins), they're a nice finishing touch to the rear, also fitted the carpet to the wheel arches.


mini-1170.jpeg


As you can see here I also fitted new seatbelts, I also have decided to carpet the outside of the bins, not completed this yet though.


The ECU is fitted to the bulkhead and I carpeted the outside of the box...


mini-1172.jpeg


mini-1173.jpeg


This is quite neat, I'm pleased with it!


Next up, headlining, a little fiddly but actually not as difficult as I thought, a couple of minor imperfections but I'm perfectly happy with the end result. This is another Optimise product, soft texture material in stone colour, it's nice and has a modern finish to it, also comes with A B and C coverings, I used some of the spare material they sent to extend the covering down the B pillars into the bins as well, I just need to work out a way of tidying them up where it meets the waist rail on the rear quarter lights.


mini-1174.jpeg


mini-1175.jpeg


I have also pretty much finished tidying up and securing the wiring, the alarm also works well and operates the central locking perfectly...


mini-1177.jpeg


I've now started on the glazing, rear screen fitted, another fiddly but not especially difficult job...


mini-1178.jpeg


As you can see I also fitted the boot lid.


And most recent of all I have fitted the door glass, this was a difficult task, it required lots of masking tape to avoid taking lots of paint off the inside of the doors, not that it will ever be visible but I didn't want to make a mess of them. It also required some fettling to get the windows to run properly, I'm not quite there with the drivers door but I think it will get better as it eases off and the glass becomes less of a tight fit in the runners, I've used silicone lubricant in the runners but it's still a little stiff for the time being, passenger side has started to free up, I did this first.


mini-1176.jpeg


Oh I think you can just see the MPI door seals and how they finish off the edges of the carpet on the sills on that picture.


That's it for now, watch this space....


#655 KTS

KTS

    Up Into Fourth

  • TMF+ Member
  • PipPipPipPipPipPipPipPipPip
  • 2,271 posts
  • Location: Herts

Posted 02 December 2020 - 01:02 PM

cracking job - coming along very nicely 


#656 alchall

alchall

    Super Mini Mad

  • Just Joined
  • PipPipPipPipPipPip
  • 604 posts
  • Location: Chorley

Posted 02 December 2020 - 01:29 PM

cracking job - coming along very nicely 


It's now really starting to look like a car again, which is nice :-) 


#657 jonlad

jonlad

    Speeding Along Now

  • TMF+ Member
  • PipPipPipPipPip
  • 313 posts
  • Location: Cheshire

Posted 02 December 2020 - 03:18 PM

Absolutely stunning work, this is great inspiration for the rest of us!


Can I ask which electric fan that is? it looks like a perfect fit in the hole in the inner wing.  Apologies if i've missed the detail in the posts


many thanks

Jon


#658 alchall

alchall

    Super Mini Mad

  • Just Joined
  • PipPipPipPipPipPip
  • 604 posts
  • Location: Chorley

Posted 02 December 2020 - 03:29 PM

Absolutely stunning work, this is great inspiration for the rest of us!


Can I ask which electric fan that is? it looks like a perfect fit in the hole in the inner wing.  Apologies if i've missed the detail in the posts


many thanks

Jon


Thanks Jon!


The fan is from Minispares - part number PGG10058MS


My original fan was a mess so needed replacing, this one seems to be as good as they get, it's more efficient than a direct replacement SPI type fan and actually a lot cheaper (it was 1/2 the price of the OEM alternative when I bought it, looks like it's gone up a little bit in price a bit since then but still a lot cheaper). 


It fits perfectly, but you do need to rewire the plug, that's not a hard job though.


Al.


#659 Maccmike8

Maccmike8

    One Carb Or Two?

  • Members
  • PipPipPipPipPipPipPip
  • 1,089 posts
  • Location: uk

Posted 02 December 2020 - 05:12 PM

Looking fantastic.


#660 FlyingScot

FlyingScot

    Up Into Fourth

  • TMF Team
  • PipPipPipPipPipPipPipPipPip
  • 2,660 posts
  • Location: Inverclyde Scotland
  • Local Club: Mini Cooper Register

Posted 02 December 2020 - 05:29 PM

Great work there! Just spent a few hours reading your thread - brilliant.


You've ended up with a very nice and unique mini.


FS


0 user(s) are reading this topic

0 members, 0 guests, 0 anonymous users