Jump to content


Photo
- - - - -

My Money Pit - 1987 Mini 998Cc - Complete Strip And Rebuild

roundnose

  • Please log in to reply
19 replies to this topic

#1 Fewtch

Fewtch

    Passed Test

  • Noobies
  • PipPip
  • 25 posts
  • Location: Shrewsbury

Posted 14 November 2014 - 11:13 AM

Hello all!

I think it’s time I started showing you my project that I have started.

Back in 2009 I got my first mini which was my first car too. Rebuilt it completely with my father. I've sold it and changed cars twice now, from a 1275 Split coloured mini, then to a Honda Civic Coupe. And now I'm back, wanting to build another mini!!


This is the new project. I've had the car for more than a year now, and the project is still on going. I mostly haven't had to start getting into it as the car doesn't live at the home I'm mostly at.


So here it is:

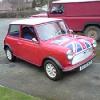
1987 Austin Mini City

998cc Stage 1


IMAG0281.jpg


The plan for this one is to see what needed to be done with it, tune the engine up to a nice fast road 998cc.

But as like all minis as you all know, it was just a walk in the park. I brought it quickly as I really wanted another toy to get building.

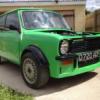
So when it arrived at my door, I decided to start stripping it, I knew there were a few holes in the body work, but it got worse as I kept digging...

IMAG0296.jpg

IMAG0297.jpg

IMAG0299.jpg

IMAG0303.jpg


Here is the beauty of what she is in full view

IMAG0308.jpg


Did quite a bit of cleaning in the engine bay,  you couldn’t even find an engine in there before, it was very oily and greasy.

IMAG0320.jpg


Hole finding in the back of the car

IMAG0458.jpg


Believe it or not, this was a tiiiinnnyyy little needle hole at the back, so I started prodding and realised it got quite large!

IMAG0465.jpg


Starting to get emptied + anyone know what that steering wheel  is, Rare? Crap? I’ll try and get a better picture when I can

IMAG0551.jpg


More Holes
IMAG0606.jpg


Mmmm! New panels!!

IMAG0664.jpg


Engine out!

IMAG0668.jpg


Stripped interior, no electrics anymore

IMAG0677.jpg


Cleaning up the engine bay

IMAG0678.jpg


Red oxide primered just to keep the rust off for the time

IMAG0697.jpg


More holes

IMAG1213.jpg

IMAG1217.jpg


Now at this point I decided to start cutting the floor out and try and my welding skills out, but ended up not wanting to do the welding purely because I wanted it to look good and not like pigeon sh*te everywhere due to my poor welder not being the best quality in the world.

So I sent it away to the best man who knows what he’s doing and does it day in and day out on minis.

Mick Slater in West Midlands, you can ask him anything over the phone or face to face, and he will tell you exactly what it is or what you need instantly.

IMAG1145.jpg


Engine Build

So the rebuild starts here:

This is just a standard 998cc with a HS4 Carb and LCB Mani and central exhaust.

IMAG0920.jpg

IMAG1182.jpg


Dirty vs clean

IMAG1183.jpg


IMAG1202.jpg

IMAG1220.jpg


After a quick chemical clean

IMAG1389.jpg

Mmmmm Greasy...

IMAG1423.jpg


The Diff had alot of play in the pinion gears so I purchased some goodies!

IMAG1441.jpg


Plus this rather good looking 12G295 Stage 2 Head, which didn’t come with collets or spring clips, but had to source them out and found a full set of the collets and springs from 2 different mini places.

IMAG1480.jpg

Diff and gearbox all nicely cleaned up and put back together

IMAG1553.jpg

IMG-1415376560863-V.jpg


But this is where I am at now. so from here on, will be up to date of where I am now.

Hope you enjoy my build, and I really like the comments and advice that you want to share!


Edited by Fewtch, 14 November 2014 - 11:24 AM.


#2 RedRuby

RedRuby

    One Carb Or Two?

  • Members
  • PipPipPipPipPipPipPip
  • 1,201 posts
  • Location: County Durham
  • Local Club: No

Posted 14 November 2014 - 11:43 AM

Welcome, good work on your project so far, hope you are able to get photos of the shell as the welding progresses.

#3 MINIMADrt

MINIMADrt

    Speeding Along Now

  • Members
  • PipPipPipPipPip
  • 465 posts
  • Location: oxford
  • Local Club: none at mo

Posted 14 November 2014 - 11:49 AM

Hi mate looking good seems like a good base to work from look forward to seeing it progress.

Have you got any more pictures of your bracing going to have to do the same to mine but never braced up befor so do t no were to start?

Thank you.

#4 Fewtch

Fewtch

    Passed Test

  • Noobies
  • PipPip
  • 25 posts
  • Location: Shrewsbury

Posted 14 November 2014 - 11:54 PM

Cheers guys!
I got a few pictures of the mini from for you MINIMADrt so will post them tomorrow for you. Plus I've got some of the welding work done on the floor aswell

#5 stevearch0

stevearch0

    Speeding Along Now

  • Members
  • PipPipPipPipPip
  • 310 posts
  • Location: Shropshire

Posted 15 November 2014 - 03:09 AM

i've also used mick slater over the last couple of years whilst restoring mine. great bloke for advice and his parts prices are very reasonable too. doesnt make a bad cup of tea either!! 


#6 Badboytunes

Badboytunes

    Camshaft & Stage Two Head

  • Members
  • PipPipPipPipPipPipPipPip
  • 1,615 posts
  • Location: Northampton
  • Local Club: MINIS Unleashed

Posted 15 November 2014 - 07:38 AM

What a great thread. Will be following this. ;D


#7 Fewtch

Fewtch

    Passed Test

  • Noobies
  • PipPip
  • 25 posts
  • Location: Shrewsbury

Posted 15 November 2014 - 03:14 PM

Here is some of the welding work and my bracing that I did just to keep it in tack when I cut some of the floor out
IMAG1276.jpg
IMAG0927_1.jpg
IMAG1149.jpg
IMAG1279.jpg

Hope that helps a bit MINIMADrt

Mick has helped me for both my other minis and has given me loads of advice!

#8 Fewtch

Fewtch

    Passed Test

  • Noobies
  • PipPip
  • 25 posts
  • Location: Shrewsbury

Posted 15 November 2014 - 03:15 PM

IMAG0675.jpg

#9 Fewtch

Fewtch

    Passed Test

  • Noobies
  • PipPip
  • 25 posts
  • Location: Shrewsbury

Posted 28 November 2014 - 10:38 PM

Quick Update on more purchases! 


Found this little beaut on ebay!

IMAG1480.jpg

IMAG1481.jpg


It didn't come with any valve seats/collets/spring clips, plus 2 of the valves were 1mm different in width, so i had to get some more
£50 for collets! Must be having a laugh!!!! searched high and low for them!

IMAG1533.jpg

IMAG1545.jpg


Got some seats put in it, and new valves and all new guides too

IMAG1602.jpg


This is the difference between a normal standard 998 (bottom) and a Stage 3, Fully Ported and Ported to the max, skimmed and unleaded with smoothed polished chambers (top)

IMAG1612.jpg


Now cleaned and added a lick of paint to the block and head, have done around 3-5 light coats, and then will be adding lacquer on later too

IMAG1582.jpg

IMAG1613.jpg

IMAG1616.jpg


#10 StefanPieter

StefanPieter

    Mini Mad

  • Noobies
  • PipPipPipPip
  • 131 posts
  • Location: Farnborough
  • Local Club: FDMC

Posted 28 November 2014 - 10:53 PM

Well done. That looks good. Are you planning to hone the block?

#11 Fewtch

Fewtch

    Passed Test

  • Noobies
  • PipPip
  • 25 posts
  • Location: Shrewsbury

Posted 28 November 2014 - 10:58 PM

The piston rings have scored the top making a nasty lip in the bore, so i'm having to bore the block out :( I'm going to get +40 flat top pistons aswell. The block has been done but just waiting for the pistons to arrive at the moment


#12 Jedi Master

Jedi Master

    Stage One Kit Fitted

  • Noobies
  • PipPipPip
  • 87 posts
  • Location: South Staffs

Posted 29 November 2014 - 07:41 PM

Loving this rebuild!

#13 MINIMADrt

MINIMADrt

    Speeding Along Now

  • Members
  • PipPipPipPipPip
  • 465 posts
  • Location: oxford
  • Local Club: none at mo

Posted 29 November 2014 - 07:51 PM

Here is some of the welding work and my bracing that I did just to keep it in tack when I cut some of the floor out
IMAG1276.jpg
IMAG0927_1.jpg
IMAG1149.jpg
IMAG1279.jpg

Hope that helps a bit MINIMADrt

Mick has helped me for both my other minis and has given me loads of advice!

yeah cheers mate great help


#14 Fewtch

Fewtch

    Passed Test

  • Noobies
  • PipPip
  • 25 posts
  • Location: Shrewsbury

Posted 04 January 2015 - 01:24 PM

Yaaay! Some free time at last!

Going to build the engine (or as much as possible) today.

Here is some head building as we speak:
IMAG1731.jpg
IMAG1735.jpg
IMAG1736.jpg
IMAG1738.jpg
IMAG1739.jpg

#15 Fewtch

Fewtch

    Passed Test

  • Noobies
  • PipPip
  • 25 posts
  • Location: Shrewsbury

Posted 04 January 2015 - 04:48 PM

More engine building
IMAG1741.jpg
IMAG1743.jpg

+40 pistons are now in!
IMAG1747.jpg


Kent cam 266 going in, bought this 3 years ago!
IMAG1749.jpg

More goodies!
IMAG1751.jpg


Also tagged with one or more of these keywords: roundnose

1 user(s) are reading this topic

0 members, 1 guests, 0 anonymous users