Jump to content


Photo
- - - - -

Another Cg13 Conversion


  • Please log in to reply
129 replies to this topic

#16 Artstu

Artstu

    One Carb Or Two?

  • Members
  • PipPipPipPipPipPipPip
  • 827 posts
  • Location: Derbyshire

Posted 07 March 2015 - 06:44 PM

Pretty sure its a 1.3 but cant be certain, Because its a coilpack engine I am pretty sure I cant get the JUN flywheel though. If anyone knows any different please correct me.


Linky  http://www.fortyone..../view/5471.html


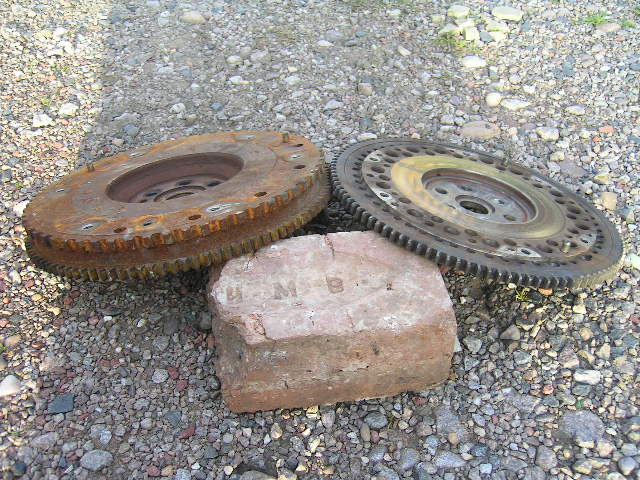
That flywheel won't fit your engine. The coil-pack engine you have uses a different flywheel.


Comparison of coil-pack flywheel (on left) with an earlier flywheel.


54341.jpg


Edited by Artstu, 07 March 2015 - 07:24 PM.


#17 zebigfatman

zebigfatman

    Mini Mad

  • Just Joined
  • PipPipPipPip
  • 159 posts
  • Location: Gwynedd
  • Local Club: Snowdon minis

Posted 08 March 2015 - 01:35 AM

Thats massive! Definately going to have to get it lightened or something. The crank sensor part doesnt need to be that strong does it? By the looks of it


you could get away with getting the centre of it machined out. Then just have to find someone who can balance the thing.


#18 Tupers

Tupers

    Up Into Fourth

  • Members
  • PipPipPipPipPipPipPipPipPip
  • 4,105 posts
  • Location: Devon

Posted 08 March 2015 - 02:49 PM

It wouldn't be hard to get a trigger wheel cut similar to the ones Selby Race Engines use on their A-series lumps and bolt it to the earlier flywheel. 


1798657_542996819149814_898148134_n.jpg?


#19 lucas1amps

lucas1amps

    Super Mini Mad

  • Just Joined
  • PipPipPipPipPipPip
  • 587 posts
  • Location: Bristol
  • Local Club: Weston Mini Muckers

Posted 08 March 2015 - 10:22 PM

email lucas1amps as me and him know someone who is designing a subframe for the micra engine in tube and will look better and be stronger than the all speed ones. the first prototype is being made now and should be finished soon. it will use standard bottom arms and tie bars.

Indeed frame is being developed and will be avaliable later in the year priced around the 750 mark with mounts and driveshafts will be a miniworld action day in September 


#20 fuzzy-hair-man

fuzzy-hair-man

    Mini Mad

  • Members
  • PipPipPipPip
  • 181 posts
  • Location: Armidale NSW
  • Local Club: Minis in the Gong

Posted 09 March 2015 - 12:07 AM

I think matt Humphries has lightened flywheels for the cga3 engine available in his rally parts listing. There's also some stuff on lightening flywheels on micra.org.UK but lightening the coil packs doesn't get you very far from memory... http://www.humphriso...etail_Price.pdf

#21 zebigfatman

zebigfatman

    Mini Mad

  • Just Joined
  • PipPipPipPip
  • 159 posts
  • Location: Gwynedd
  • Local Club: Snowdon minis

Posted 09 March 2015 - 05:45 PM

Thanks for the replies guys! To be honest I'm suprised anyone is reading this because it will be a slow moving project.

The Humphries flywheel does sound tempting, I'll have to look into that. and with regards to the custom trigger wheel, it had crossed my mind but if I can get one which doesnt require any playing with then it will be better.


#22 Grimshaw17

Grimshaw17

    Mini Mad

  • Members
  • PipPipPipPip
  • 221 posts
  • Location: England

Posted 10 March 2015 - 09:44 AM

Planning on the conversion myself, so will be following this! 


#23 666junky

666junky

    One Carb Or Two?

  • Members
  • PipPipPipPipPipPipPip
  • 1,225 posts

Posted 10 March 2015 - 06:47 PM

Helpful hint, if you are using the allspeed frame you will need to cut those inner wings away right underneath the shock absorber mount almost to where the bolts go into the bulkhead. The towers are wide on this frame and stick out a bit sideways so any metal in the way will stop it going upwards. I got away with bending and flaring it outwards but better to cut if you can. Its difficult to explain but look at your frame in position now and imagine the tops of the towers are a couple of cms wider on their outer sides. Its a very tight fit and the fact you have no front end on is a massive bonus.
Good luck with the build

#24 smudger068

smudger068

    Speeding Along Now

  • Members
  • PipPipPipPipPip
  • 344 posts
  • Location: Ipswich

Posted 10 March 2015 - 07:29 PM

Helpful hint, if you are using the allspeed frame you will need to cut those inner wings away right underneath the shock absorber mount almost to where the bolts go into the bulkhead. The towers are wide on this frame and stick out a bit sideways so any metal in the way will stop it going upwards. I got away with bending and flaring it outwards but better to cut if you can. Its difficult to explain but look at your frame in position now and imagine the tops of the towers are a couple of cms wider on their outer sides. Its a very tight fit and the fact you have no front end on is a massive bonus.
Good luck with the build


Agreed I had the same issue

#25 666junky

666junky

    One Carb Or Two?

  • Members
  • PipPipPipPipPipPipPip
  • 1,225 posts

Posted 10 March 2015 - 08:01 PM

Glad you understood where i meant haha, its so difficult to explain. Anyone thats trying to place the frame with the front end in place MUST remove everything on the back of the front panel, once the teardrop mounts are removed all the metal in that area needs to be flush with where the teardrop face sits. The braces from the inner wings to the front panel need to be cut off and you will have to bend the lower part of the front panel out to slide it all up and in. Il do a better write up on my thread to stop spamming this one!

#26 zebigfatman

zebigfatman

    Mini Mad

  • Just Joined
  • PipPipPipPip
  • 159 posts
  • Location: Gwynedd
  • Local Club: Snowdon minis

Posted 14 March 2015 - 04:10 PM

Thanks for the hint on the allspeed frame. So I had a few hours spare today and went to work on Kelvin. Started looking at the holes in the bulkhead and drained the tank (before starting to grind next to fuel lines) and found that there is surface rust under the bracket that holds the steering rack in position. I spent about an hour trying to remove the rack but had no luck, I removed the u bolts and the bolt from the bottom of the column and pulled, then tried wedging a BIG crowbar between the floor and bottom of the column and it wont move. Someone is going to say something which makes me feel really thick but I am right in thinking that the end of the column is splined and should just pull out of the rack aren't I?


Edited by zebigfatman, 14 March 2015 - 04:16 PM.

#27 l_jonez

l_jonez

    One Carb Or Two?

  • Members
  • PipPipPipPipPipPipPip
  • 1,453 posts
  • Local Club: south wales mini club

Posted 14 March 2015 - 04:36 PM

Not still attached to the column?

#28 zebigfatman

zebigfatman

    Mini Mad

  • Just Joined
  • PipPipPipPip
  • 159 posts
  • Location: Gwynedd
  • Local Club: Snowdon minis

Posted 15 March 2015 - 12:43 AM

Not sure what you mean, I have it in my head that the end of the steering column might have a clip similar to what holds the drive shafts into the pot joints and CV joints. Everything on the rack is loose (it is only held on by the column) and the 1/2" bolt that goes through the bottom of the column (inside the car) has been removed.


It just wont pull out of the rack which makes me think that there must be someting else holding them together.


#29 Artstu

Artstu

    One Carb Or Two?

  • Members
  • PipPipPipPipPipPipPip
  • 827 posts
  • Location: Derbyshire

Posted 15 March 2015 - 08:18 AM

Not sure what you mean, I have it in my head that the end of the steering column might have a clip similar to what holds the drive shafts into the pot joints and CV joints. Everything on the rack is loose (it is only held on by the column) and the 1/2" bolt that goes through the bottom of the column (inside the car) has been removed.


It just wont pull out of the rack which makes me think that there must be someting else holding them together.


It's only the bolt that holds them together, it's a long time since I messed about with one so this could be wrong, you can tap a screwdriver into the gap a little to release the grip on the rack pin splines. the bit that the bolt clamps together.


Edited by Artstu, 15 March 2015 - 08:18 AM.


#30 zebigfatman

zebigfatman

    Mini Mad

  • Just Joined
  • PipPipPipPip
  • 159 posts
  • Location: Gwynedd
  • Local Club: Snowdon minis

Posted 15 March 2015 - 11:05 AM

I see what you mean. It was quite dark down there so didnt spot the gap, Just assumed the bolt went through a slot in the rack if you know what I mean. I will try this next time I am over


0 user(s) are reading this topic

0 members, 0 guests, 0 anonymous users