Jump to content


Photo
- - - - -

Mary - Subtle Mods Rolling Resto

roundnose

  • Please log in to reply
9 replies to this topic

#1 jsiggee

jsiggee

    Speeding Along Now

  • Noobies
  • PipPipPipPipPip
  • 383 posts
  • Location: Norfolk
  • Local Club: Norfolk Mini Owners Club

Posted 25 April 2016 - 08:30 PM

I thought it was about time I started a Project thread for my Mini... 4 years in, the ongoing work doesn't seem to be letting up just yet! ;D


The goal for my mini has always been a standard mini with subtle modification, moderation is key!


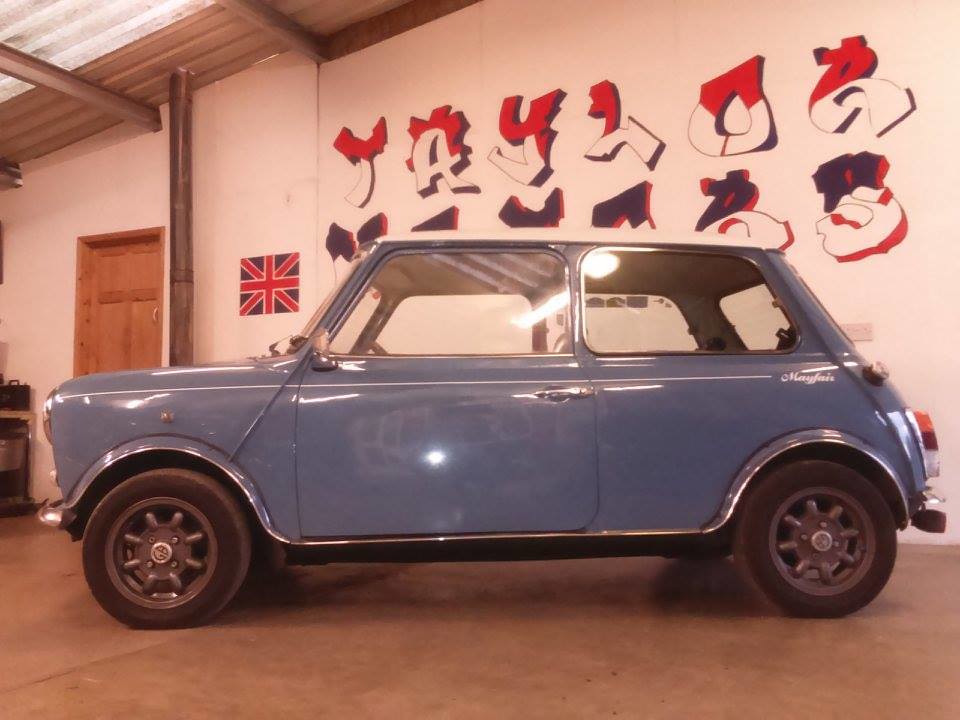
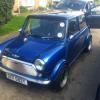
This is Mary, affectionately named by my mate...


IMG_0852_zps8gqby2jj.jpg


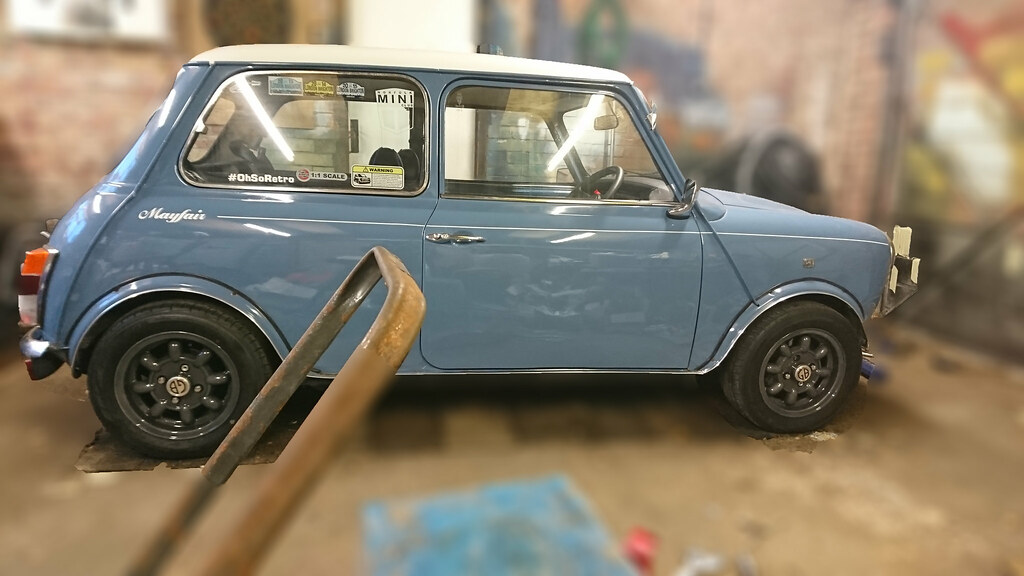
Or at least, that's how the ol' girl used to look. Since then a lot has happened! 


Here we go on the four year journey which has taken us to the current stage we are at now :gimme:


I first bought my mini in 2011, a 1988 Lipari blue, 998cc Mayfair, my first car after wanting a mini from an early age. On the surface it looked like a pretty sound car for the price. Despite the floor being solid there were a few issues, it seemed it was someone's project and the money pot had run out, so had a few issues. The drive back home after picking the car up was, erm... entertaining. Sitting on the clearly standard 'studio 2' seats, :teehee: the drone of the very loud exhaust (a peashooter with the back box cut off and replaced with a tube of similar pea-shootey size) at 60mph down the dual with no door cards and no stereo, hmm what have I bought! I won't forget the first time I put my foot on the non-servo brake pedal approaching a red light, nearly having a heart attack because the pedal felt weird, not because the breaks were bad, I just hadn't driven a non-servo car before. I then proceeded to lock up... oh to be a 17 year old, just passed their test and driving a classic... I digress. The bodywork... it seemed pretty solid, there was an oversill however it seemed to be good and rust free. A few bubbles here and there, you know how it is. 

A new front end was the first stop on the journey, the old one had inch thick filler in places and really was not nice at all. While the guy was under there, a few patches to the flich panel were done too...


IMG_0978_zpscvqla1ox.jpg

IMG_0977_zpsl7lzfqwv.jpg


The colour match was not too great from this work, the guy sent a sample off but the colour cam beck a touch darker. The colour wasn't quite the original colour anyway.


IMG_1112_zpsq4zv8ekd.jpg

IMG_08481_zpsdf66cdf1.jpg


Along side the front end work, a 'temporary' engine was put in as the originals rings had gone, the temporary engine was a :xxx: it had a gearbox issue with the idler gear meaning it was very stiff across the gate. This meant you had to 'know' how to drive it, good anti theft device I suppose if you have a sense of humour!


Among lots of little things such as a new grille, the engine was obviously the next thing to do. I took it to the machine shop, turns out the rings weren't the issue, the bores were worn. They rebored +20 thou, reground the mains on the big ends +10 and the mains were fine. So I ordered myself some ClaverST +20 pistons, all the other gubbins for a rebuild from minispares, the paint from somerford and off I went. The gearbox, in hindsight I should have had rebuilt but on the old engine it had no crunches or anything so I didn't bother. Maybe I will in the future.


_MG_0159_zpswbmkvghw.jpg


IMG_20140624_165327_zpsre1ftzvu.jpg


20140607_130718_zpsuuianf2o.jpg


20140605_170817_zpsy33rhc1u.jpg


Engine%20Boot_zpspr0l3n9i.jpg

Off to the machine shop in Briston


20140713_151339_zpsbxzow8oe.jpg


_MG_3322_zpsope2gq0u.jpg


IMG_20140717_211232_zpsgokwkdij.jpg


IMG_20140721_170827_zpsvlhi0ke0.jpg


_MG_3312_zps8vv4oodf.jpg


_MG_3314_zpsabzhgr2a.jpg


_MG_3316_zpsr1tgxhiq.jpg


_MG_3317_zpsj8x8plb4.jpg


_MG_3321_zps29vmtx4o.jpg


IMG_20140812_160656_zpsg04qffb2.jpg


IMG_20140816_155646_zpsch0fbjfk.jpg


IMG_20140818_144411_zpsgxjqr4nk.jpg


IMG_3455_zps4h4q7lll.jpg


That takes us up to some of the work carried out up to 2014


James


#2 jsiggee

jsiggee

    Speeding Along Now

  • Noobies
  • PipPipPipPipPip
  • 383 posts
  • Location: Norfolk
  • Local Club: Norfolk Mini Owners Club

Posted 26 April 2016 - 02:12 PM

Other bodywork carried out in 2014 was to the rear end, I had the rear valance replaced and the boot lid lip replaced as well as a dent repaired which was in the rear quarter panel above the arch on the n/s, a lovely addition added by a previous owner. At the same time, I had a coat of the original colour, Lipari blue blown over the whole car to tidy it up a bit.


Other things done around this time were the obligatory stage one kit with a centre exit full maniflow system, maniflow freeflow manifold. I also replaced the Rubber suspension dohnuts all round as the 'stance' on the front was making the suspension a bit too unforgiving for my liking.


IMG_1712_zpsv8oplfr3.jpg


IMG_1714_zpsvyhvuzba.jpg


IMG_1715_zpsyurujmdo.jpg


IMG_1713_zpsj0k8gpqj.jpg


IMG_2094_zpsx7isq5ty.jpg


IMG_2093_zpse7dilnca.jpg


Unfortunately I don't have any pictures of before the work, just during.


IMG_2075_zpspjrh4ecd.jpg


IMG_2076_zpsp6dvsddq.jpg


IMG_2077_zpsbsbfimxk.jpg


The respray was only a cheap job and was by no means perfect, It came out looking reasonable but to someone who details cars as a hobby, it was far from what i desired.

Came out looking like this, camera doesnt pick it up but it was orange peeley, had a run and ripples ...


Mary-Eleanor%20resprayed_zpsaeymtkxc.jpg


This was fine for around six months or so until my OCD side came out and I had to wetsand the whole car...


A panel from an old clio just to demonstrate the sort of thing I wanted to achieve


Wetsand-2_zpsxvqnh5gn.jpg


Before

_MG_4844_zpshkty65um.jpg


Druing

Wetsand-3_zpsg2vffsed.jpg


Wetsand-4_zpsynb91tl7.jpg


Wetsand-5_zpseqsyju7v.jpg


After

Wetsand-6_zpsm1hzihxt.jpg


The eagle eyed will have also noticed the Arch change to Group 2's.

Before I did this I also installed Dereks minis Arch liners because I really wasn't happy with the thought of a load of salt, mud and general rubbish from the road being thrown into the corners under the wings, scuttle etc and rotting the new front end away from the seams outwards.


Liners_zpsvoi6qawr.jpg


20140415_105834_zpsmtovzqa2.jpg


20140415_121318_zps1lihhelq.jpg


GP22_zpsfbcfjwgu.jpg


So we went from the tacky looking (imo) Stainless special arch covers


IMG_1112_zpsvpweysnp.jpg


To more subtle and nicer looking Group 2's with a chrome trim


_MG_3372_zpsizect5ri.jpg


All in time for the 2014 Norfolk Mini Owners Club - East Anglian Job! lovely.


#3 se_juggles

se_juggles

    One Carb Or Two?

  • Members
  • PipPipPipPipPipPipPip
  • 1,043 posts

Posted 26 April 2016 - 03:01 PM

she's looking beautiful. very nice mini.


se


#4 lapider

lapider

    Speeding Along Now

  • Members
  • PipPipPipPipPip
  • 473 posts
  • Local Club: cardiff mini club

Posted 26 April 2016 - 06:35 PM

lovely mini!!!! very similar to mine, a lipase blue mayfair from 87. check out my build thread in my signature. 


i dont suppose you have a clear photo of the white roof as I'm in i dilemma whether i repaint my roof white, black or keep it standard. 


cheers


also is it cellulose paint or 2k. (i have a respray on the way and am wondering whether i do it myself or send it off)


Max


#5 jsiggee

jsiggee

    Speeding Along Now

  • Noobies
  • PipPipPipPipPip
  • 383 posts
  • Location: Norfolk
  • Local Club: Norfolk Mini Owners Club

Posted 26 April 2016 - 07:41 PM

she's looking beautiful. very nice mini.


se


lovely mini!!!! very similar to mine, a lipase blue mayfair from 87. check out my build thread in my signature. 


i dont suppose you have a clear photo of the white roof as I'm in i dilemma whether i repaint my roof white, black or keep it standard. 


cheers


also is it cellulose paint or 2k. (i have a respray on the way and am wondering whether i do it myself or send it off)


Max


Cheers, I still have lots to write up and add. I'm not sure how a black roof would look with a light car but it can always be photoshopped i guess to give you an idea. Mine was painted with 2k clear over base. If I had the room I would do paint myself but sadly, I don't! Youll get a better finish if you send it off to get sprayed anyway, and youll get a much cleaner paint job


#6 jsiggee

jsiggee

    Speeding Along Now

  • Noobies
  • PipPipPipPipPip
  • 383 posts
  • Location: Norfolk
  • Local Club: Norfolk Mini Owners Club

Posted 01 May 2016 - 08:01 PM

So once I had the exterior looking roughly how I wanted with the colour coded Group 2's, Original pinstriping and mayfair gubbins, wavy grille and gunmetal grey wheels, It was time to address the horrible interior.


When I got the car it didn't really have an interior worth speaking of. No door cards, original shelf style dash with the radio handily on the passenger side (I liked to think of this as a safety feature ;D ) mismatched studio2 seats, grey old worn out carpet. It wasn't the cars best feature.


I sourced some SPI 'Rio' front seats for the car, I wanted either the later and more comfortable/supportive seats or something special like the cobra recliners. (maybe some day) I also got some velour mayfair door cards temporarily. I also bought a second had walnut dash to replace the shelf dash and smarten it up a bit and black cheap carpet temporarily.

Once id got the much more comfortable seats in, which needed new diaphragms. I began thinking about the sort of interior I wanted. I got on to Optimise Automotive and had them make up some door cards, my request was; black vinyl with blue piping and blue diamond stitching. I was very impressed with the end result...


IMG_3454_zpscaf8mpkw.jpg


After having them make up some rather dashing door cards, I had them make me some seat covers to match. I would have loved leather but the student budget wouldn't allow that. I was also reluctant to get just vinyl seat covers, I don't like the sticky feeling in the summer! :X  They suggested micro suede, I went with a similar design to the door cards and the result was simply fantastic. 


The old Studio2 rear seat...


1_zpsyhjykwhp.jpg


Transformed to this...


recovered%20rear%20seat_zps64tw5bve.jpg


and the finished seats in the car...


untitled-4840_zpsxp0ycvou.jpg


untitled-4833_zpskzsefknx.jpg


untitled-4836_zpsm5jdmmvx.jpg


untitled-4835_zpsvvr2xvxe.jpg


Needless to say, I'm very happy with OA's work. Andy at OA was very helpful and the service I received was great!


I also ordered some black with blue stitch dash covers but they are yet to go in, I've not had the time to take the screen out to get the top rail off, I tried with the screen in and it wasn't budging.


#7 jsiggee

jsiggee

    Speeding Along Now

  • Noobies
  • PipPipPipPipPip
  • 383 posts
  • Location: Norfolk
  • Local Club: Norfolk Mini Owners Club

Posted 01 May 2016 - 08:02 PM

That brings us up to this year, which has so far been bodywork related. Currently the mini is off the road waiting for work, more about that in a minute.


So far this year it's been sills. Sills, sills, sills.... and door steps, and repairs to the scuttle. In Jan it went to Taylor Motors in Attleborough for some extensive work. I knew that on one side there was an oversill, I'd been quietly ignoring it. I thought, it had to have the sills and steps done, the MOT was looming and I wanted to get it done before then. So off it went to the more than capable hands of Leigh. He replaced both inner, outer sills, door steps, repaired the strengthening  box at either end and repaired a bubble under the windscreen. As always he did a stella job!


O_O 
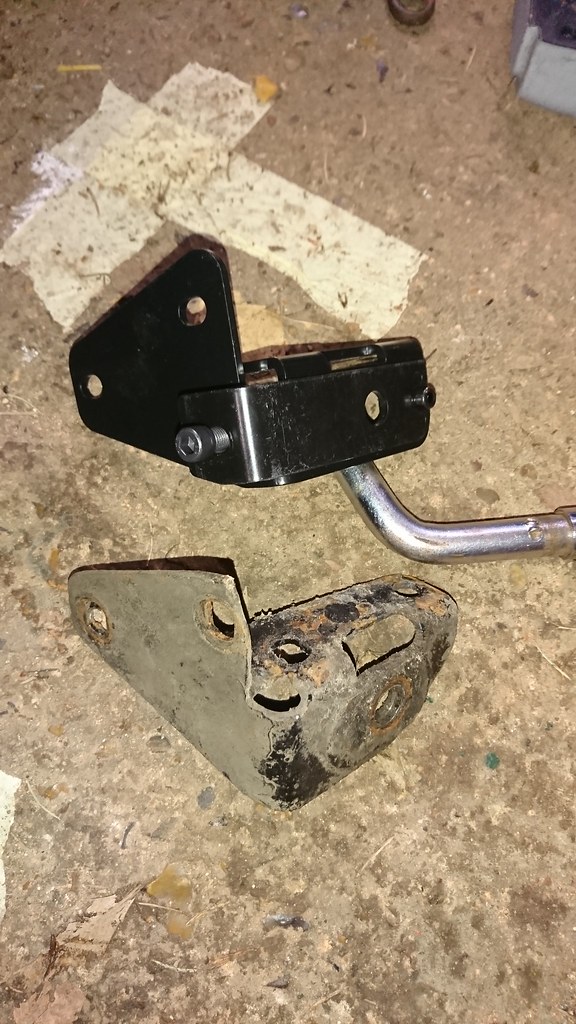
Yeah, It definitely needed doing...


21_zpsi2su7vdt.jpg

22_zpshhsjnzwu.jpg

9_zpsehidiavl.jpg

12_zpszlytp5ef.jpg

19_zpsaiaek57e.jpg

20_zpspvhsamlt.jpg

18_zpsl7pawsqq.jpg

11_zps6uqaw22s.jpg

8_zps3sg5hlzq.jpg

5_zpsflw63ip5.jpg


nobody likes rusty sills.


10_zps67f7vwdn.jpg

4_zpsv4vflwx3.jpg

6_zpstwbw3e7w.jpg

3_zpsy5gofwfk.jpg

7_zpswvzf6kwa.jpg

14_zpsecygxn0c.jpg

13_zps9msone9f.jpg

15_zpscwje7i5p.jpg

16_zpstt6byxal.jpg

17_zpsd4rlgmga.jpg

20151129_122214_zpsd7vfzxvg.jpg

20151129_122108_zpsojw0wujp.jpg

20151129_122059_zpswedmzeww.jpg

20151129_122036_zpsgwbz3plk.jpg

12523154_448634518676010_587681445244361


I also got some new old stock hinges for the doors while they were off for this job, the old ones were gone. If they had any more play they would have fallen apart.


IMG_20151219_134357_zpse2ib9i0a.jpg

20151219_141410_zpshb7jiygo.jpg


After all this I was pretty confident the old girl was going to breeze through the MOT... Oh how wrong I was...


IMG_20151231_121416_zpsx59ypyfh.jpg


Ok, it wasn't that bad but its been a pit of a pain in the proverbial. Only failed on the rear subframe. Luckily I had a new one in the shed I'd been meaning to plonk on. Quick job, I thought. Nah! Heelboard issues mean that the mini is waiting to go back for some work. 

I had the two bottom bolts snap on me leaving long stubs I can't get out, the captive nuts are moving about a bit and I'm not prepared to cut into my new sills so an appointment had to be made at Taylor motors again.

I'm also going to need a new n/s radius arm when its back as the current one is shot, might as well while the nuts are all new and easy to get off. 


G0054022_zpsyswtckha.jpg

20160321_185900_zps6lr8sfvz.jpg

20160319_141525_zpszf9q7qbp.jpg

20160322_141420_zpsjez6zsbf.jpg

20160326_161902_zpsdh4uwaq4.jpg

GOPR4234_zps8jw0h1bs.jpg

GOPR4236_zpsantmcbf9.jpg

GOPR4237_zpspjxdg8r4.jpg

GOPR4232_zps2twtpxlz.jpg


Updates once I've got the heelboard sorted, new subframe on and a fresh MOT.


#8 jsiggee

jsiggee

    Speeding Along Now

  • Noobies
  • PipPipPipPipPip
  • 383 posts
  • Location: Norfolk
  • Local Club: Norfolk Mini Owners Club

Posted 26 June 2016 - 02:32 PM

Since my last post the mini has been off to get the heel board repaired and is now mostly assembled. Tomorrow, I'm taking the radius arms to get new bushes etc installed after taking out the old nearly non existent bushes yesterday. It now has the exhaust back on, battery back in and a new subframe. The 'to do' list for the MOT consists of bleeding the brakes when the radius arm are back on, new steering rack gaiters, new fuel pump gasket and adjust the mixture.


IMG_20160611_084038_zpsb75m8lh9.jpg


Heelboard%202_zpsvgoxrfey.jpeg


Heelboard_zpslnlgddl4.jpeg


Little bit needed on the valance closing panel too

Heelboard%203_zps12eqxvm6.jpeg


Heelboard%206_zpsjidr50ta.jpeg


Heelboard%205_zpsife7rtpc.jpeg


Heelboard%204_zpsfebzlywl.jpeg


Exhaust back on, Battery cable clipped up and the battery back in

IMG_20160626_121846_zpsionbsu7o.jpg


This is the state of the arms, one of the roller bearings had completely worn through. They're going to DSN tomorrow to have new bushes and bearings put in

IMG_20160624_100520_zpsdy3ekmqp.jpg


IMG_20160624_100526_zpswtxopvle.jpg


IMG_20160625_180931_zpsrek0ijlr.jpg


#9 jsiggee

jsiggee

    Speeding Along Now

  • Noobies
  • PipPipPipPipPip
  • 383 posts
  • Location: Norfolk
  • Local Club: Norfolk Mini Owners Club

Posted 12 November 2016 - 02:24 PM

Not much has happened since the last update.


Once the rear subframe was all back together and the radius arms were back on I gave the underside a liberal coating of Waxoyl.


IMG_20160731_143253_zpszrbmh26f.jpg


The mini got a fresh MOT, New wiper arms and bosh wipers (I got annoyed of not seeing in the rain with chrome wipers so converted back to black arms and wipers) I've also replaced the wiper park switch which died about a year ago and I never got round to fitting. Before the MOT it had a thorough service.


I also did the sunday run of the East Anglian Job with Norfolk Mini Owners Club on the August bank holiday weekend, which was very fun as always!


IMG_20160828_113307_zpsph8satnw.jpg


Other than that, I gave it a mini detail before it went back in the garage under its cover. I got myself a tin of the fantastic Bilt Hamber Finis wax, so I was keen to use this. I also got a new Snow Foam lance, latherly! (I'll leave the puns to the pros) The next time it will emerge from the garage now will be Christmas.


Snow%20foam_zpsnic4bd08.gif


IMG_20161031_081814_zpsv4cfmjoc.jpg


IMG_20160910_160928_zpsekegqkqc.jpg


Edited by jsiggee, 12 November 2016 - 02:38 PM.


#10 jsiggee

jsiggee

    Speeding Along Now

  • Noobies
  • PipPipPipPipPip
  • 383 posts
  • Location: Norfolk
  • Local Club: Norfolk Mini Owners Club

Posted 04 March 2018 - 07:55 PM

Update time.


The Mini has been off of the road so to speak for a few months.


I've been doing some much awaited modifications to the suspension recently,

The list of new bits for the suspension includes;


Genuine Hi-Lo's (I don't like the cheap non gen ones, I also have doubts if the designers did any R&D where the rubber contacts / edge radius is concerned)

New knuckles

Extended track rod ends

Heavy duty tie rods

Adjustable bottom arms

Adjustable rear camber brackets

Protech Shocks


This is largely the Minispares geometry set, but I wanted Protech shocks to accompany the geometry kit mainly for the reason that they're rebuildable units and I've heard nothing but good things about them.


39907200494_bb904daabd_b.jpgDSC_0702 by James Siggee, on Flickr


So, I decided to start with the rear as they should be easier to do. I had forgotten that you need to be a contortionist to get to the nuts on the n/s shocks, trying to reach around the tank with a boot lid in the way.


39722310655_12c5ec2bc4_b.jpgDSC_0603 by James Siggee, on Flickr


Much like the last time I had the suspension off, the knuckle joints proved the most annoying piece. Specifically, the little plastic cups, they never come out cleanly! Anyway, got them out, old trumpets out and Hi-Los in. Lovely!


39907205294_4dc0ceac83_b.jpgDSC_0604 by James Siggee, on Flickr


The other problem I came across on the rear was that the metal bush from the old damper had rusted itself to the pin on the back of the radius arm.

I had a pair of mole grips on it and heat to try to twist it off but it wouldn't budge, so I filed through the bush to release it. Then the new dampers could go on. I then put the adjustable rear brackets on and called the rear done pending setup and a thorough seeing to with a torque wrench.


39907207394_22fa85bc00_b.jpgDSC_0713 by James Siggee, on Flickr

38808014460_48f84ff215_b.jpgDSC_0608 by James Siggee, on Flickr


The front also went fairly smoothly, Hi-Los on and in, then I hit a couple of bumps. The metal sleeve from the O/S bottom arm bush, much like the rear shock bush sleeve, was firmly attached to the bottom arm pin and not for moving. So two new bottom arm pins were purchased and then the install continued, the old tie bars came off smoothly and shiny new ones put in place. I then took the old dampers off of the front, O/S went well, N/S not so well. A previous owner had stripped the thread on the top arm damper mount bolt, instead of replacing the bolt and doing the job properly, they decided to retap the bolt badly and put a couple of course thread nuts on. That wont do for me, so I got a new bolt. I then proceeded to remove the old rusted bot from the top arm. After lots of heat, hammering the threaded end and carefully teasing the bolt round with a breaker bar it came out.


39907199104_0b0d72db5b_b.jpgDSC_0707 by James Siggee, on Flickr


I then went round and got the rough ride height I'd like, which proves very time consuming when you have to jack the car up, put it back down, roll it backwards and forwards, then decide you want it lower/ higher. I've got it roughly where I want, I may take it a touch lower.


This is where the car was sitting before the drop,

40575925762_48f0ba4bb6_b.jpgTaylor Motors by James Siggee, on Flickr


This is where its sitting now.

26746423788_48f0ba4bb6_b.jpgDSC_0686_2 by James Siggee, on Flickr


My next job is to set the geometry roughly so I can take it to get dialled in properly. My setup will be 1° to 1.5° negative camber, 3° to 3.5° caster and 1mm to 2mm toe out on the front and 0° to 0.5° negative camber and 1mm to 2mm toe in on the rear.


In other news, I've just got a 1275 engine which I have plans for. I will strip it down and see what's what with it, if it is in good health, I may just drop it in for the time being and enjoy a bit more torque and power, however the plan is to make a fast road 1275 out of it, so it may not see the engine bay until that's done. Exciting times anyhow.


Thanks, James


Also tagged with one or more of these keywords: roundnose

1 user(s) are reading this topic

0 members, 1 guests, 0 anonymous users