Jump to content


Photo
- - - - -

Fuel Injected Forced Induction

roundnose

  • Please log in to reply
14 replies to this topic

#1 Sii

Sii

    Passed Test

  • Noobies
  • PipPip
  • 32 posts

Posted 04 January 2017 - 10:23 PM

Hello one and all!


Welcome to what appears to be yet another Mini project - as i'm not one to buck-a-trend, this is a project which started initially as a "couple of quick mods" and "sorting some minor rust issues" and has somehow turned into a full blown strip-down and rebuild. The current plan is to create something which is hopefully a little bit different! Nonetheless, on with the back-story.


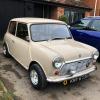
The Mini in question is a 1991 998cc Mini Neon was purchased back in early 2012 for £1,800.00 with 40,000 miles on the clock, its intended use being as a daily driver for newly qualified 17 year old's first car (that 17 year old being me!). The car was in very good nick, with no rust being present in the usual places you would expect and being pretty standard bar the aftermarket Sportspack arches and 13 inch wheels. It was duly run around through College and University with about 15,000 miles being put on the clock. The picture below shows it in all its original glory a few days after it was purchased.


429037_10150845261643452_1458829955_n_zp


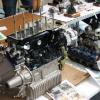
Through College the typical mods were made; a Stage 1 kit was added for the enviable extra power and of course the "Fuel Economy" (inevitably neither of which was all that noticeable once installed and tuned appropriately)!; a new interior with Black and White Cobra Bucket Seats with matching dash and centre console was added; and the choice to install a 7.5inch disc brake conversion with 6 x 10 inch JBW Minilight Wheels with an Offset of ET-7 was taken to gain some "retro street-cred'". In its final guise it looked something similar to the next picture; (cue the terrible artsy photo which shows literally nothing of use)


31911_10200830639911178_2146597153_n_zps


If you noticed the Group 6 Race Arches then congratulations...


After 3 years at University in Portsmouth (which coincidently seems to be quite wet and salty), the mini was looking slightly worse for wear. The decision was taken to replace the Off side door, have the near side door repaired with a bottom inner repair panel and to have some rust repairs beneath the rear windows. Following the works the mini started to take on a very tame "Rat look"  which wasn't intentional and which I wasn't a fan of (I just couldn't afford a paint job!) - looking something like this; 


1011962_10151565380309818_2145747321_n_z


It's the one on the left unfortunately...


And the next picture is where this (bane of my life) project all started from - only kidding, building a car from the bottom up it's great fun! What follows appears to be an act of sheer genius therefore please feel free to plagiarize it for you own minis. Some of the lovely Portsmouth inhabitants, (the culprits of which where never identified therefore I shall comment no further), who I can only conceive got this impressive idea after a few too many down the pub, decided the mini was hitting too many height restriction barriers going into car parks and it was time to try and make it smaller... 


IMG_0166_zpsqn0wrcmi.jpg


Quite a shock to find one early morning on my way to a lecture!


Nevertheless this is where this first post will end. To the keen eyed of you the Topic Title has kind of given away where this project may be going. Bar the help of a few select specialist undertaking work that is out of my remit, I have basically been working on this project singlehandedly for past year and a half so I am quite far into the build. If you've read this far then Thank you for your commitment to what is inevitably me rambling on. Hopefully it will be rewarded as the next post will start to contain some more of the juicy stuff in terms of whats happened so far, the current plan and how its going to be achieved!


#2 BritishRacingGreen

BritishRacingGreen

    Speeding Along Now

  • Members
  • PipPipPipPipPip
  • 433 posts
  • Location: Hertfordshire

Posted 04 January 2017 - 10:36 PM

Sounds interesting, I am also in the 'fitted a stage 1 kit now doing a full resto' community.


I'd be interested to hear your plans for the engine, if you have got that far. I've built a carb'd turbo 998 but always thought that FI would be the way to go should I do it again.


#3 Anthony30

Anthony30

    One Carb Or Two?

  • Members
  • PipPipPipPipPipPipPip
  • 1,466 posts
  • Location: Rainhill,Merseyside
  • Local Club: N/A

Posted 04 January 2017 - 10:38 PM

Have you not considered ditching the fuel injection idea, and just fit electronic ignition? A 1293 with a GT1752 should be more than enough to keep you happy. :shifty:


#4 Sii

Sii

    Passed Test

  • Noobies
  • PipPip
  • 32 posts

Posted 08 January 2017 - 07:43 PM

Hello and welcome back!


At the end of the last post you may have noticed a small dent on the roof… Unperturbed, the roof was duly pushed out hoping for the best but unfortunately got the worst. I was now the proud owner of a mini with a roof panel that was stretched and deformed in multiple places, and it was this that essentially steered this project onto it’s current path!


Last post I did mention I would start getting to some of the juicy stuff, now to run-through what the actual plan for this car is;


What to do about the Roof…


The roof panel was clearly the most obvious problem with the car at this point. I did toss around many different ideas, i.e. try repairing the roof; replace the panel all together; or even installing a carbon fibre roof skin which lead me to the final decision. It was at this point that I though “if I’m going to cut a great big hole in the roof, why not try incorporate some sort of sunroof in their as well!”. The end decision, (after a lot of “are you mad” and “it’s more hassle than it’s worth” comments from the voices in my head) was to shoehorn the Panoramic Glass Sunroof from the new MINI’s. Quite conveniently this mean’s pretty much the entire damaged panel can be cut out!


I'm not the first to do this, and it should look somewhat similar to this once completed;


BMWSunroof_zpskyn0s5bz.jpg


BMWSunroof2_zpsz0bevssy.jpg


Well the car’s got to match…


With the roof decision made, it felt wrong not to have the rest of the car match the awesomeness! I therefore started putting together a little brief for the car I wanted to build, which turned out to be a road racer/GT cruiser. Therefore the car would need to:


1.     Produce a lot more Reliable, usable power on tap. The car would need to cover both blasts around the B Roads and weekend road trips around the UK and into Europe.

2.     Run flat, level and low with a little negative camber. It was running as a bit of a cheese wedge when I bought it!

3.     Retain the wide stance and be running on 10’s. It should have a planted and purposeful stance on the road.

4.     Have a retro look and try turn as many heads as possible when on the road!


Onto the plan!


With brief in hand, so began the fun task of choosing how I was going to achieve this brief!


1.     The engine was the most important aspect here! The list of potentials thrown around was as follows: straight swap with a second hand 1275cc with twin carbs and all the goodies; all out 1293cc engine from Minisport with all the goodies, FWD VTEC, AWD VTEC or even a RWD Zcars build. In the end it came down to ease of build and being a little different. I wasn’t interested in a straight swap for a 1275cc as that’s just slightly predictable and easy! A 1293cc was, to me, just too predictable again! Although probably perfect for my requirements, I wanted to be a little bit different which is probably my Achilles heel in this project in reality! On the other end of the spectrum, although incredibly interesting with lots of potential, the installation of a donor engine was just too much hassle in terms of fabrication etc. After much trepidation the decision was therefore made to retain the 998cc engine, but boost the power up as much as possible via a supercharger!


Now with the plan for the power ‘sorted’, onto the reliability! Fed-up with maintaining a carb system, it was decided that the car would run an ECU, as lets be honest, modern cars have ECU’s/fuel injection and not carbs for a reason! The thought of perfect, reliable tuning whilst also being able to properly understand and monitor the outputs the engine was producing was very appealing in this instance. There are however a few snags that will need to be addressed however when switching from a carb system to a fuel injected, not to mention the wiring loom and installation of the sensors! Good thing MPI/SPI wiring looms are cheap at the moment… (Pretty sure I am an idiot for what I am attempting here!)


2.     Onto running flat and level with a bit of camber. Nothing too drastic here work wise. The entire running gear/subframes will be revitalised/replaced where necessary. A car wide adjusta ride kit will be installed to achieve the flat stance I’m after whilst the arches will be tubbed to allow the car to sit at the level I’m after. Fully adjustable bottom arms and tie-rods will be installed to sort out the camber requirement. Running the car low along with me adding in more criteria also adds many other implications bodywork wise. These will all become apparent in later posts! 


The below gives an idea of the stance i'm going for;


c912fccfd6a352a5744f4f4db2d524f3_zpsx0hq


3.     For the purposeful, aggressive stance, the car will most likely run the same wheels that are currently on it, which are 6 x 10” minilights with an offset of ET-7 (These will be reconditioned and repainted). Arches wise the car will have Miglia’s, which will be cut down to allow the tyre to stick out a “cheeky” little bit. 


4.     The retro look will be achieved with the 10” wheels, by installing MK1 rear lamp conversions and potentially a MK1 boot lid to complete the look. Obviously there will be a lot more mods but there’s no point listing them all here just yet!


And that’s the plan! Simple really and now just to build it!


As before I’m pretty far into this build and over the next couple of weeks I will try make a number of posts to bring you up to date with current events! For now though, that’s the end of this post! Once again if you’ve read this far thank you for bearing with my endless ramblings!


Edited by Sii, 15 June 2017 - 07:52 PM.


#5 Sii

Sii

    Passed Test

  • Noobies
  • PipPip
  • 32 posts

Posted 15 June 2017 - 07:51 PM

Hi Guys,


Welcome back to a long overdue update on the 998. Its been quite a few months and i've been working away with some quite interesting bits and bobs. - Time for a bodywork update!


I'm all for personalising the mini into something a little bit different, hence I am making quite a few modifications, some subtle some not so. The idea is to make the car I want, not what others think I should make therefore I make no apologies for cutting it apart!


Anyway, lets get straight to it with the roof! In my last post I mentioned that I was looking into installing a MINI sunroof in place of the damaged panel. This has thankfully come to fruition and so far I am incredibly please with the results that have been achieved!


Right, onto how we've done it! I say 'we' because as much as I much as I would like to say this is my handy work, once you see the quality of the fabrication you can probably tell it someone who has a bit of skill with a welder! My welding and fabrication skills are very sub-par in comparison!


So, there were two options to get this roof shoe-horned in! One was to cut the roof skin out of a MINI, inclusive of the sun roof and weld this in. This would have probably been the simpler route, however this has been done before and we like to do things a little different, therefore we decided to fabricate a frame within the current roof panel to accept the sunroof. The thinking being to a bit of strength back into the roof panel, as we will try tie in the roll cage to help stiffen up the car generally. Some nice photos for you - unfortunately they are a few and far between but you get the idea!


IMG_5611_zpscjtlyf3m.jpg


Almost looks like it is missing something wouldn't you agree! 


9B9ECC25-C7C5-4907-90B9-6558EA529928_zps


That's better! You can see what remained of the dents from the edge of the roof skin have been beaten out, with the roof fitting very nicely. Conveniently the curvature of the glass almost exactly follows the old roof skin. The roof is being held in from below in this photo as the frame wasn't quite complete. You'll also notice that the front lip still needs a little work to bring it up into line with the sunroof, nothing to major thankfully. Also I do have a second sunroof, the one in the photo is just a spare for completing the fabrication works! Currently i have no pictures of the frame, that will follow in the next update.


Onto the next interesting modification - de-seaming the rear end. This is quite a common modification therefore I'll keep the explanation brief. I'm intending to have the exhaust exiting through the rear valance and in all honesty, I got fed up with replacing and polishing rusty chrome bumpers - no bumpers removes that problem entirely! As above we don't take photos to often so here's the finished article.


IMG_4682_zpsjiypbp5q.jpg


IMG_4681_zpslywd2sxd.jpg


The boot floor lip has been folded down onto the new rear valance to create a strong mounting point, with the three panels then being TIG welded together. As I said earlier, I've been very lucky to have someone with very top-quality fabrications skills completing this work for me, therefore there will be little to no filler required here.


The rear valance leads me quite nicely onto the next modification - the boot floor. With the intention of having the car running at a fairly low and aggressive stance, along with the exhaust exiting through the rear valance, it was apparent that I would need to mount the exhaust as high as possible to avoid scraping - really can't be dealing with that! This meant putting in a flat boot floor - with a slight twist. We wanted to make the floor look like an almost "stock' panel BL may have used, hence we rolled in the markings to match those on the seat back!


IMG_4681_zpslywd2sxd.jpg


You can see the panel follows the lines of the original boot floor sides, and crucially frees up a lot of space for a rear silencer up behind the rear subframe. The panel is only spot welded in and will be seam sealed at a later date.


For the final part of this post, and one of my favourite modifications so far - Please be kind as I may have taken some creative licensing from a particular youtube series, but I couldn't resist as it's such a good looking mod! There is also a bit of reasoning behind it. I will eventually be attaching a supercharger to the 998, therefore we thought it would be sensible to add in a bit of additional venting in the scuttle panel, in the form of the below!


IMG_5610_zpshtsjlohm.jpg


The vents were taken from an old scrapped BMW and TIG welded into the new scuttle panel. The two are completely flush and there will be no filler required, I couldn't be happier with the results. There will be a small water catch tray welded below the vent which drain out through the inner wings to stop any unnecessary water ingress, however that is still in development.


And that brings us to the end of this post, there are some updates on various other bits but I will leave those for another day.


Thanks for reading if you have been - any comments are welcome.


Edited by Sii, 01 October 2017 - 03:39 PM.


#6 panky

panky

    Camshaft & Stage Two Head

  • Members
  • PipPipPipPipPipPipPipPip
  • 1,776 posts
  • Location: Cheshire
  • Local Club: Northwest Casual Classics

Posted 15 June 2017 - 08:11 PM

Looks great and some skillful fabbing going on, your plans sound like they'll lead to a cracking car - I do like the sunroof :mrcool:


#7 Zach P-D

Zach P-D

    Speeding Along Now

  • Members
  • PipPipPipPipPip
  • 444 posts
  • Location: Bridgnorth

Posted 16 June 2017 - 10:09 AM

Liking this a lot.


#8 Steve220

Steve220

    Up Into Fourth

  • TMF+ Member
  • PipPipPipPipPipPipPipPipPip
  • 4,877 posts
  • Location: Shropshire
  • Local Club: RAF Mini Club

Posted 16 June 2017 - 11:11 AM

Great effort and love the roof!

#9 Sii

Sii

    Passed Test

  • Noobies
  • PipPip
  • 32 posts

Posted 01 October 2017 - 03:36 PM

Hi Guy's


Time for a long overdue update on the project!


It's been a while since my last post, but things have been progressing slowly but surely in the background, lets get into an update on the bodywork!


In the last post the MINI Sunroof was almost complete, with only a few minor shaping issues etc. to sort. Thankfully, after approximately 7 months of intermittent work, the roof is finally complete! I'll let the pictures do the talking for now..


IMG_5802_zpsdgmbimmt.jpg


IMG_5798_zpspnvmkx1i.jpg


After a lot of work, the roof skin is now fully matches the curvature of the sun roof, making for a seamless look. The pictures you see have no filler whatsoever, the whole roof skin has been reworked to match the profile of the sunroof, the idea being that you shouldn't notice the roof on first glance (unlikely but I can try to make it discreet)!  There will be some small amounts of filler required to cover up the remnants of the plug welds which were necessary to fix the mounting frame (which you can see below) to the roof skin, however there won't be any required to get the profile correct which is a massive credit to the guy completing the work for me.


IMG_5677_zpsvotlflvd.jpg


It's not the best picture of the frame unfortunately, however you can see the mounting bar disappearing off to the rear. There is one either side running the full length of the car, both being plug welded to the roof skin and just above the front and rear windscreens. The Sunroof mounts directly onto these, with a lip turned down on the roof skin which utilises the original rubber seal from the donor car's Sunroof to provide a water-tight seal all round. These bars also serve a second purpose, restoring a bit of the rigidity lost by cutting a great whopping hole in the roof skin!


Some of the more keen-eyed among you may have noticed a load of scaffold tubes appear inside the car - thankfully these are supposed to be there as we've also re-engineered and installed a bolt-in roll cage. This is also supposedly to add a bit more strength to the car, but in reality it is just another show cage. I quite like the look of these when they're in, but each to to there own. A couple of pictures below for you guys:


IMG_5799_zps0p4u559y.jpg


IMG_5800_zps8inallnw.jpg


IMG_5801_zpsz65hjl8o.jpg


Although it was an absolute pain in the *** to get in, I'm really happy with the fit and finish. The cage barely impedes on the already limited 'mini' floor space, whilst also managing to line up with the sunroof perfectly. The rear crossmember neatly matches the break in the sunroof, which really adds to the 'it was always supposed to be that way' look I'm going for.


Right - enough of bodywork as you're probably sick of me banging on about the sunroof! In the background of this all going on, I've had the engine reconditioned and rebuilt but Vmaxscart ready to take the increased load imposed by the forthcoming supercharger! A couple of nice shinny photo's for you:


IMG_5548_zpsukc0yfpo.jpg


IMG_5547_zpspmzzmd8x.jpg


IMG_5549_zpsytzq9t0y.jpg


The engine has been painted matte black the follow the general colour scheme of trying to eliminate anything shinny, and has had the following mods/reconditioning work done to it:


- New Piston Rings.

- New Standard Bearings.

- New Oil Pump.

- Short Duration SW5 Cam.

- New Water Pump.

- 12g295 Head modified with 33mm inlet and 29mm ex vales for unleaded 8:1 Compression ratio.

- Modified Flywheer housing to recieve the MPI Crank Position sensor, which is now insitu.

- Minispares steel light flywheel with 120ft lbs clutch.

- New alloy front Supercharger pulley ready to power the supercharge once installed.

- Distributor drive hole blanked as we're going to be running of an ECU.


The plan for the engine is that I will complete everything else required to get it running bar the installation of the supercharger, ECU and wiring loom, of which Vmaxscart will put together. They will also dyno the car to get it running correctly.


And finally for this post, I have been working my way through reconditioning a small mountain of parts ready to put back on the car. I won't post many pictures of these are they are just all the standard ancillary items painted black. I will post my favourite one though, which is the reconditioned gear knob with contrasting blue demarcations. I'm really pleased with how this has come out, I hope you guys like it as much as I do!


IMG_5608_zps0skonj7e.jpg


As always I'm a little bit further on than this post will suggest - I have had both doors repaired and re-skinned, along with having reconditioned and rebuilt both the front and rear subframes with their respective running gear, ready to bolt onto the shell once the bodywork is finished. I'll post about these in my next post which hopefully shouldn't be to long away.


As always if you've got this far thankyou for reading!


#10 johnR

johnR

    Up Into Fourth

  • Members
  • PipPipPipPipPipPipPipPipPip
  • 2,242 posts
  • Location: Dorset

Posted 02 October 2017 - 06:05 PM

that roof is very neat and loving the black engine - keep up the good work. I shouldn't follow your build really because I'm going to re-build a 1275 motor this winter and I could easily be tempted into one of Vmaxscart's lovely superchargers!


#11 blueovalcraig

blueovalcraig

    Mini Mad

  • Members
  • PipPipPipPip
  • 193 posts
  • Location: Rothesay, Isle of Bute

Posted 04 October 2017 - 12:09 PM

Totally awesome!


#12 Ben_O

Ben_O

    Mill Road Garage

  • Paint Doctor
  • PipPipPipPipPipPipPipPipPipPip
  • 9,781 posts
  • Location: Isle of Wight

Posted 05 October 2017 - 09:08 PM

Great stuff!


#13 Sii

Sii

    Passed Test

  • Noobies
  • PipPip
  • 32 posts

Posted 28 July 2019 - 08:47 PM

Hi Guys,


It's been a while since I last posted on here, things have been progressing slowly and intermittently as these tend to do. The main highlights over the last couple of years has been to fabricate space for the exhaust to be mounted through the rear valance. I've always tried to get the exhaust to be as far into the main shell as possible, I personally don't like the look of exhaust hanging down below a car as it always seems to come across as an afterthought.


Therefore the first element was to cut the hole in the rear valance to get the look, which in this case is a double centre exit exhaust. This has been cut, and flanged inwards for a clean look (it looks a bit oval without the exhaust in it in the first photo!). 


93852B00-1B22-4C30-B76F-5F6232C60457_zps


The next element was to have the exhaust run over the rear subframe where it meets the heel board, to bring the exhaust right up into the centre tunnel and reduce any chance of being ripped off by manhole covers. This involved fabricating a tunnel up, over and back down through the rear seat panel, which also acts a further support to the rear seats. Conveniently, this will be hidden by the rear seat cover once it is all fitted out, therefore from above it will still look fairly standard. 


0659C19A-8581-4F12-A8E9-85F528A25826_zps


Next on the list was the exhaust itself, which from the manifold back is a completely custom item. It is made from 2" stainless and comes in three pieces which are connected using v-band clamps. I decided to go for a more modern attempt at an exhaust using v-band clamps, as from the point of view of general maintenance/ease of use and sealing of the connections, I thought they would be more reliable. There is a 2" flexi-pipe where the down-pipe meets the main exhaust run to reduce any movement through the exhaust system from the engine. The backbox is a standard single-single item from Demontweaks, which is mounted at 4 points (first photo below) with powerflex poly exhaust mounts to again bring any movement to a minimum.  This then Y's out into 2&1/4" tail pipes you can see in the second photo below. I'm debating as to whether these are painted black or not, however all in all I think the end result is very neat and tidy.


97B0ADFD-2E83-4916-A8C0-47F7A7A04138_zps


F975C5F5-7272-400D-B100-5D314E136616_zps


The next part has been to have a Mk1 insert panel laid in the boot, which you can see in on of the above photos - again I'm very happy with the result as it looks very clean. The car has been given a new front end (de-seamed so no bumpers) and a general straightening out also, with all the doors, bonnet, boot etc. all being re-worked the have as consistent of a panel gap and fit as you can hope for without getting too silly. The front arches have also been opened up a bit more to avoid the tyres catching once finished. I had this problem back on the car when it was running on 13x7's, and it wasn't much fun!


The car has also been dry built to some extent, with all the running gear being installed and the engine dropped into place. Thankfully everything does seem to fit nicely, however I had some real trouble with the captive nut engine mounts that are available. I've therefore ended up going with the easy to install standard rubber engine mounts.


D352407F-EE51-4250-8EA8-A3E920258184_zps


Finally, the car has now all been stripped and is in the paint shop, being prepped and painted. I should have the painted shell and bit back early September. Below are a couple of photos of it fully stripped.


5172C17E-D862-4502-9404-65AB8FB48E79_zps


AEC98626-EDDB-46D2-8D32-142CFC9F4A64_zps


65BB9602-C2F2-4D55-AA0E-1CACE9EAAEE5_zps


Hopefully I should be updating this fairly frequently form now on, I'm on a big push to get this over the line now!


Anyway, hope you enjoyed and thanks for reading.


Si.


#14 johnR

johnR

    Up Into Fourth

  • Members
  • PipPipPipPipPipPipPipPipPip
  • 2,242 posts
  • Location: Dorset

Posted 28 July 2019 - 09:40 PM

Nice work on the exhaust - will you need a heat shield with it being so close to the boot floor?

#15 ajperry

ajperry

    Speeding Along Now

  • Members
  • PipPipPipPipPip
  • 316 posts
  • Location: Wokingham
  • Local Club: Thames Valley Mini Club

Posted 03 August 2019 - 10:02 PM

This is very cool. Look forward to reading more about the supercharged 998!


Also tagged with one or more of these keywords: roundnose

1 user(s) are reading this topic

0 members, 1 guests, 0 anonymous users