Thats a neat setup, We've a caravan rather than a motorhome so not really of use to me, but always interested seeing the way people transport their cars behind motorhomes. Was amazed in the States to see people driving RVs the size of single decker buses with full size 4v4s hitched on the back 
Duffy My 1965 Riley Elf
Started by
DUF2
, Jan 02 2018 12:17 PM
149 replies to this topic
#76

surfblue
-

- Members
-

- 1,829 posts
Camshaft & Stage Two Head
- Location: Stuck in the 1980's
Posted 19 December 2020 - 03:40 PM
#77
DUF2
-
- Members
-
- 463 posts
Formally known as DUFfi
- Location: Swalwell
- Local Club: Whickham & DMC
Posted 30 December 2020 - 05:08 PM
The boot lid support spring on my Elf is not very strong. I have queried adjustment on Elf/Hornet Facebook pages but there does not appear to be any way to tighten up the springs.
So I have made a small modification and have fitted an additional gas strut to assist the original boot spring system.
 BF07E69F-9CB1-41AC-B6C7-7175EB2F9662.jpeg 26.49K
0 downloads
BF07E69F-9CB1-41AC-B6C7-7175EB2F9662.jpeg 26.49K
0 downloads
#78
DUF2
-
- Members
-
- 463 posts
Formally known as DUFfi
- Location: Swalwell
- Local Club: Whickham & DMC
Posted 04 January 2021 - 04:20 PM
I have now finished trimming the boot.
509C46A5-0BD5-4509-A552-3B361BB88FF0.jpeg 90.04K
0 downloads
2214EB89-DE24-4F0C-8659-46C59B64F33A.jpeg 72.67K
0 downloads
5F59C0BA-96E8-495E-8CEF-4C26F5EFF51F.jpeg 76.89K
1 downloads
#79
DUF2
-
- Members
-
- 463 posts
Formally known as DUFfi
- Location: Swalwell
- Local Club: Whickham & DMC
Posted 30 January 2021 - 06:21 PM
Done a bit more in the last few days.
Centre section of dashboard fitted
4A1D5953-47C6-4DE2-8069-ACCB72A2C70A.jpeg 62.67K
0 downloads
lined out the glove box
4DADB7F4-450D-43AB-91B2-33FA74C08582.jpeg 26.82K
1 downloads
I had a bit trouble fitting the outer sections but here they are.
628E7621-15D1-4127-9A9B-BEA13F22941B.jpeg 89.04K
0 downloads
In the glove box on the drivers side is a battery cut off switch, also a bracket containing a USB socket, a 12v accessory socket, a switch controlling the spot lights and an LED voltmeter.
Attached Files
-
C4D1749A-D6CD-442A-883B-9A815D3C24A3.jpeg 78.1K
2 downloads
#80
DUF2
-
- Members
-
- 463 posts
Formally known as DUFfi
- Location: Swalwell
- Local Club: Whickham & DMC
Posted 30 January 2021 - 06:22 PM
I really need to get on with fitting the headlining, but it has been a bit too cold to work with in the garage.
Edited by DUF2, 31 January 2021 - 12:42 AM.
#81
toromod
-
- Noobies
-
- 43 posts
On The Road
- Location: Western Isles, Scotland
Posted 31 January 2021 - 11:54 PM
Great work! I like the idea of the accessories in the driver's side glove box, is that voltmeter & power socket one unit? If so where from? I'm afraid Covid has brought my restoration to an almost stop since it is stored 10 miles away and 2m distancing doesn't allow 2 people to work on something as compact as an Elf! 


#82
DUF2
-
- Members
-
- 463 posts
Formally known as DUFfi
- Location: Swalwell
- Local Club: Whickham & DMC
Posted 01 February 2021 - 08:12 PM
toromod, the socket assembly was bought off eBay and comprises of a Voltmeter, a Dual USB socket and a 12V accessory socket. Onto this I have mounted a switch controlling the spotlights, as you can see it is well hidden away in the glove box
93A9A4F8-BCAF-4755-A6CD-D06F43238281.jpeg 62.99K
2 downloads
https://www.ebay.co....fQAAOSwpmZfI92X
#83
DUF2
-
- Members
-
- 463 posts
Formally known as DUFfi
- Location: Swalwell
- Local Club: Whickham & DMC
Posted 04 February 2021 - 01:47 PM
My son bought me a Heritage Certificate for Christmas, due to the pandemic, it has only just arrived this week and had quite a surprise for me.
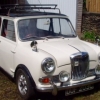
whilst the car was white with a black roof when I bought it (see post #1) I knew this was not the original colour.
whilst working on the car the white paint had been chipped revealing a light green paint underneath, this is visible in a pic on post #66.
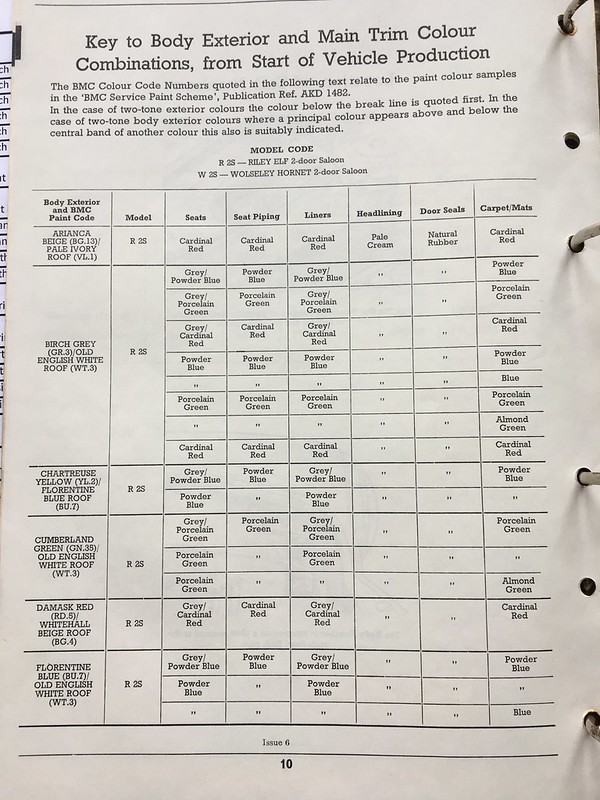
the Heritage cert shows the original colours as Birch Grey and English White!
So I am guessing this car has already undergone a substantial restoration in the past.
Apart from the original colours, the car has been changed from Hydrolastic to dry suspension, it has been fitted with a 1275 A+ engine & gear box, along with the 8.4” discs and callipers, the seats have also been re trimmed in burgundy leather. Also the car has been de seamed.
As I say I had thought the original colour had been Cumberland Green, which would have had Porcelain Green seats. I presumed the seat colours had been changed when re trimmed. The Heritage Cert shows the trim as “Cherry Red” is this the same as “Cardinal Red” as listed in Porters Guide to purchase & DIY restoration Mini all models?
Very surprised at the info on the Heritage Cert. the car must have sat in a showroom for a few weeks, as it was despatched on 26 July ‘65 but not registered until 16th Sept.
#84
humph
-

- TMF+ Member
-
- 1,124 posts
How bad can it Be?
Posted 04 February 2021 - 09:02 PM
Birch grey mk1&2 Elves had a cardinal red interior.
Looking good by the way. Am in the middle of bolting my Riley back together.
Looking good by the way. Am in the middle of bolting my Riley back together.
Edited by humph, 04 February 2021 - 09:06 PM.
#85
DUF2
-
- Members
-
- 463 posts
Formally known as DUFfi
- Location: Swalwell
- Local Club: Whickham & DMC
Posted 28 February 2021 - 11:16 AM
A bit of an update.
I have now bought the new carpet. I needed to fit the bulkhead piece before I could fit the heater. The heater was duly mounted and I drained the cooling system to connect the heater pipes. I was expecting the coolant to be relatively clean as both the fairly new radiator and the original heater matrix had been well flushed before being refitted, also all the hoses have been replaced.
However the coolant I collected was rather dirty! As this had new antifreeze last year I decided to filter the muck out of the coolant, I used a coffee filter, here what the used filter looked like.
5D5BC256-37B6-4DBA-AA06-0335A0C84902.jpeg 34.11K
3 downloads
I continued to flush and drain the system to try to get rid of the sediment which must have been hiding in the block. I’d fill the radiator run the engine till it got hot and the stat opened, then let it cool sufficiently so I did not burn my hands and drain the system again. I am really pleased I fitted the drain tap into the bottom of the radiator!
During one of the engine warming sessions, the oil pressure pipe must have moved and come into contact with one of the manifold bolts resulting in a burst pipe and oil all over the place! I bought a rubber pipe that is used for jointing the copper oil pressure pipe on some minis and used this to replace the punctured nylon pipe. I took the opportunity to shorten the nylon pipe as it was far too long. I did consider renewing the oil pressure pipe but did not want to have to remove the dash again to access the oil pressure gauge so elected to repair the pipe.
Engine running again, so I could continue flushing, I’m amazed at the the amount of crap I’m getting out, so will continue flushing until I get clean water out. One of the problems I have noticed is I’m only able to drop around 2L out of the system which should contain 3L (3.5L including the heater). This is because the water pump is not the lowest point on the block, hence an amount of water always stays in the block. This is an A+ block without a drain on the back of the block.
Yesterday I filled the system with sugar free Coca Cola to attempt to scour out a bit more crap, but when I was running the engine up to temperature I spotted fuel coming out of the carburetor overflow pipe. So I now have to remove the HIF44 and check out the float needle valve! As I don’t have any gaskets I shall strip the carb to see what bits I need, to repair/rebuild the leaking carb.
#86
toromod
-
- Noobies
-
- 43 posts
On The Road
- Location: Western Isles, Scotland
Posted 28 February 2021 - 05:18 PM
sugar-free Coca Cola?
#87
DUF2
-
- Members
-
- 463 posts
Formally known as DUFfi
- Location: Swalwell
- Local Club: Whickham & DMC
Posted 01 March 2021 - 07:47 PM
sugar-free Coca Cola?
Yes.
have you seen what happens to an old copper coin if left in coke?
68D7D581-ADD2-4DDC-8709-DD31BFDEA19B.jpeg 29.08K
3 downloads
Sugar free should stop things becoming sticky.
#88
DUF2
-
- Members
-
- 463 posts
Formally known as DUFfi
- Location: Swalwell
- Local Club: Whickham & DMC
Posted 09 March 2021 - 10:05 AM
Despite numerous flushes, I am STILL getting discoloured water out of my cooling system.
I fill the system with clean water, run the engine for about 15 minutes to get the stat to open and circulate the water. I then turn off the engine and allow it to cool before draining out discolored water. I then flush through the radiator until the water is clean before repeating the process. I have lost count of the number of times I have flushed the system.
I realise there is always some water left in the cylinder block, but thought by now the water should be clear.
The radiator is relatively new and was flushed back and forth before being reinstalled, similarly, I have had the heater out and flushed the matrix back and forth until clear, all hoses have been renewed. Also a while ago, I flushed the block as best as I could using a hose pipe. But still I am getting some sediment/discolouration when I drain the system.
#89
DUF2
-
- Members
-
- 463 posts
Formally known as DUFfi
- Location: Swalwell
- Local Club: Whickham & DMC
Posted 02 April 2021 - 05:58 PM
At long last I have the headlining in!!
E57F09C0-759E-4E49-B735-7C039F5B988F.jpeg 43.07K
1 downloads
0E0D4DFE-C369-4DAC-B0C2-ECD019F76BAB.jpeg 64.78K
2 downloads
To say this has caused me problems is an understatement. The main problem has been the cold in the garage. The headliner was very stiff in the cold garage and did not seem to fit. I pulled it into the screen aperture and the back window aperture, but is was still “baggy” and loose in the corners making me think it needed shrinking.
I was advised to heat the garage to make stretching the liner. I put a couple of heaters In the car in the garage and got the temp inside upto 20C. Now when I stretched it into the apertures it stretched quite a bit as a result this took the baginess out of the corners. The screen aperture was relatively easy, whilst the C pillars were a bit more difficult. The upper profile of the C Pillar covers was NOT very good, the top edge had a bit of a wave in it, whilst the one that was in the car had been straight. But I eventually got there.
I now have the rear window fitted but am a bit disappointed with it. I pulled the headliner onto the flange expecting it to be covered by the window seal, but the seal did not go all the way to the edge, so I have had to cut the liner back a bit under the rubber seal.
Edited by DUF2, 02 April 2021 - 06:46 PM.
#90
Homersimpson
-

- Members
-
- 851 posts
One Carb Or Two?
- Location: Redditch
Posted 03 April 2021 - 08:57 AM
Fitting headlinings is a difficult and time consuming task and to get them to fit correctly can take a fair bit of fiddling.
It sounds like you did everything right like getting it warm etc. , I recall that you can use steam to help shrink wrinkles so it might be worth looking at that.
Its looking good, i've had a few Elf's and Hornet's and always loved them, they are such a fantastic looking car.


0 user(s) are reading this topic
0 members, 0 guests, 0 anonymous users


