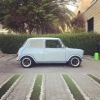


My Mini DIY project
 QSMT4315.JPG 80.85K
4 downloads
IMG_0449.JPG 54.54K
2 downloads
QSMT4315.JPG 80.85K
4 downloads
IMG_0449.JPG 54.54K
2 downloads
The journey and build: 20-25 minute read
Hello,
To cut to the chase, I spent the last 2 years of my free time working on a full rebuild of a classic mini. I am by no means an expert nor really a petrol head, it is just the love for the mini (and other certain cars and bikes), passion for hobbies, and working with my hands. I thought I would write this not to tell people how to go about it technically (lord knows there are plenty and better resources,) but more towards the experience and learning to take on a project as well as what I have actually decided on my build.
Building up a rundown mini, to the way I imagined it and it being back on the road has been a great and very fulfilling adventure with a lot learned on the way. However, it did come with a silly price tag, and time spent which I know a second time round, I would be able to reduce both quite significantly, and with probably little change to the end product. So hopefully this write up will help highlight and showcase successes and pitfalls for anyone reading this can use if they wish.
I am not really reviewing the products or items I used from a quality point of view. I have tried to look at it from a price, effort of installing, complexity. The reason I have done this is I realise in a lot of reading it all boils down to money. Now yes money is important and plays a huge factor in decisions but for some you may have an open cheque book and want to buy the best of the best, so then this is where I would advise you to factor in complexity, time and impact. If you can try to understand the basic function of the item, 4 core radiator, 3 angle stem valve etc….to see what it means for your needs, this way you are getting or can look for the best of the best for what you need.
Finally, a little background of myself, I am from, live and work in Kuwait and as you probably imagine getting hold of minis, parts and going to fairs isn’t an everyday occurrence, but nevertheless, we managed. I am a huge believer in hobbies and trying out things to find your passion but to always take it full on and while I have little/basic experience in any mechanics of a car, good ol dad does, so I had great support where needed at home. I say this because it is one thing building or fixing a car and it being damaged and having to fork out a chunk of hard earned cash, it is a totally different thing putting yourself or anyone in danger, and so with that it is always advised that if you are not certain or don’t have someone around that is, go get it checked by a pro, it will cost time and money, but better that than a serious or fatal accident.
Disclaimer: Not that I have a clue in law, but just for the record, I am not advertising/promoting/ crediting or any form of the mentioned brands/products/companies, nor paid or affiliated with any of them, one of them gave me a free bottle of water once though, it is just easier to use a name or brand to explain at times.
So lets get on with it!!!
side.JPG 82.24K
1 downloads
Project planning
I forgot to mentioned earlier, this is actually the second full resto on a mini I have done, and one thing I found I did much better this time around was planning as far as what I needed to get done and the order I was going to do the project in. While it still took a while and mistakes were made, I found the planning really did help reduce the amount of times I had to redo things, also knowing the next few steps ahead, I would better work around what I was doing then and there, example fitting petrol lines and then the subframe, knowing I needed to make sure the lines were tied down as once the subframe was in, it would be so much more difficult to do so after, and so on.
Direction and Parts!
I went through a lot of resources over the last two years and still do, and one thing I noticed a lot on marketplace or other part selling sites was “selling due to change of direction”…ouch!
While there is no better feeling than getting on with taking the car apart, looking at new shiny parts, clicking “buy” on that insane Wishlist that even cause Santa’s elves to break a sweat, it really is a good idea to have a direction you want to go with on the project. There are two main factors I looked at when it came to direction:
- Look/style – This will determine bodywork needs, certain parts to achieve the desired look and changing it later in the project might not always be that expensive or hard to do. Again this is said with a good amount of salt, if you decide you want to have a no roof or a blue car and decide later that actually green with a roof would be better, yeah that’s gonna leave you in a bit of a pickle!
- Usage – This is really the bit that needs thinking about. What are you doing this project for, how are you going to use this wonderful little car once it is back on the road. The reason this is so important is because costs, expertise and complexity can increase very very quickly. Being honest with yourself and defining what the car really is going to be used for will help in more ways than one as I will explain later.
The direction I wanted to go in was somewhat clear, I knew I wanted a fast road, possibly something I could take to the track and it was custom (not restoration, so original parts or originality were not a concern) personal, and specific parts like lights, seats, colour etc.. what I didn’t fully sign off on was usage (or realistic usage), and because of that I ended up with a hybrid, expensive fast road/track engine, brakes and suspension, with heavy, cosy interior with little consideration for weight reduction and fast track tuning amongst other things.
So were did that leave me….. As I mention because of not nailing down the usage of the car I ended up buying things over and beyond what was really needed. Now Luckily for me (as most of you may know), most of the upgrades also work for road going minis (adjustable suspension, better disk brakes, mine were actually originally drum in the front!, improved cylinder head), but where I over did it was the carb (a badass weber instead of lovely straight forward SU), pistons, shocks which don’t get the full potential out of them and I could of bought “easier” more cost effective parts that honestly, for the weekend fun car it is meant to be, you wouldn’t really feel the difference.
I would assume, (like myself) race parts are always tempting and sexy. They look cool, you gain bragging rights and just adds that panash! What I have come to realise is race parts can sometime be much more harder work, more maintenance, complex, costly, require additional changes and at times can actually reduce the performance because as it says on the tin, “for racing”, so using a racing part in a non-racing car seems to be similar to using a non-racing part in a racing car, it’s just not going to work out.
This brings it all back to the first sentence which is “selling due to change of direction”…so yeah the better you clearly home in on what you want out of the car,…. show stopper…., weekend getaway, full on goodwood winner, in my experience, it really does reduce a lot of wasted time, money and effort.
Parts…Part two
I would like to also talk about restoration and used parts. One of the best things about minis, other than everything, are the amount of spare second-hand parts, and for very reasonable rates. Now granted sometimes the amount of time to fix or clean a second hand part, you might be better of with a new one, but personally I love refurbing old, OEM parts rather than just getting a new part, guess that comes with the idea of restoration. I couldn’t get my hands on second parts that easily being in Kuwait, but recently found a few trusted sellers on ebay and marketplace and managed to get great deals. So if you are able to go to a mini event, try to build a wishlist and have a look, it will save you a good deal of money and at times the quality is better than the new.
IMG_0598.JPG 45.89K
1 downloads
IMG_1571.JPG 47.51K
3 downloads
Enjoying it and time consuming
The way I see it, unless you’re fixing the car for the next big race in which you are going to win big bucks, or you are paying a daily rate for renting out a location, there shouldn’t be stress on fixing it and getting it done. I am totally not practicing what I preach here of course. I have had endless, sleepless nights thinking of things and how things haven’t gone right, but I think with classic cars and rebuilding them (especially as a newbie with little to no experience like myself) there will always have problems. Probably watching too many YouTube videos in which the person does the job in the 5 minute episode, when in reality it was 4 weeks and a broken finger late, gets you thinking what am I doing so wrong!!!
What I found was forum after forum you will see people saying the same thing, so I decided to take my time on things, read and find out as much as I could and then commence, and most importantly enjoy it! If you are really into building it to perfection, then really don’t rush. The last thing you want is to know a part is in there that didn’t get the love and attention it deserved and it is now forever stuck there because taking it out means the end of the world!!! You have to ask yourself one question….was it not worth the extra few days work, well wasn’t it…punk! (I know overused)
Finally, you verses them, your mates, amigos, rivals….the race is on. They are doing it, so I best to as well, sure chances are they are doing it because either they know what they are doing or it has been done so many times it’s the way it is done, but at times it doesn’t hurt to cross check it and even try something different, you never know, it might be that expensive mistake you should have avoided, or you may have found a way that you like to do things and it works out just as well, or even better!
test engine.jpg 108.68K
3 downloads
test engine 2.jpg 111.66K
4 downloads
Tools
Tools, tools, tools!!! This is always a tricky one as you kinda want to have everything but cost, space and really how many times are going to use tool FBX 20101 to turn that screw in that part in the place you will visit every 150,000 miles!
What I learnt was buy good tools that you are going to use a lot, spanners, screw drivers, wrenches and TORQUE Wrench if it is a special tool see if you can borrow from a friend or workshop. The bottom line for me is the right (good quality) tool will make the job soooooooooo much easier, save time, sweat and less blood wise.
Resources
Ah, pen is mightier than the sword, knowledge is power, always seek knowledge etc. the list goes on and well, so do the resources. The key is you’re not alone I mean just look at this forum of wonders!!!
Through the build I found that asking advice was extremely helpful, except you need to be careful where you get it from.
Youtube: Well if this ain’t the place, video after video telling you how to do things. Top mechanics, home DIY, beginners they are all there to guide you. Cheekiness aside, youtube is without a doubt a great source of information and know how. I used it a lot, but I realised you have to go through a lot to get a solid average happy answer and should be combined with other information. Examples here, I watched one guy with loads of followers, talking like they do this all the time (he used phases like when I do this, I generally use, l love using, my approach…etc) and as he went on I was like oh ok let me see the comments, and ironically enough, some comments were full of praise others heeds warning as to what he is doing is so wrong it will be catastrophic, you could imagine how my heart felt when I was about to go and do the same. In the next few video onwards, he retracked and said he was wrong what he did, good on him, but could have meant a lot of damage for those who were about to get into it there and then! Long and short, check the credibility and check a few, not the ones that say build your suspension in 2 mins flat!
Forums: Another great source of information and one of my favourites too is forums, specific ones to general ones, as you can always see what applies in practice. All walks of life posting questions, some similar to yours and a wonderful crew of people responding with range of advice. What I like about it, is that more direct questions can be found, FAQs, more organised etc… as well as that unlike a video from one person, and answer to a question can come from loads of people and you get a quick gauge on things. Again, I learnt my lesson, as even I have the right to answer someone’s questions, which could be pretty dangerous given I am a learner myself, so again research and background checking is always worthwhile.
Books: My favorite, not because I am a book worm, far from it and prefer visuals far more, in fact I read sentences 5 time over just to understand them and always get lost trying to find FIG7.2 !!! However, the wonderful thing about books (digital or hard copy) is the authenticity, creditability and somewhat guarantee that comes with them. Owner manuals or experts on the matter (like Haynes manuals) I find it is the best thing. The downside are books come in all shapes and sizes, or what I should say ages and detail. For example, a manual I used last published in 1990 (which given the car is a 73’) I thought would be fine. All the torques and sizes where based on technology and know-how 30 years ago. The parts I had were far better specked and so you just need to make sure you keep that in consideration. Detail is another one, at times it is written like you know what you are doing and if you do, great, if you don’t, eesh that’s not fun, so yeah.
Community: One thing I would love to get to know more in Kuwait is a community, I know the mini is hardly the street or race car of choice in K town, (we do have a few around though) but knowing and talking to people who build cars, fix cars, other than the garage, might be able to give insights that is still applicable and more so, “who to go to in Kuwait” which is always a tricky one. But whether it is a digital community or neighbours, having a chat with them wouldn’t be a bad idea.
Side note, one thing I do notice, and I admittedly have done it myself, is asking a question(s) straight up with neither of the following:
- Putting a little bit of effort in trying to understand or research yourself. Example ….what’s this? Shows Picture of a part. At minimum if you just do a quick check on a mini-parts-providers-parts-diagram you probably will find the answer.
- Asking for a solution without giving a fair amount of detail to help solve your problem.. example: my engine won’t turn over….that’s gonna give you one billion answers!
The reason I bring these both up (other than the obvious) is because I feel people will help, but if you don’t put in the effort, it is very demotivating for them to do so. Also, there is also a kind of “boy who cries wolf” aspect, in which if you just keep asking every little thing, there is a chance people may start losing interest in what you are asking. Again, this is my opinion, observation and thoughts, not factual!
Places for things
Last thing before I close up. During a rebuild or fix up, you are bound to come across requirements and needs of third parties, paint job, fine tuning, final wheel alignment, so do some research on 2 or 3 trusted mini experts offering these services in your area, or radius you are will to travel to, might work out very helpful in the short or long run.
interior 3.jpg 65.07K
5 downloads
The build
The original
I managed to find a 1973 MKIII Spanish built 850 in not so good order. The engine was a 998 aplus, non-runner, and with a drum brake at the front. I did go back a forth with the idea of making a customised car or just restore it back to its former glory, I decided it would be a customised project in the end as I only have one mini and really wanted it to be mine, (I do dream of two more, a full out racer for the track and a 60s cooper s, but who doesn’t)
IMG_0255.JPG 62.65K
3 downloads
The body and paint
I outsourced the work for body and paint for several reasons, one I have no clue/experience/skill on welding or painting and secondly, parts and shells don’t come by often in Kuwait, so figured not to mess it up. I decided for a surf blue as I really wanted a retro feel, and the popular choice of MKI look (grill, lights, bonnet). I do have a lot of questions regarding why converting the doors, but that’s for another day. The body was stripped to bare, fixed up and resprayed, with most bodywork panels being original panels rather than metal cut to shape, but at times I just had to go with the flow, as shipping costs would be too high for certain panels.
AOUN3781.JPG 74.63K
2 downloads
paint work.JPG 45.91K
2 downloads
The heart
So Kuwait is a very “big engine” centric place with little worry on fuel expense or insurance, so trying to drive next to them in a mini can be a pant changing experience at the best of times. I figured I would try and get the biggest engine in there and while I toyed with the idea of a VTEC conversion, I wanted this car to be something I can build and maintain myself as well as keep as “original as possible”. I contacted MED originally who actually supplied the engine kit for the first mini I built, but unfortunately for me, not them, they stopped doing fast road and only focused on race engines. So after a lot more research and soul searching, I came across crafted classic tuning. Spoke to a gentleman called chris and we discussed what I needed, share ideas and honestly was happy I went with him. He sourced the engine, put together the kits, oversaw the mods and did a quick size check on key things and then shipped it. Now, this is what I was talking about …parts, usage and result. I did want a fast road, yes ok I wanted bragging rights, and I wanted cool things and I got em…but expensive? yes, more work? double yes, complicated? yes! Worth it…..depends…bragging rights, tick the good looking box, sexy….then yes total worth it….headache, working it out, effort and budget….still in two minds. So lets look at why…
IMG_1513.JPG 65.57K
2 downloads
Omega pistons….not sure if I am getting the best out of these beauties, they are diecast, but there is a lot of discussion on if they are good for road use and other pistons do the same. I have had these in both builds and rings and pistons still running lovely. I think price is on the higher side vs other options. Comments welcome, I think swifttune and Minispares have their versions which range from 200 onwards for fast road onwards.
IMG_3368.JPG 49.08K
2 downloads
DSN timing cover…but look how pretty!!! But you cant see it!!!! Still look how nice, yes but you cant seeeeeeeee iiiiiittttt……yeah but….. I will let you judge, but my main purpose for this was to address the oil leak common in the timing cover, which I experienced in the first build. There are other options.
IMG_0573.JPG 64.41K
3 downloads
Race valves…..yum, but I am not racing, so yeah you get the point there….
IMG_3369.JPG 60.24K
5 downloads
Weber, ah the weber, the mere fact of saying it is great….but…wow was that a topic to learn. I enjoyed it, I really did and have managed to work it out and understand the concepts and it really is a magnificent piece of engineering, but is it really doing much more than a HIF44, I don’t think so in my case, and the SU, while are simple, are just perfect, and lets be frank racers are racing with them and are so much more manageable for a guy like myself. Petrol line to the mechanical fuel pump (VIA A FILTER) and up to the SU, tweak the needle type and bit more and ta da, you are there. Go to twins and you are now getting a bit more complicated, but still ok. What I am happy about the weber though is I did it, I tuned it, and while it needs a slight more adjustment, it is working lovely. In a nut shell I read somewhere that putting a weber in is like get a pro camera, you wouldn’t need a pro camera if you are just going to take a quick snap of something, a basic camera will do the same trick.
I can go on about this forever, but key points you need to consider:
- Unless you get a specific inlet, chances are bulkhead cutting is a must
- Fuel regulator is suggested for a weber as I understand generally the standard mechanical pump doesn’t give enough flow. There is a weber pump I found which can remove the need for it, but in general other pumps do require,
- Electric fuel pump is suggested for the same as above
(I cant not confirm the above 100%, as I haven’t tested for myself, but I have read a few places an electric pump is often required and what this means is more expense and wiring if you don’t have an electric pump and then also cut off switch, and filter regulator )
Would I do it again, RACE possibly yes, fast road weekend car….probably not, SU and probably the HIF44, I like it a lot.
WZQT1848.JPG 49.13K
4 downloads
fuel pump.jpg 73.4K
3 downloads
Dry deck, this is literally split down the middle, when reading about it, some say it helps others say it doesn’t. I went with it, but I think if I were to do it again I wouldn’t. I was thinking I might remove it and see if there is any affect as I did not do the dry decking of the block but used the gasket to do so. IMPORTANT NOTE, I DIDN’T DRY DECK THE HEAD AND BLOCK (I USED A GASKET THAT DOES IT), IF YOU DO, THEN IT IS NOT A SIMPLE REVERSE. Also the drydeck gasket is a lot more expensive, and you pay for machining for the connections, so in general it adds a lot of cost
Cooling: I am in Kuwait, it was 43 degrees today, 50 a few weeks ago. Not that I drive in this heat, but cooling is vital! I went with an Ultimate road radiator I think they are made by radtech. Easy to install, you need to check side , you need to check side clearance.
ARP bolts: Boy do these cost a pretty penny. But yes I would use again for a fast road and up, on the standard engine I wouldn’t simply because minis have been roaming around for more than my life time with standards in them….
Gearbox
All standard, except the upgraded layshaft and baulk, cross pin diff and side oil pipe and honestly, I think I would do it all again. Simply because the oil pipe makes absolute sense, and doesn’t break the bank, and the upgrade layshaft and baulk rings hopefully will provide strength to a gearbox with a more powerful engine. Finally, cross pin also makes sense to me, not to the fact that I am pulling and revving the pistons out of it, but just additional strength and it is not crazy expensive.
IMG_3042.JPG 37.95K
1 downloads
IMG_2300.JPG 44.28K
1 downloads
Engine Bay.JPG 64.72K
1 downloads
Suspension: I went with adjusta ride and SPAX adjustable shocks, which I think adjustable suspension is a very good idea, even road cars, it is not a bad thing you can adjust your ride to suit. The shocks, yeah I would definitely upgrade from standard but maybe SPAX are overboard, as amazing as they are I am not a seasoned driver or use the car in a way I would be able to tell you the difference if I got another good brand on there for a bit less, but from installation and set up it is as easy as standard.
suspension.jpg 72.72K
3 downloads
Brakes
8’4 disc vented minisport brakes, yes on disc brakes, vented maybe I didn’t need to go that far but they sure do stop me….
brakes.jpg 85.01K
3 downloads
Wheels
13 inch wheels, I did regret this but only because I had 13s on my last mini and should have given the 10s a shot, and honestly this was one of those things that you should nail down before hand, because with size of wheel comes brake set up, suspension adjustment and to some extent arches…so yeah think long and hard…. Minis came with 10s, and then went to 12s. 13s came a lot later as I understand. 13s do look superb, and I am currently reading about the effects of tire/wheel size on the drivability, handlings, gearbox and I may in the future go smaller, so let’s see
wheels.jpg 76.74K
3 downloads
Wiring:
I bough a full rewire kit and glad I did and would advise anyone to do so if you don’t know what you are doing. I read a lot to work about the basics and still got help, but that was mainly to extend wires a little bit or add a few things, but to try and rewire a car from scratch would not be realistic and probably dangerous! Also, the original wiring that was in my car was a horrible mess and the readymade looms are not ridiculously priced when you factor in how much labour goes into making them. I put a lot of effort into hiding them and the result was great, very little wiring, all neat and clean for most part.
wiring.jpg 65.42K
1 downloads
Custom stuff – There are a couple of custom parts with the car, the main one being the dashboard which I designed but had someone build. I am happy with the out come, I have a few changes I would make and the finishing could improve but I am chuffed over all.
GEZF0130.JPG 39.35K
3 downloads
chairs.jpg 101.22K
1 downloads
Order of build
So this is not the order I did it in, but more as how I would do it next time I think, it might need a bit more review but I though to put it out there and maybe comments and suggests we can build a how to in order … ironically enough I am sure there is plenty of articles and even books on the steps you take to rebuild a car, not practicing what I preach here huh!!
1. Clean – Thorough clean, I mean really get in there. I say this as it will save you in the long run especially once you start working on the subframe and engine bay.
IMG_0253.JPG 68.87K
1 downloads
2. Body – Do all body work/fix/welds/mods, and double check everything. Bonnet, boot, door fitments to make sure no surprises later on.
XZQF6773.JPG 68.41K
2 downloads
3. Primer and Paint - This is an interesting step, because it depends how much time you have. Normally you see these amazing painted bodies come out of the paint shop gleamy and sparkly and then you set to work on them, I did the same, simply because you can’t build everything to then take it apart…or can you! That’s what I would love to do for the next build, literally build as much as possible (basically not carpet or glass, you get the point) on a primed only body, drill, cut, place, everything and then take apart. Then paint and then rebuild, this way all lines, holes, accidental scratch marks, mistakes, are not an issue, you get them sorted and second time round, and with any luck, it will literally be like putting lego back together, time consuming but should fit like a glove.
4. Wiring and insulation – I love clean wiring, and I loved doing the electrics and learning about it all. For my next build I would definitely work on the wiring outside of the car in a very clean area. Make sure I measure and mapped out all the gauges, instruments items that need power and then start adding to a pre-made loom. Once I have got that sorted, install in the car and test test test. I found trying to add wiring, adding connectors, cutting, once the wiring is in the car and at a later stage really was harder and sometimes, I ended up with longer wire than needed, redoing it and sometime not clipping properly which is unacceptable. So yeah wiring would then be next in my books. If you go down the route of insultation this would be a good time to do it unless you have to paint the floor, then do it once it is painted. Basically, the less stuff in the way the easier the insulation.
Lines and master cylinders– After that I would fit fuel and brake lines, get it all measured up and fitted nicely (both rear and front). Master cylinders is to help get the lines properly bent into shape.
5. Wiper – with a nice empty front end jump in there and get on with the wiper set up cause trying to get there later is a painful experience or just don’t put a wiper if you are brave enough.
6. Steering wrack and arm and the rest of it…also try and put a drivers seat in side just to make sure you are setting it up as a driver as chances are you don’t drive on your knees.
7. Subframes: I would advise to build the subframe out of the body as most people do and then plug it in, even better if you can add everything to it, less the wheels, it may be a lot heavier but essentially you have everything in order beforehand. At this point, continue with brake lines
8. Shock absorbers would be good to fit at this point as well.
9. Petrol tank - Can be fitted now to make sure all is still nicely snug and you have all the correct fuel lines (size and length).
10. Engine, box and exhaust: I would put the engine now to make sure everything fits nicely and wiring and plumping all fit it. I would however not have the c clips on the drive shaft to make it easier to take in and out (OBVIOUSLY INSTALL THE C CLIP FOR FINALL INSTALLATION). Also, I would recommend if you are building a new engine or putting the same one back in, try and run it outside the car to check for leaks, if it actually working and basic set up. It will be a whole lot easier to fix a problem than try and fix a leak when it is in the bay. I did everything outside and tested several times and I was a lot more confident with the build as I new the engine going in works and not leaking. Of course, this being said, does not mean further tuning is not required and more so once the engine break-in or being run in, you may realise things need working on or there is a leak that didn’t appear at first.
PLNC6195.JPG 61.36K
1 downloads
11. Arches and Ride adjustment – I would say now would be a good time to do the initial ride height, steering and suspension, engine is in, subframe etc… while it is going to get heavier with doors, windows etc…. you have a good idea of things.
12. Roll cage – If you are fitting one, it will be easier to install without doors and interior so go ahead, if it is permenant then you might want to fit the headlining first.
If you haven’t painted the car I would say now would be good chance to take it all apart and send it to the paint job as you should have all the holes and cuts you need and even can get the old holes you don’t want out of the way. (Reminder, make sure all doors, bonnet and boot fit nicely just in case any other work is needed before painting)
13. After that set on get the rest getting done, I put doors and boot too early and makes it harder to work on the interior, so I would keep them to the very end as with the bonnet.
So, I hope this helped, sorry for the length of it, but it was a two-year experience to put down and I hope it helps those who use it. Please remember I am not an expert; I am a DIY home garage learning as I go. If anyone wishes to suggest or advice please do so I would like to hear it especially if I have got something wrong or if it is going to approve my knowledge or approach.
If you would like to get in touch and ask any questions, feel free to send a message
With that I wish you best of luck on your project and keep on keeping on
thanks
Best regards
aziz
@Projectmini_kwt
the car.jpg 96.44K
2 downloads
the end.jpg 119.98K
6 downloads