I'm gonna be replacing my first sill soon, only I have the sill up to and including the first groove in the floorpan. Now when it comes to putting it on I know I need to do loads of little welds a few inches apart, and then go back over gradually filling in the gaps, so as to prevent to much panel distortion. But am I better off working from one end to the other, or am I better off doing a weld one end then one the other end then one the other end and so on gradually working my way into the middle?
Any advice appreciated.

Welding And Sill Replacement
Started by
mike.
, Apr 09 2008 08:55 PM
50 replies to this topic
#47

panelbeaterpeter
-

- Members
-

- 5,606 posts
Crazy About Mini's
- Location: Scotland
- Local Club: n/a
Posted 20 April 2008 - 07:29 PM
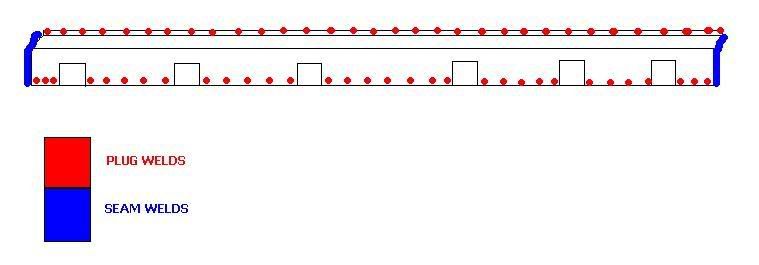
You don't need to do it like that unless you're fitting an oversill, which is severely frowned upon! 
If it's a proper sill, you only need to seam weld the ends.
diagram time..
If it's a proper sill, you only need to seam weld the ends.
diagram time..
#48
mike.
-
- Members
-
- 6,176 posts
Crazy About Mini's
Posted 20 April 2008 - 11:04 PM
Nice diagram there pete 
Anyway managed to find an old toolbox in my nanas garage so i can cut that up and practice with and my mates dad says hes got some gas and may have a mask...
Anyway managed to find an old toolbox in my nanas garage so i can cut that up and practice with and my mates dad says hes got some gas and may have a mask...
#49
duncancallum
-

- Members
-
- 533 posts
Super Mini Mad
- Local Club: South Lancs Mini Owners Club
Posted 21 April 2008 - 07:32 AM
has any omne fiitwed the heratige sill and floor section it comes with the inner and outer sill and the floour up to the first groove.
i was wondering ow you would atach it to the heal board?
i was wondering ow you would atach it to the heal board?
#50
LuckyRob
-

- Noobies
-
- 33 posts
Passed Test
Posted 21 April 2008 - 07:08 PM
Thanks for the diagram Peter but I have the part that Duncancallum is talking about. Obviously my description of it wasn't very good, sorry 
#51
duncancallum
-
- Members
-
- 533 posts
Super Mini Mad
- Local Club: South Lancs Mini Owners Club
Posted 22 April 2008 - 07:09 AM
i have a mini mag with them fitting it but i dont think its particualy good guide.


0 user(s) are reading this topic
0 members, 0 guests, 0 anonymous users


