Also i've just thought - How do you clamp the sill in place?
Its not like i'm just clamping 2 sheets of metal together.
For example if i drill a load of holes in the sill/floor to do plug welds - how can i clamp the 2 panels together enough to get a decent plug weld?

Welding And Sill Replacement
Started by
mike.
, Apr 09 2008 08:55 PM
50 replies to this topic
#32

Shifty
-

- Admin
-

- 13,145 posts
Sponsored by Fosters (tm)
- Name: Sean
- Location: Shropshire(sunny)
- Local Club: TMF
Posted 10 April 2008 - 07:45 PM
How about self tappers or pop rivits?
Once you've finished you can drill em out and weld up the hole.
Further to your earlier Q about volts.
Usually the welding current is refered to as amps and the wire speed is the volts.
Not to be confused with the voltage supply to the welder ie 415 or 240v
Once you've finished you can drill em out and weld up the hole.
Further to your earlier Q about volts.
Usually the welding current is refered to as amps and the wire speed is the volts.
Not to be confused with the voltage supply to the welder ie 415 or 240v
#33
panelbeaterpeter
-

- Members
-
- 5,606 posts
Crazy About Mini's
- Location: Scotland
- Local Club: n/a
Posted 10 April 2008 - 07:55 PM
I always grip the top together with vice grips, then prop the bottom up from the floor with a bit of wood or a hammer or whatever random object is within reach, and tack it in place. As for the inside, I etch prime this inside, them hammerite it very thickly. Some of it will burn off, but it's better than underseal which will set alight when you weld it. After fitting, fill it with waxoyl and jobs a good un.
#34
mike.
-
- Members
-
- 6,176 posts
Crazy About Mini's
Posted 10 April 2008 - 08:14 PM
ahh right yeah i could wedge a load of stuff under the sill so it pushes up against the floor pretty tightley.
Not sure on the self tappers idea - Only because i'm not sure i'll be able to seal them properly with weld.
Another thing. Is there a small box section type support between the inner and outer sills about halfway along? Because through the holes i've poked in the outer sill i can feel something pretty solid - like a support between them?
Thing is i'm thinking there must be something there because when i first got my car i pumped the sills full of waxoyl through the seatbelt bolt holes. But now the front of the sill - After the support - has rusted away, but before it, where the waxoyl would have gone is still solid? hmmmm
#35
panelbeaterpeter
-
- Members
-
- 5,606 posts
Crazy About Mini's
- Location: Scotland
- Local Club: n/a
Posted 10 April 2008 - 08:27 PM
It's probably the jacking support. I usually cut it out and weld the hole up. If you're worried about welding up a hole for a self tapper, I would forget about welding on a sill! it's only a little hole, same as if you were doing a plug weld.
#36
mike.
-
- Members
-
- 6,176 posts
Crazy About Mini's
Posted 10 April 2008 - 08:40 PM
If you're worried about welding up a hole for a self tapper, I would forget about welding on a sill! it's only a little hole, same as if you were doing a plug weld.
Yeah but i just thought that a plug weld would be pretty easy since your just filling a pool - But if i used a self tapper the hole would be through both panels and the weld wouldn't be as simple as that. But i spose its not really a problem.
#37
panelbeaterpeter
-
- Members
-
- 5,606 posts
Crazy About Mini's
- Location: Scotland
- Local Club: n/a
Posted 10 April 2008 - 08:49 PM
If you're worried about that, drill the hole in the sill bigger, and put a washer on the self tapper. Wouldn't really make any difference though.
#38
mike.
-
- Members
-
- 6,176 posts
Crazy About Mini's
Posted 10 April 2008 - 08:52 PM
If you're worried about that, drill the hole in the sill bigger, and put a washer on the self tapper. Wouldn't really make any difference though.
ow right yeah - That'd probably help me if i went for that method. Good thinking
#39
mike.
-
- Members
-
- 6,176 posts
Crazy About Mini's
Posted 19 April 2008 - 03:11 PM
Right i've just picked up the new sill and the welder.
The welder is a clarke weld 100E mk2 - According to the label.
Heres a pic:
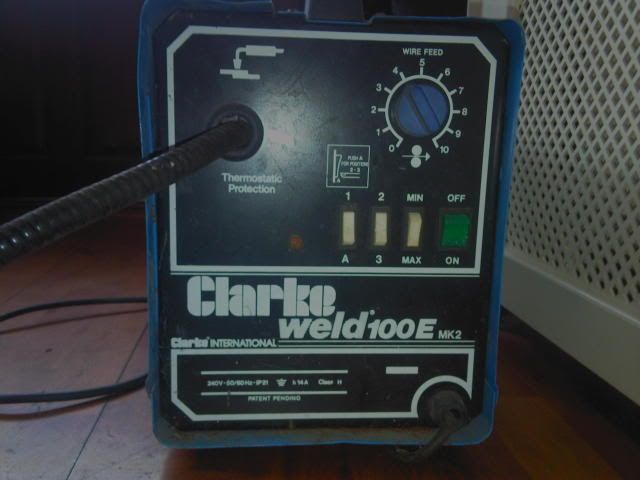
Any ideas on what settings i should have it set to for welding a sill on?
Also how do i go about feeding the wire through. Theres abit of wire sticking out of the feeder part:
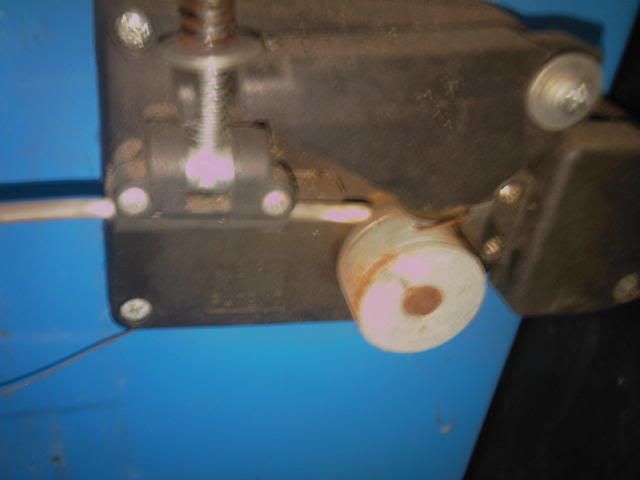
Do i just sqeeze the trigger till thats out of the way then feed the new wire through?
Another thing - Theres still a full roll of wire with it - Its pretty old and dull - Is it a good idea to wire using this wire or should i chuck it and buy a new roll so i know i've got the right stuff?
Thanks.
The welder is a clarke weld 100E mk2 - According to the label.
Heres a pic:
Any ideas on what settings i should have it set to for welding a sill on?
Also how do i go about feeding the wire through. Theres abit of wire sticking out of the feeder part:
Do i just sqeeze the trigger till thats out of the way then feed the new wire through?
Another thing - Theres still a full roll of wire with it - Its pretty old and dull - Is it a good idea to wire using this wire or should i chuck it and buy a new roll so i know i've got the right stuff?
Thanks.
#40
1340 gt
-

- Noobies
-
- 148 posts
Mini Mad
- Location: Yorkshire
- Local Club: ?????
Posted 19 April 2008 - 05:22 PM
new wire!! old wire will not weld well.
hold torch leads straight ish and feed the wire in while pulling the triggor.
hold torch leads straight ish and feed the wire in while pulling the triggor.
#41
panelbeaterpeter
-
- Members
-
- 5,606 posts
Crazy About Mini's
- Location: Scotland
- Local Club: n/a
Posted 19 April 2008 - 06:10 PM
Pull the wire out with a pair of pliers. Wire's usually ok under a couple of layers, don't use it if it's rusty though, you'll get a horrible weld. As for loading the wire back in, put the spool on the holder, and feed the wire inbetween the 2 wheels with the groove in the middle, the wire should sit in the groove. There will be some kind of a clamp holding the wheels together, loosen this first. Feed the wire through the tube where it enters the cable, turn the welder on, and pull the trigger with the wire speed set to about 4, you don't want it to come out too fast or it can get tangled inside. Providing the tip isn't blocked it should come out of the torch.
#42
mike.
-
- Members
-
- 6,176 posts
Crazy About Mini's
Posted 19 April 2008 - 06:22 PM
Ok cheers guys.
So when does the wire actually turn into 'weld' - As soon as it dissapears out of the wheels i guess?
So what about the settings.
Min or max? - What does that refer to? Amps?
1, 2 and 3? - Same question really.
So when does the wire actually turn into 'weld' - As soon as it dissapears out of the wheels i guess?
So what about the settings.
Min or max? - What does that refer to? Amps?
1, 2 and 3? - Same question really.
#43
panelbeaterpeter
-
- Members
-
- 5,606 posts
Crazy About Mini's
- Location: Scotland
- Local Club: n/a
Posted 19 April 2008 - 06:30 PM
The wire melts when it comes out of the torch and makes contact with the metal you're welding.
I'd strongly suggest getting a dvd or a book on welding, and do your homework before you even try any welding. You really need to get a bit of metal and have a play, practice with different settings. I have no idea what the A switch is, but I imagine it turns off the switch so you can get higher power with the 2 and 3. For welding sheet steel I'd probably try it with the switches turned to "A" "2" and MIN, with the wire speed about 6 and see how you get on, playing about with it until you get a decent penetrative weld.
I'd strongly suggest getting a dvd or a book on welding, and do your homework before you even try any welding. You really need to get a bit of metal and have a play, practice with different settings. I have no idea what the A switch is, but I imagine it turns off the switch so you can get higher power with the 2 and 3. For welding sheet steel I'd probably try it with the switches turned to "A" "2" and MIN, with the wire speed about 6 and see how you get on, playing about with it until you get a decent penetrative weld.
#44
mike.
-
- Members
-
- 6,176 posts
Crazy About Mini's
Posted 19 April 2008 - 06:46 PM
Yeah i was planning on doing plenty of practice before even taking the old sill off.
Like you said the 'A' bit is so you can set the power to 2 or 3 if you need to.
I've got a book on welding that i'll get round to reading through properly.
Where can i get some thin sheet metal to practice with? I've been to the local DIY shops and they only sell 3mm thick+ stuff. For example where do people normally get their metal for making patches?
Does B&Q sell thin metal? What sort of thickness metal shall i get to practice with?
#45
macfoot
-

- Members
-
- 561 posts
Super Mini Mad
Posted 19 April 2008 - 06:59 PM
i use 0.9 mm sheet metal
look up a sheet metal place in your area
this is what i found under my seals lots of holes, i used 0.9mm metal to repair it all
cut it all out

after you finished use seam sealer on all joints and paint it up
look up a sheet metal place in your area
this is what i found under my seals lots of holes, i used 0.9mm metal to repair it all
cut it all out
after you finished use seam sealer on all joints and paint it up
Edited by macfoot, 19 April 2008 - 07:23 PM.


1 user(s) are reading this topic
0 members, 1 guests, 0 anonymous users


