Jump to content


Photo
- - - - -

Ed's Mk1 Morris Cooper


  • Please log in to reply
188 replies to this topic

#166 edi57

edi57

    One Carb Or Two?

  • Members
  • PipPipPipPipPipPipPip
  • 821 posts

Posted 11 October 2009 - 09:18 PM

Hi Ed
Nice to see you back again, excellent job on removing the wheel arch, I had to remove both of mine and they are a pain, you think you've drilled all the spots but theres always one that you miss, glad to see your using heritage arches. First ones I bought were patent ones and they didn't fit well at all, took them back in the end and got heritage ones , look forward to more updates soon

Andy


Thanks Andy

I'm glad to hear that it's not just me who struggled with getting out the arches! Yes it was tricky... I still have the other one to do too! These things are always quicker on the second try tho.

Ed

#167 edi57

edi57

    One Carb Or Two?

  • Members
  • PipPipPipPipPipPipPip
  • 821 posts

Posted 11 October 2009 - 09:19 PM

Nice work as usual Ed, wondered where this project went!


Thanks mate... it's still alive and kicking.. it was just summer hibernating!

Ed

#168 edi57

edi57

    One Carb Or Two?

  • Members
  • PipPipPipPipPipPipPip
  • 821 posts

Posted 14 October 2009 - 08:39 PM

So I got a little time in the garage tonight. No major progress.. but I'm posting this just to prove that the work I did on Sunday was not just a one-off!

I removed the e-coat where I'm going to need to weld.

Posted Image


Then clamped the arch into place.

Posted Image


Putting my guide in place, I found that the top of the arch was out by about 4-5mm. I needed to pull the arch in.

Posted Image


After a moment of thinking, I found a rachet strap. This pulled the arch in just perfectly.

Posted Image


I readjusted the clamps, so it's now perfectly positioned for welding. That's it for tonight!

Posted Image

#169 mk1john

mk1john

    Stage One Kit Fitted

  • Noobies
  • PipPipPip
  • 55 posts

Posted 18 October 2009 - 08:32 AM

Great work mate, fully agree with keeping repairs invisible, makes for a nice clean look and shows great pride in your work.
keep it up

#170 edi57

edi57

    One Carb Or Two?

  • Members
  • PipPipPipPipPipPipPip
  • 821 posts

Posted 12 November 2009 - 08:20 PM

A couple of long overdue updates...

With the arch nicely positioned I got it welded securely in place. It was spot welded on the outer edge and all the inside welds were plug welded.

Where the metal was a little thin I had to get the mig welder out. Weld then grind back. Thankfully this only happen in a few places.

Posted Image

Posted Image


With that arch done I got started on the other arch... well actually my good friend David was keen to help me drill out quite a few of those spot welds.. he did a great job which was very much appeciated!

Posted Image


Old arch gone!

Posted Image


New arch clamped into place. This makes it look so quick and easy. But clamping this arch in place and getting it positioned just perfectly took about an hour.

Posted Image

That arch has now been fully welded in place.

Which takes me onto....


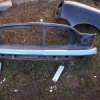
The complete boot floor/rear seat panel! I was quite exciting about getting started on this panel because it's probably going to be the biggest panel I replace (lots less metal to worry about after I've finished) and I had in mind that it was going to be quick and easy.

I thought it would definitely be quick to remove because it's not secured to the rear panel (that's been replaced), it's not secured to the arches (they've been replaced) so it's not attached to all that much! Anyway... it ended up taking me about 4 hours last Saturday and probably a further 5 hours on Sunday! I was so pleased when I finally got it out that I lit the BBQ... even though it was cold and dark and roasted some marshmallows with a few friends to celebrate!

Posted Image

Posted Image

Posted Image

Posted Image

I hope to be able to spend a decent amount of time on the mini over the weekend. This weekend will consist of:

- Prepping the body to accept the new boot floor (cutting off any left over bits, fixing areas etc etc)
- Prepping new boot floor (adding space wheel retaining clamp and other bits)

I doubt I'll get as far as fitting the panel... but I'll be please if I manage to get to the position where I am ready to fit it.

That actually reminds me. When fitting the panel, I'm going to need to bolt on the subframe to get alignment right... which means I'm going to need to order a rear subframe bush and bolt set MS44..

#171 HARBER07

HARBER07

    Up Into Fourth

  • Traders
  • PipPipPipPipPipPipPipPipPip
  • 4,498 posts
  • Location: Suffolk
  • Local Club: Naaa......

Posted 12 November 2009 - 10:51 PM

Brilliant work Ed!!! :) How are you finishing your welds? Just the usual flap discs in a grinder, or something else? Really top notch job though :P

#172 Mini Basher

Mini Basher

    Speeding Along Now

  • TMF+ Member
  • PipPipPipPipPip
  • 424 posts
  • Location: Forest of Dean
  • Local Club: Mini Foresters

Posted 12 November 2009 - 10:57 PM

HI Edd

Nice job of doing the arches, suprising how difficult it is to remove the boot floor though, it took me a lot longer than anticipated when I did mine. If your using a heritage boot floor panel you will find that to keep it as the original one is that you will need to modify a few bits on the panel, namely the fuel and cable holes and also the battery cable hole as these are not the same on the newer floor pans, another tip is to fit the battery box before you fit the floor panel, it makes life so much easier, good luck and keep up the good work

Cheers

Andy

#173 deemo

deemo

    Mini Mad

  • Members
  • PipPipPipPip
  • 185 posts
  • Local Club: LCMOC

Posted 13 November 2009 - 03:36 PM

Really nice
Love this thread, Keep it up.

#174 edi57

edi57

    One Carb Or Two?

  • Members
  • PipPipPipPipPipPipPip
  • 821 posts

Posted 02 January 2010 - 10:33 PM

Hi All,

Not much progress has been made really. I've been busy enjoying Christmas/New year and all that. Today I finally got in the garage for a couple of hours.

It was freezing outside and snowed for a while. Luckily I had the space heater going so it was toastily warm.

My buddy Pete stopped by which really helped with progress. Here he is copping out the "difficult" bits left of the boot floor.


Posted Image


The spare wheel clamp and fuel tank rest were salvaged from the old floor. Unfortunately I didn't make note of exactly where the fuel tank rest should be positioned. Has anyone got anything that could help me here?

Spare wheel clamp bracket was plug welded in today.

Posted Image

#175 Hassan23

Hassan23

    Stage One Kit Fitted

  • Noobies
  • PipPipPip
  • 63 posts

Posted 03 January 2010 - 01:00 AM

Hi Ed just read your thread from the beginning and i am blown away by your attention to detail, really fantastic work would you consider showing this at concours shows because i am positive i would destroy most minis.

Hassan

#176 1964Woody

1964Woody

    Mini Mad

  • Members
  • PipPipPipPip
  • 201 posts
  • Location: Calgary, Alberta

Posted 10 March 2010 - 08:11 PM

Beautiful work- am just starting a complete resto (my first) on a Countryman. Your work is inspiring (and some great teaching).

A question- what is the reasoning behind clamping copper sheet behind a hole before you fill it? I havent seen that done before- I see that it works but does the copper stay there or is it simply to hold the weld material in place until it cools? Thanks.

#177 GreaseMonkey

GreaseMonkey

    Has Ratchet, Will Make Noises

  • Members
  • PipPipPipPipPipPipPipPipPip
  • 3,663 posts

Posted 10 March 2010 - 08:15 PM

A question- what is the reasoning behind clamping copper sheet behind a hole before you fill it? I havent seen that done before- I see that it works but does the copper stay there or is it simply to hold the weld material in place until it cools? Thanks.


It lets you build up the weld without it falling through, till it cools as you said :)

#178 Scallywag630

Scallywag630

    Up Into Fourth

  • Banned
  • PipPipPipPipPipPipPipPipPip
  • 2,850 posts

Posted 10 March 2010 - 08:23 PM

Looks great, but obviously a lot of work. Well done, another mini saved.

#179 analogue_radio

analogue_radio

    Up Into Fourth

  • TMF+ Member
  • PipPipPipPipPipPipPipPipPip
  • 4,897 posts
  • Location: Melton Mowbray, UK.

Posted 11 March 2010 - 01:01 PM

Fantastic work, really inspiring.

Guessing you are around my age, 19? & I'm hoping over easter to get started on the boot.. like you, I will be replacing the full boot floor. You've made it look bloody easy :thumbsup:

What size spot weld drill are you using?

#180 tedmcedd

tedmcedd

    Up Into Fourth

  • Traders
  • PipPipPipPipPipPipPipPipPip
  • 2,751 posts
  • Location: Huddersfield

Posted 11 March 2010 - 06:04 PM

Any more happening on this Ed? looking fab as usual!


0 user(s) are reading this topic

0 members, 0 guests, 0 anonymous users