Jump to content


Photo

1972 Mini Van Restoration

van

  • Please log in to reply
40 replies to this topic

#1 The B team

The B team

    Learner Driver

  • Noobies
  • PipPip
  • 22 posts
  • Location: Somerset

Posted 04 September 2017 - 07:42 PM

Hi everyone! 


First post on here! thought I'd share the rebuild of my Mini Van, I'll warn you in advance it's going to be a slow project...i'm just terrible at getting things done!


The Van was originally my granddads and was getting into a bit of a sorry state after being used by him as a daily driver for some 40 odd years and always being kept outside, Somerset county council originally bought it new and He drove it for the school meals service, a few years later when they were selling it he bought it from them so effectively he knew the car from new, in 2015 I decided I was going to have it restored for him but sadly he passed away during the bodywork side of things, as much as I wanted to do as much as I could my self bodywork isn't my thing so I left it to a local mini enthusiast after it initially got butchered by a garage claiming they would do a good job...amazingly when metal work was initially cut away it had 7 layers of over sills on it!  O_O all nicely rusting away!


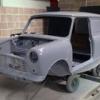
Anyway enough talking here's some photos of when it came back from the crap garage, only the floor had been touched at this point:

DSC_0004_zpsl13hwnib.jpg

DSC_0005_zpsstuslikk.jpg

DSC_0006_zpsllq4uh0f.jpg

DSC_0007_zps9c7hd8cv.jpg

DSC_0008_zpsyw1ttupo.jpg

DSC_0009_zpsovtdrrrl.jpg


The work that the trusted guy did...couldn't have asked for better!


The pile of scrap he cut out...

P5010010_zps2exiyz1d.jpg

IMG_0295_zps1ls174w9.jpg

IMG_0327_zps30xktjig.jpg

IMG_0328_zpstwnto9qp.jpg

IMG_0330_zpswlp0xww2.jpg

IMG_0338_zpsr9usc3e7.jpg

IMG_0341_zpsdoopmofl.jpg

IMG_0342_zpsnueq9dq5.jpg

IMG_0344_zpsvwf5hmep.jpg

IMG_0346_zpsso31w0os.jpg

IMG_0493_zpsxgxlwzfp.jpg

IMG_0494_zps6a0kobum.jpg


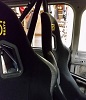
And a bit of a change to what it is now:

IMG_0857_zpst7ozfylw.jpg

IMG_0856_zpsgqhjoakx.jpg

IMG_0854_zpsss6qprdz.jpg

IMG_0852_zpsbljkjlg6.jpg

IMG_0851_zpswoqxemjm.jpg

P7160130_zpsv5rf3hwr.jpg

P7160132_zpscijm6qen.jpg

P7160133_zpsu23nxake.jpg

P7160134_zpsa7csj1qc.jpg


Bit of photo spam but speaks louder than words!


Feel free to comment, hope you all enjoy!


#2 Northernpower

Northernpower

    Mr. 7-Port

  • Members
  • PipPipPipPipPipPipPipPipPip
  • 2,409 posts
  • Name: Graham
  • Location: North Yorkshire (God's County)
  • Local Club: Its out there somewhere

Posted 04 September 2017 - 07:46 PM

Welcome to the forum, great looking project. Given the hosting problems we now have with photobucket I'd suggest you use imgur from now on.

#3 The B team

The B team

    Learner Driver

  • Noobies
  • PipPip
  • 22 posts
  • Location: Somerset

Posted 04 September 2017 - 08:03 PM

Thanks, and thanks for the heads up on pb I noticed recently all the photos seem to be loading ok from there and didn't think it was an issue  :huh:


#4 Northernpower

Northernpower

    Mr. 7-Port

  • Members
  • PipPipPipPipPipPipPipPipPip
  • 2,409 posts
  • Name: Graham
  • Location: North Yorkshire (God's County)
  • Local Club: Its out there somewhere

Posted 04 September 2017 - 08:10 PM

Thanks, and thanks for the heads up on pb I noticed recently all the photos seem to be loading ok from there and didn't think it was an issue  :huh:

They're ok at the moment but photobucket is not a long term solution.

#5 Northernpower

Northernpower

    Mr. 7-Port

  • Members
  • PipPipPipPipPipPipPipPipPip
  • 2,409 posts
  • Name: Graham
  • Location: North Yorkshire (God's County)
  • Local Club: Its out there somewhere

Posted 04 September 2017 - 08:14 PM

I'd also suggest you subscribe to the forum and become a TMF+member. It only costs £5 and it entitles you to various discounts from suppliers including 7.5% off MiniSpares and more importantly it supports the forum as well.

#6 g111mds

g111mds

    Speeding Along Now

  • Members
  • PipPipPipPipPip
  • 432 posts
  • Location: Edinburgh

Posted 04 September 2017 - 09:21 PM

That looks great!!!

#7 Marc_mcq

Marc_mcq

    Speeding Along Now

  • Members
  • PipPipPipPipPip
  • 353 posts

Posted 04 September 2017 - 10:36 PM

That colour is amazing! :o

#8 minimissions

minimissions

    Up Into Fourth

  • Members
  • PipPipPipPipPipPipPipPipPip
  • 3,427 posts
  • Location: North West
  • Local Club: M.M.O.C

Posted 06 September 2017 - 05:39 AM

Welcome,


Wow that is a awesome looking van and a nice bit of history he would be very proud to see it now. Nice work. I will check in to see the build process.


Good Luck


#9 jamesquintin

jamesquintin

    One Carb Or Two?

  • TMF+ Member
  • PipPipPipPipPipPipPip
  • 1,016 posts
  • Location: Harlow

Posted 06 September 2017 - 11:50 AM

Looks great, but why did you stone chip the load bay floor..?


#10 The B team

The B team

    Learner Driver

  • Noobies
  • PipPip
  • 22 posts
  • Location: Somerset

Posted 08 September 2017 - 01:03 PM

thanks for the comments, the load bay is coated with a sprayed on polyurethane liner, as is the underside of the car, it was initially used as a truck bed liner but it seemed quite a good idea for the car as its completely water proof and you can physically hit it with a hammer and it just bounces off, remains flexible too, I intend on getting the car as original as possible but still to be used all year round so this seemed like a good way to protect it and if you chuck tools in the back it doesn't damage the floor


#11 blueovalcraig

blueovalcraig

    Mini Mad

  • Members
  • PipPipPipPip
  • 193 posts
  • Location: Rothesay, Isle of Bute

Posted 08 September 2017 - 05:51 PM

Fantastic story and the van looks really good. Definitely a keeper!

#12 The B team

The B team

    Learner Driver

  • Noobies
  • PipPip
  • 22 posts
  • Location: Somerset

Posted 06 March 2018 - 07:53 PM

Well got round to some work recently....told you it would be slow going! 


Decided to work on the rear subframe, its all ready been sand blasted and powder coated...annoyingly the person who sent them off didn't take the mounting brackets off, don't ask I have no idea why either  :mmkay:

mmk5mzx.jpg


Anyway I started taking off the rear support brackets one side came off quite nicely the otherside...well  >_<


Y5EcAKB.jpg


I thought about the various ways of fixing the problem, thought about using weld, grinding it down and cutting a new thread with a die, welding in a new part that would have needed to be made up and would have damaged the paint, turns out its much easier to cut it off and drill a hole tap it and screw in a bolt then cut the head off... here's what I got done tonight before the light disappeared! hopefully the hole will be drilled and tapped this weekend when I have more time and then I can continue with the subframe rebuild! 


Oft3lkI.jpg


DlYTth3.jpg


fnSlFHL.jpg


If the same happens to anyone else, I'm sure i'm not the only one! its a 7/16 x 20 UNF thread needs a 9.9mm hole for tapping 


And here's the final product, barely even notice it!


gNIWxdq.jpg


Edited by The B team, 16 March 2018 - 01:08 PM.


#13 The B team

The B team

    Learner Driver

  • Noobies
  • PipPip
  • 22 posts
  • Location: Somerset

Posted 16 March 2018 - 01:26 PM

I overhauled the Steering rack over the winter, only just dug it out again for some finished photos!


Having read about newer ones not being built as well as the originals I thought I'd give it a go at restoring it as there wasn't really any play in it, Stripped the whole rack apart removed the old nylon bush in the passenger side end that didn't look worn but crumbled as soon as I touched it!


Gave it a thorough clean and de-greasing checked all the bearings and the rack gearing, no real sign of wear anywhere which was good! 


ikWwJ2Z.jpg


jedBlwz.jpg


NuH2I6p.jpg


0n9LJr9.jpg


vSMVqFy.jpg


wire brushed the whole lot back to bare metal and painted it up with POR-15 rust preventative paint, its fantastic stuff, holds like nothing i've seen before, it's not recommended for sunlight so i'm only using it for under body parts unless it's sanded and a different paint added on top, but when it looks this good why would you!  :D


KoqQJRi.jpg


B3dJJhm.jpg


F85Y1vA.jpg


Even the original 'U' bolts cleaned up really well (probably from being covered in oil leaks) and had a lick of paint with some new nuts, interestingly it was more rusty on the parts inside the car than out  O_O


C1h47df.jpg


filled it up with Castrol Classic gear oil...and to my relief not a dribble from anywhere after being sat for 4 months! that counts as a success for me  :D


#14 GraemeC

GraemeC

    Crazy About Mini's

  • TMF+ Member
  • PipPipPipPipPipPipPipPipPipPip
  • 7,313 posts
  • Location: Carnforth

Posted 17 March 2018 - 06:03 AM

Fantastic little van, with nice family history! And what a great transformation.
I love the Elastoplast steering wheel ‘wrap’ - tell me you’re keeping it - it’d be a great talking point and a nod to the history

#15 The B team

The B team

    Learner Driver

  • Noobies
  • PipPip
  • 22 posts
  • Location: Somerset

Posted 01 July 2018 - 08:53 AM

I'm not sure on the steering wheel yet its starting to crack a bit underneath so might need a bit of tlc, managed to get the van out into the sun last weekend and give it a good spray with Dinitrol....what a mess! but seeing it ooze out of every little gap gave me the confidence it was well protected inside! fingers crossed no rust will every appear on this car again!


Bit of a technical question for all of you with more experience...looking at having a new loom made as the original was damaged...and obviously you cant get sealed beam lamps anymore so i'm converting to halogen, I've heard lots of people saying you need to install relays and heavier gauge wiring otherwise it will melt and catch fire but this all seems to be from people running much higher wattage bulbs (80-130w)...sealed beam being 40 watts I'm just looking at fitting 55/60W halogens will standard wiring be ok or should I have the loom prepped for relays?


Also I was given a pair of 'Autopal' lamps but have heard they are pretty pants, and they don't have a domed front not very OEM style...from what i've read Cibis/Hella make the best but i cant find any for sale Wipac are readily available on minispares but again some say OK others say rubbish? 


I'm just after some decent lighting, not worried about the 'best in the world' as I know halogen will be a big improvement over sealed beam anyway just don't want complete rubbish...


Thanks in advance!


Also tagged with one or more of these keywords: van

0 user(s) are reading this topic

0 members, 0 guests, 0 anonymous users