Jump to content


Photo
- - - - -

1988 City E For Essex Boy

roundnose

  • Please log in to reply
78 replies to this topic

#1 ga2davt

ga2davt

    Stage One Kit Fitted

  • Noobies
  • PipPipPip
  • 97 posts
  • Location: Brentwood, Essex

Posted 05 October 2017 - 08:22 PM

When I was a kid, I'm 50-ish now, I smashed up a dark blue 1983 Mini City E as the other driver "didn't see me" turning right late at night... Now I want to put a part-way dead Mini back on the road for years to come. I saw this Mini and thought it looks nice and bright but the respray is hiding a lot of bodged repairs. ... I think the lady who styled it is a surf instructor in Newquay (ouch ..sea air..)

Attached Files


#2 Wise Old Elf

Wise Old Elf

    Camshaft & Stage Two Head

  • Members
  • PipPipPipPipPipPipPipPip
  • 1,655 posts
  • Location: Maldon
  • Local Club: Club Lotus

Posted 05 October 2017 - 08:50 PM

Ohh those seats are bright! :)

Good luck with the project.

Jason

#3 ga2davt

ga2davt

    Stage One Kit Fitted

  • Noobies
  • PipPipPip
  • 97 posts
  • Location: Brentwood, Essex

Posted 05 October 2017 - 08:54 PM

I bought the car on Saturday and the above pictures show it looking pretty okay. On Sunday the interior was stripped out and I started by trying to drop the rear sub-frame. My goal was to strip it down, rust-proof it and reassemble. I don't want to strip the back-end, front-end and middle-end at the same time.. so just the back-end for now. Do one thing at a time and finish it..  


The nuts and bolts haven't turned for 30 years.. the bolts shear the heads, the nuts round themselves off. I need to buy more tools .. 6 point 1/2" sockets, deep sockets and grip nut removers .. or just drill them out and re-tap.. Messy. 


Despite best intentions, I also started a second job, stripping out bitumen patches on the inside that were not there to deaden the sound. They were hiding glass-fibre and filler patches that should be steel...I've got a MIG so will sort these out soon.   

Attached Files


#4 ga2davt

ga2davt

    Stage One Kit Fitted

  • Noobies
  • PipPipPip
  • 97 posts
  • Location: Brentwood, Essex

Posted 05 October 2017 - 09:00 PM

My friend Matt started stripping off the petrol tank. It will either have clear lacquer or have Bilt Hamber Hydrate 80 (rust eater), then a matt black paint.  :D

Attached Files


Edited by ga2davt, 09 October 2017 - 10:02 PM.


#5 Wise Old Elf

Wise Old Elf

    Camshaft & Stage Two Head

  • Members
  • PipPipPipPipPipPipPipPip
  • 1,655 posts
  • Location: Maldon
  • Local Club: Club Lotus

Posted 06 October 2017 - 06:35 AM

I like the colour and it looks tidy from the pics.
You will find lots of rust to fix when you start digging. Snapped bolts in the healboard are very common. 😩

#6 ga2davt

ga2davt

    Stage One Kit Fitted

  • Noobies
  • PipPipPip
  • 97 posts
  • Location: Brentwood, Essex

Posted 06 October 2017 - 12:08 PM

Hello Wise Old Elf, 

I think snapped bolts are the story of 30 year old british cars... if the bolts came off like on Jap cars, it wouldn't be a challenge.. 


So far to drop the sub frame I got cobalt and hss drill bits & drilled the bolts out.

Penetrating fluid & the blow torch were not going to touch them.

I tried a nut remover tool from ToolStation that grips on 6 points but it is rubbish..

www.toolstation.com/shop/Automotive/d60/Socket+Sets/sd2938/Irwin+Bolt+Grip+Nut+Remover+Set/p81815

The 6 point sockets are still on the way from eBay, but they will just shear the heads off..

.. 

Snapped bolts in the heel board.. I guess I'll heat the threaded remains to red hot, spray with PlusGas then use a stud extractor ... maybe one of these..

www.machinemart.co.uk/p/tool-connection-tc3986-impact-stud-extractor/

Worst case, grind it off , drill and tap .. 

..

Stainless bolts and nyloc nus are going back on, with plenty of copperslip


Edited by ga2davt, 06 October 2017 - 12:09 PM.


#7 Wise Old Elf

Wise Old Elf

    Camshaft & Stage Two Head

  • Members
  • PipPipPipPipPipPipPipPip
  • 1,655 posts
  • Location: Maldon
  • Local Club: Club Lotus

Posted 06 October 2017 - 01:42 PM

If you are lucky you will be able to drill them out a run a tap through.
Worse case you will need to cut the sill, peel it back and weld new nuts onto the back of the headboard.

#8 Wise Old Elf

Wise Old Elf

    Camshaft & Stage Two Head

  • Members
  • PipPipPipPipPipPipPipPip
  • 1,655 posts
  • Location: Maldon
  • Local Club: Club Lotus

Posted 06 October 2017 - 03:14 PM

The colour reminds me of this one. http://www.theminifo...rk#entry3365650

#9 panky

panky

    Camshaft & Stage Two Head

  • Members
  • PipPipPipPipPipPipPipPip
  • 1,776 posts
  • Location: Cheshire
  • Local Club: Northwest Casual Classics

Posted 06 October 2017 - 03:50 PM

Try building up weld on the end of the sheared stud with a mig. It gives you something to bash an old socket on to, or twist with mole grips,  and the heat usually cracks the bond between threads.


#10 ga2davt

ga2davt

    Stage One Kit Fitted

  • Noobies
  • PipPipPip
  • 97 posts
  • Location: Brentwood, Essex

Posted 06 October 2017 - 08:25 PM

thanks :-)    .. i spent the evening getting intimate with an led flood lamp, drill and angle grinder on the driveway, until the batteries on the lamp died... the closing panel on the sill is floating and not attached to anything ... so I'll need to drop the sub-frame (quietly) in the morning and work out what welding is needed .. i think i just started a project... I've already got a Triumph Spitfire on a rotisserie in the garage ..i didn't want another long term project... i'll take some pictures to share.. thankfully it is not  the daily driver..    


#11 ga2davt

ga2davt

    Stage One Kit Fitted

  • Noobies
  • PipPipPip
  • 97 posts
  • Location: Brentwood, Essex

Posted 09 October 2017 - 05:54 PM

Two mini-projects running:


1. Swap Filler for Welding

================

First the good news.. there was thick bitumen on the floor pans & car interior, maybe from the factory.

This was all scraped off using a hot air gun, scraper, xylene/paint thinner and finally white spirit.

Attached File  clean bitumen.JPG   117.45K   2 downloads


Now I can see the extent of the rust - there's lots, the state of previous repairs-they're filler/fibreglass or just bad welded patches and it is made good for welding.

Next step is to do the same under the car - get rid of the paint/underseal!!!


My friend Matt is helping restore the fuel tank - he's polishing it. 

Attached File  Matt the polisher.JPG   127.89K   3 downloads


2. Rear Sub Frame

============

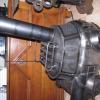
The old sub frame was finished - I got a good NOS one, but had to drive 50 miles to Ipswich to fetch it, driving back with the roof of my MR2 down at half ten..

Attached File  new rear subframe.JPG   88.18K   4 downloads


Heel boards were rusted through, leaving just holes... A full panel here with both sides is needed. This is what the rear sub frame bolts onto!

Attached File  nearside heel board.JPG   138.29K   2 downloads

Attached File  offside heelboard.JPG   156.01K   1 downloads

 
Shocker mount was covered with filler. You can see the grass through it!

Attached File  offside rear shock mount.JPG   115.26K   1 downloads


Camber brackets destroyed to get radius arms off the sub frame. Need new ones.

Radius arms has washers and seals that need to be replaced. Probably need a reconditioning kit for this.


Edited by ga2davt, 09 October 2017 - 10:01 PM.


#12 ga2davt

ga2davt

    Stage One Kit Fitted

  • Noobies
  • PipPipPip
  • 97 posts
  • Location: Brentwood, Essex

Posted 10 October 2017 - 08:59 PM

So...  tonight the rear sub frame was brush painted in Bilt Hamber two pack epoxy mastic in grey, so the same colour as the etch primer... no pic as it looks the same... I ordered some 'Tractor & Machinery Enamel Paint David Brown HIGHWAY YELLOW 1 litre £16" that will go on sub frame and underside.  


A tacky blue/yellow dashboard was removed and lots of wires from the stereo removed with it. I don't see the need for stereos in cars anymore. As a driver I want to hear the engine and road. My passengers have iPhones etc so either use headphones or play it through a mobile speaker... so no stereo!


With the dash out, the air vents coming through the top of off the front wings were very rusty. I don't think new steel needs welding into this, but something needs doing. I will forget about this until the rear sub frame is back on.


Like MikaRaymond and Petrol (Pete) my other car is a Jap and I just had a 'splitter'  (like a spoiler but fits under the lowered front bumper) delivered. My MR2 needs painting to match the car.


#13 Itsaminithing

Itsaminithing

    One Carb Or Two?

  • TMF+ Member
  • PipPipPipPipPipPipPip
  • 849 posts
  • Location: Berkshire
  • Local Club: Not One Worth Mentioning

Posted 10 October 2017 - 09:53 PM

Got to admire the speed with which your correcting the bodging, & looking forward to seeing the end result.


#14 ga2davt

ga2davt

    Stage One Kit Fitted

  • Noobies
  • PipPipPip
  • 97 posts
  • Location: Brentwood, Essex

Posted 11 October 2017 - 08:58 PM

Thanks for your support.


Can anyone recommend a welder to do my heel boards please? 

I'm talking to Jamie at 'Little Legends Mini Specialists'


Edited by ga2davt, 12 October 2017 - 02:02 PM.


#15 ga2davt

ga2davt

    Stage One Kit Fitted

  • Noobies
  • PipPipPip
  • 97 posts
  • Location: Brentwood, Essex

Posted 14 October 2017 - 08:36 AM

Rear sub frame was

  • sand blasted & sprayed in etch primer
  • brush painted in two pack epoxy mastic
  • brush painted in enamel paint --highway yellow -bright!

​It needs a week to dry properly, so I'll try to paint other bits. 


Since Mini Legends will be replacing the heel board with the full heritage panel , I asked them to replace the over-sills with heritage sills on both sides, and the full inner sills. This is all too structural for me and I was sad to see over sills on the car. I don't like seeing patches and prefer full panels, but where there are patches, I'm going to grind them down a bit and get a power file for where the grinder won't go.  


As there's no rear sub frame, the engine+front sub frame will come out and I take just the shell over to them. The strip-down has been started but I'll take pictures later. I'm hoping there won't be too many sheared bolts or rust around the front sub frame and panels...    


I ordered a 1 and 5/16" impact socket to get the tower bolts off. Just need to order a breaker bar to avoid trashing the torque wrench.. 

Attached Files


Also tagged with one or more of these keywords: roundnose

0 user(s) are reading this topic

0 members, 0 guests, 0 anonymous users