Jump to content


Photo

Project Penny - Complete Restauration Including Timelapse

pickup

  • Please log in to reply
32 replies to this topic

#1 Rasmus Holst

Rasmus Holst

    Stage One Kit Fitted

  • Noobies
  • PipPipPip
  • 84 posts

Posted 29 December 2017 - 08:53 PM

Hi 


This will be a project thread about the complete restauration of a pickup. I call her Penny. 


The restauration is at this moment more than a year into the build phase, and a timelapse has been recorded for most of the work. I will upload the first part of it once the thread gets going.


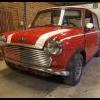
The pickup was bought in 2010 from another Mini enthusiast in Denmark. By the time the pickup was put up for sale the car had already been taken apart, media blasted and primed on the exposed surfaces. 

It was only the body shell, a few non-original bodypanels, tailgate and a steering column in the sale. Everything else had to be sourced elsewhere. 


The pictures from the add are here: 


img0.jpg


img1.jpg


img2.jpg


img3.jpg


img4.jpg


img5.jpg


img6.jpg


img7.jpg


img8.jpg


img9.jpg


img10.jpg


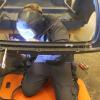
The project was, as can be seen, very rusten. When the car was bought in 2010 it was placed in a closed garage at a neighbour. At summer 2016 is was pulled out of the garage. By the time I had luckily forgotten all about just how bad the rust was. I had rented a new garage close to my apartment with the intention to work on the pickup while I hadn't looked at the car for 5 years. I'm not sure I would have done it if I had a fresh image of the work needed in this one. I will upload some more detailed pictures of the rust soon. 


This was the car after additional 5+ years in storage


img11.jpg


The intention of the project is to have the car all original, or fitted with aftermarket part available in the early 70's. All panels are replaced with Heritage panels or M-Machine. I don't like the quality of the cheaper ones (which is why the body panels following the car was donated to another build). 


During the build all panels except the main part of the roof and the rear window surroundings have been replaced. More to come. 


##### 

Edit: 


First part of the timelaps on page 2


Edited by Rasmus Holst, 25 April 2018 - 07:22 PM.


#2 g111mds

g111mds

    Speeding Along Now

  • Members
  • PipPipPipPipPip
  • 432 posts
  • Location: Edinburgh

Posted 29 December 2017 - 11:01 PM

Look forward to seeing the pics! Do you still have the extra B post sections?

#3 Rasmus Holst

Rasmus Holst

    Stage One Kit Fitted

  • Noobies
  • PipPipPip
  • 84 posts

Posted 30 December 2017 - 09:22 PM

Look forward to seeing the pics! Do you still have the extra B post sections?


I used parts of them for the rear window surrounding, the rest was given to another build. What part of the B posts are you looking for? 


#4 Rasmus Holst

Rasmus Holst

    Stage One Kit Fitted

  • Noobies
  • PipPipPip
  • 84 posts

Posted 30 December 2017 - 09:35 PM

While the car was tugged away I sourced some doors needing a complete rebuild as well. I wanted to have the doors ready for replacing the A- and B-posts and doorstep. 


DSCF2364.JPG


DSCF2363.JPG


DSCF2367.JPG


DSCF2370.JPG


DSCF2387.JPG


DSCF2391.JPG


DSCF2392.JPG


DSCF2535.JPG


DSCF2353.JPG


DSCF2394.JPG


DSCF2530.JPG


DSCF2532.JPG


#5 Rasmus Holst

Rasmus Holst

    Stage One Kit Fitted

  • Noobies
  • PipPipPip
  • 84 posts

Posted 31 December 2017 - 11:24 AM

New parts made on the CNC. Didn't know M Machine made these before spending weeks getting these right. 


DSCF2541.JPG


DSCF2542.JPG


DSCF2546.JPG


DSCF2547.JPG


DSCF2549.JPG


DSCF2551.JPG


#6 Van13

Van13

    Speeding Along Now

  • Members
  • PipPipPipPipPip
  • 314 posts
  • Location: England
  • Local Club: Unknown

Posted 31 December 2017 - 11:58 AM

Nice bit of machine work going on enjoy

#7 clarkey31

clarkey31

    Stage One Kit Fitted

  • Noobies
  • PipPipPip
  • 95 posts
  • Location: Barry

Posted 31 December 2017 - 03:33 PM

will be good to see this i have just about finished one pretty much the same and got another one waiting to be started


#8 Rasmus Holst

Rasmus Holst

    Stage One Kit Fitted

  • Noobies
  • PipPipPip
  • 84 posts

Posted 01 January 2018 - 03:45 PM

Started fixing the rust in the frame. It took quite a lot of work reproducing the panels by hand. 


DSCF2552.JPG


DSCF2565.JPG


DSCF2569.JPG


DSCF2575.JPG


DSCF2589.JPG


DSCF2591.JPG


DSCF2592.JPG


#9 slidehammer

slidehammer

    One Carb Or Two?

  • Members
  • PipPipPipPipPipPipPip
  • 1,081 posts
  • Location: Surrey
  • Local Club: LSMOC

Posted 01 January 2018 - 06:28 PM

Great quality work going on there, keep the updates coming and good luck with the build.


#10 johnR

johnR

    Up Into Fourth

  • Members
  • PipPipPipPipPipPipPipPipPip
  • 2,242 posts
  • Location: Dorset

Posted 02 January 2018 - 11:16 AM

nice work - you'll certainly have the satisfaction of having made those parts yourself!

#11 domdee

domdee

    Formally known as dominicdee

  • Members
  • PipPipPipPipPipPipPip
  • 1,183 posts
  • Location: hull
  • Local Club: hull clubs on FB

Posted 02 January 2018 - 12:35 PM

great work! but look at that for a workshop! WOW


#12 Rasmus Holst

Rasmus Holst

    Stage One Kit Fitted

  • Noobies
  • PipPipPip
  • 84 posts

Posted 02 January 2018 - 08:53 PM

great work! but look at that for a workshop! WOW


Yeah. That's my parents garage where I did the doors during a summer holiday. The body shell was restored in a shed. For some reason no one wants to rent out their good garages in the bigger cities for almost no money for someone wanting to use a grinder every weekend :) 


Time to skin the door frames. 


DSCF2594.JPG


DSCF2609.JPG


Bend the edge


DSCF2603.JPG


Using a hammer as support to avoid warping the panels 


DSCF2606.JPG


DSCF2614.JPG


Doors primed and ready. The thing that looks like distortions in the panel is due to a too dry primer coat, not because the thing is bended. 


DSCF2616.JPG


DSC_9211.JPG


Doors done. Ready to start on the body shell  :proud:


Edited by Rasmus Holst, 02 January 2018 - 08:54 PM.


#13 Rasmus Holst

Rasmus Holst

    Stage One Kit Fitted

  • Noobies
  • PipPipPip
  • 84 posts

Posted 02 January 2018 - 09:46 PM

Picture-heavy post with close ups of the shell as promised :) 


DSC_9145.jpg


DSC_9147.JPG


DSC_9150.JPG


DSC_9151.JPG


DSC_9153.JPG


DSC_9156.JPG


DSC_9160.JPG


DSC_9163.JPG


DSC_9165.jpg


DSC_9168.JPG


DSC_9169.jpg


DSC_9173.JPG


It also had quite a significant bend in the loading bed: 


DSC_9176.JPG


DSC_9179.JPG


DSC_9182.JPG


DSC_9183.JPG


DSC_9186.JPG


DSC_9187.JPG


Lovely outer sills :) 


DSC_9191.jpg


DSC_9194.JPG


DSC_9195.JPG


DSC_9201.JPG


DSC_9236.JPG


DSC_9240.jpg


That'll take some hours to get into shape again.. 


#14 minimissions

minimissions

    Up Into Fourth

  • Members
  • PipPipPipPipPipPipPipPipPip
  • 3,427 posts
  • Location: North West
  • Local Club: M.M.O.C

Posted 05 January 2018 - 12:35 PM

wow this is some project! nice work on those doors, i have the same work to do on my doors for my van.


Keep the pics coming


#15 Rasmus Holst

Rasmus Holst

    Stage One Kit Fitted

  • Noobies
  • PipPipPip
  • 84 posts

Posted 08 January 2018 - 10:25 PM

Let the repair begin! 


Being outside UK means that it is close to impossible to get hold of a complete floor for a mini. It would cost a fortune to get it shipped. 

Since most of the tunnel down the floor is in an okay condition, this can be used to fix everything else. The strategy in replacing the panels is: 


Replacing the heelboard

Replacing A post and doorsteps, B post and quarter panels will be done later on

Fixing tunnel

Replacing floorpans in full length

Fix bulkhead and scuttle

Replace innerwings 

Replace inner A post 

Join outer wings and front, fit to car

Once that is done the back of the car can start being cut off. 


The heelboard is an important part to get placed correctly when refitting. I use it to align the innerwings later on and of course the rear suspension will be attached to it. Getting everything cut clean and aligned perfectly is important, especially with this panel.

If you've seen Project Binky you know what to do. MAKE THE NOISE! 

DSC_0%20-%2031.jpg


Getting the panel cut away


DSC_9176.JPG


DSC_9236.JPG


DSC_9240.jpg


DSC_9254.jpg


DSC_9275.JPG


Adding some very temporary supports for the heelboard outer ends to make sure it doesn't get misaligned. The real support brackets meeting the load bay will be added later when the rear is cut away anyways.


DSC_9272.JPG


Ready to have the first of many new panels put in 


DSC_9284.JPG


I knew the load bay had to come out, so I used it to fix the heelboad 


DSC_9287.JPG


DSC_9293.JPG


First of 50-ish panels to go in.. 


Also tagged with one or more of these keywords: pickup

0 user(s) are reading this topic

0 members, 0 guests, 0 anonymous users