looking good gaz - i've got the brown paint when you're ready.
Hi Retro
Unfortunately black is the new brown, so black it will be!!

Gaz


Stage One Kit Fitted

Posted 17 March 2009 - 09:46 AM
looking good gaz - i've got the brown paint when you're ready.
Stage One Kit Fitted
Posted 07 May 2009 - 12:12 PM


Edited by Gazza211, 13 October 2009 - 02:19 PM.
Stage One Kit Fitted
Posted 17 June 2009 - 09:57 AM


Edited by Gazza211, 13 October 2009 - 02:17 PM.
In the navy you can sail 7 peas

Posted 17 June 2009 - 08:31 PM
lovely finish on the paint, i remmber when mine was freshly sprayed was liek a mirroe shame its all dirty now:(
Stage One Kit Fitted
Posted 28 June 2009 - 09:19 AM


Edited by Gazza211, 13 October 2009 - 02:15 PM.
I want a beetle
Posted 28 June 2009 - 10:35 AM
Stage One Kit Fitted
Posted 28 June 2009 - 07:15 PM

Edited by Gazza211, 13 October 2009 - 02:13 PM.
Stage One Kit Fitted
Posted 20 August 2009 - 11:32 AM

Edited by Gazza211, 13 October 2009 - 02:11 PM.
Mini Mad
Posted 21 August 2009 - 06:26 PM
 very nice
Stage One Kit Fitted

Posted 21 August 2009 - 07:46 PM
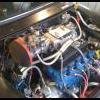
In my haste to dismantle the donor car i have a box full of bits with a bracket i cannot identify, is there anyone who might know where it goes ( i think its probably around the dash / pedal box area
4 gears good........... .......................5 gears Better

Posted 21 August 2009 - 08:09 PM

Stage One Kit Fitted
Posted 24 August 2009 - 06:27 AM
 Has anyone got a photo of the under dash / pedal box area i could look at?
Stage One Kit Fitted
Posted 14 October 2009 - 10:21 AM
Stage One Kit Fitted
Posted 25 October 2009 - 08:23 PM
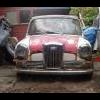
 ) anyway as promised a few piccies.


TMF Legend

Posted 25 October 2009 - 08:26 PM
Edited by Teapot, 25 October 2009 - 08:29 PM.


0 members, 1 guests, 0 anonymous users


